Skip table of contents

Student Profile

Overview

The Staff Kiosk ‘Student Profile’ can be accessed by performing a ‘Student Search’ from the Staff Kiosk Toolbar.

After opening a student’s profile, an alert appears if the student has important medical alerts or special conditions on file. You must review and close this alert pop-up before proceeding to the student’s profile. See the ‘Medical Alerts and Special Conditions’ section below for more information.

At the top of the Student Profile screen is a Toolbar with buttons that provide further information about the student’s current location, Medical Alerts, Special Conditions and Learning Support. It also contains an ‘Analytics’ button and hamburger menu with additional student-related functionality. Refer to the ‘Student Profile Toolbar’ section below for more information

Each student's profile appears on a single scrolling screen with a left side menu for quick navigation, including:

Click the links above for more information about each section of the Student Profile.

The Student Profile may include a section for school-defined database (UD Area or field) information.

The sections and information shown on this screen depend on your assigned user security permissions.

Check out these videos for more information:

▶️ Accessing Student Profiles Video

▶️ Student Profile Overview Video

Click here for Administrator Notes.

User-Defined Areas

The school-definable database information is set up in TASS.web Student Admin > Student Records > Setup Information > Student Records Setup on the ‘UD Areas’ tab. From here, you can also control which UD Areas are visible to each user group in the Staff Kiosk and Parent Lounge.

User-definable Area data for each student is entered in TASS.web Student Admin > Student Records > Student Information > Student on the ‘UD Areas’ tab.

For Staff Kiosk users to access these UD Areas, they will also need to be assigned the appropriate security permissions for each UD Area in TASS.web System Admin > Users > Portal Security Permissions.

User Security Permissions

The information displayed on this screen depends on each user's permissions.  Staff Kiosk user permissions are set up in TASS.web System Admin > Users > Portal Security Permissions.

Medical Alerts and Special Conditions

After selecting a student profile to open, if the student has important Medical Alerts or Special Conditions on file, an alert similar to this may appear on the screen.

Example

image-20240809-023106.png

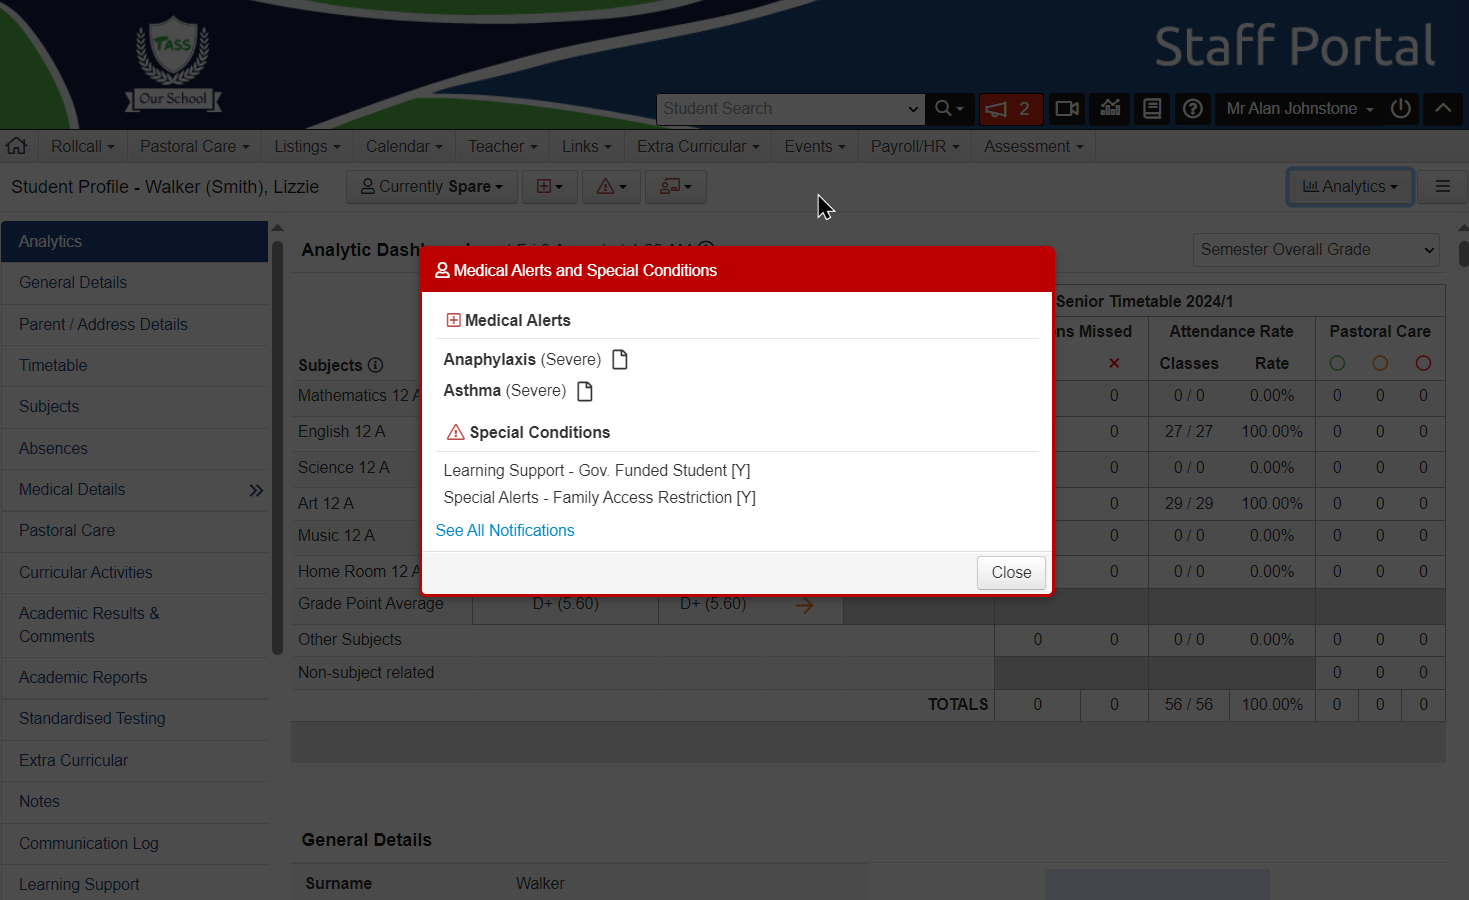
Click the ‘page’ icon to view or download associated documentation.

Click ‘See All Notifications’ to go to the General Details > Notifications section of the Student Profile, where you can find more information.

Or click the ‘Close’ button to continue to the Student Profile.

Refer to the Student Profile article for more information.

Click here for an Administrator Note.
image-20240809-032503.png
image-20240809-032539.png
  • The Medical Conditions Alerts in Staff Kiosk are set up using the ‘Alert Flag’ field in TASS.web Student Admin > Medical Records > Setup Information > Medical Setup on the ‘Conditions’ tab.

  • The Medical Alert data for each student is entered in TASS.web Student Admin > Medical Records > Student Information > Student Medical on the ‘Conditions’ tab.

image-20240809-032519.png
image-20240809-032555.png
  • The Special Conditions Alerts in Staff Kiosk are set up using the ‘Triggers’ fields in TASS.web Student Admin > Student Records > Setup Information > Student Records Setup on the ‘UD Areas’ tab.

  • The Special Condition data for each student is entered in TASS.web Student Admin > Student Records > Student Information > Students on the ‘UD Areas’ tab.

Student Profile Toolbar

Currently

Click the ‘Currently’ button to see the student’s current class details.

Notifications

Various notification icons are displayed at the top of the screen and provide additional information about the student you are viewing.

Click here for more information on the Student Profile Toolbar Icons.

Various icons are displayed throughout Staff Kiosk, providing notifications, alerts and additional information about specific students.

Hover over these icons for more details and links to further information.

This icon indicates that there are ‘Medical Alerts' recorded against this student's record. Click ‘See Details' to be taken to the 'Medical Details' section of the Student Profile.

image-20260417-012209.png

This icon indicates that ‘Special Conditions' are recorded against this student's record. Click ‘See Details' to be taken to the full Notification information in the ‘General Details’ section of the Student Profile.

This icon indicates that this student is a Boarder.

This icon is only visible in Staff Kiosk Rollcall > Class Rollcall.

This icon indicates that this student has Curricular Activities that are due today.

This icon is only visible in Staff Kiosk Student Search > Student Profile.

image-20250313-041805.png

This icon indicates that this student has a medical-related illness record (sick-bay record) for the current day.

image-20260417-011711.png

This icon indicates that a ‘Pastoral Care Entry' has been entered against this student for the current day. Click 'See All Notifications’ to be taken to the 'Pastoral Care’ section of the Student Profile.

This icon is only visible in Staff Kiosk Student Search > Student Profile.

This icon indicates that a 'Standard Note' has been entered against this student for the current day.

This icon indicates that a 'Confidential Note' has been entered against this student for the current day.

image-20240809-033022.png

This icon indicates that the Student has a Learning Support notification that requires attention.

The 'See Details' shortcut on Learning Support alerts directs users to the appropriate Class Plan when they cannot access Support Plans.

This icon indicates that this student was absent from the previous lesson.

This icon is only visible in Staff Kiosk Rollcall > Class Rollcall.

This icon indicates that the student has a teacher-assigned calendar event that clashes with this lesson.

This icon will be displayed where a student has an existing attendance record for the date of the custom rollcall.

This icon is only visible in Staff Kiosk Rollcall > Custom Rolls.

image-20240318-222849.png

This icon will be displayed where a student has been added to a custom roll at the time of custom roll marking.  

This icon is only visible in Staff Kiosk Rollcall > Custom Rolls.

image-20240318-222854.png

This icon will be displayed where a student has been added to another custom roll on the same date of the custom rollcall. 

This icon is only visible in Staff Kiosk Rollcall > Custom Rolls.

image-20240405-002106.png

This green ‘check-circle' icon indicates that a student has 'Checked In’ via the Student Check In / Out portal. 

This icon is only visible in Staff Kiosk Rollcall > Class Rollcall when the ‘Student Check In / Out' portal is enabled.

image-20240405-002114.png

This grey ‘check-circle' icon indicates that a student has 'Checked Out’ via the Student Check In / Out portal. 

This icon is only visible in Staff Kiosk Rollcall > Class Rollcall when the ‘Student Check In / Out' portal is enabled.

image-20240405-002119.png

This red ‘check-circle' icon indicates that a student has not 'Checked In’ via the Student Check In / Out portal. 

This icon is only visible in Staff Kiosk Rollcall > Class Rollcall when the ‘Student Check In / Out' portal is enabled.

Click here for an Administrator Note.

image-20240809-032503.png
image-20240809-032539.png
  • The Medical Conditions Alerts in Staff Kiosk are set up using the ‘Alert Flag’ field in TASS.web Student Admin > Medical Records > Setup Information > Medical Setup on the ‘Conditions’ tab.

  • The Medical Alert data for each student is entered in TASS.web Student Admin > Medical Records > Student Information > Student Medical on the ‘Conditions’ tab.

image-20240809-032519.png
image-20240809-032555.png
  • The Special Conditions Alerts in Staff Kiosk are set up using the ‘Triggers’ fields in TASS.web Student Admin > Student Records > Setup Information > Student Records Setup on the ‘UD Areas’ tab.

  • The Special Condition data for each student is entered in TASS.web Student Admin > Student Records > Student Information > Students on the ‘UD Areas’ tab.

Analytics

image-20240809-061705.png

Click the ‘Analytics’ button to modify the types of Student Analytics that are available in the Analytics section of the Student Profile.

Hamburger Menu

image-20240809-061647.png

The 'Hamburger Menu' lets you send correspondence to this student via several methods.

From the hamburger menu, you can access the following functionality:

eDiary

Click ‘eDiary’ to access this student's eDiary. 

See the Calendar Feeds (Setup), ▶️ Accessing Student eDiaries Video, or ▶️ How to use your eDiary in Student Cafe Video for more information.

The eDiary will show you if there is any other event occurring for this student, such as a music lesson.

Students can access their eDiary via Student Cafe eDiary > Calendars or the Student Orbit app.

Currently

View the student's current whereabouts, e.g. class, sickbay or absent.

Generate Email

Generate an email to the student or parent. 

See How to Generate Emails for more information.

Send SMS

Send an SMS to the student or parent.

Important!

SMS messages are not free. Your school will be charged a fee by your SMS provider for each message that is sent.

Your school must have an SMS Gateway configured to send SMS from this program. Refer to the SMS Notification Setup Checklist for details

Send Notification

Display a Notification to the student or parent in:

  • Student Café or Parent Lounge.

  • Your school's mobile app via a Push Notification (parents only).

See Adding a New Student Notification or SMS for more information.

PC Entry

Create a Pastoral Care Entry for the student. 

See Adding a New PC Entry for more information.

Ghost Logon

  • Ghost Login to Student Café as the student.

All communication (email, notification and SMS) generated from Staff Kiosk is recorded in a Communication Log.

The Communication Log tracks communication details, including recipients and whether they viewed the message.

View a student's Communication Log via Staff Kiosk at Student Profile > Communication Log or TASS.web at Student Admin > Student Records > Student Information > Students on the ‘Communication Log’ tab.

The parents' Communication Log is integrated into the Student Log in Staff Kiosk under Student Profile > Communication Log. To view parent communications, click the ‘See More’ button and review the ‘Recipient Info’ column. TASS.web users can also access the parent communication log via TASS.web Student Admin > Parent Records > Parent Information > Parents on the ‘Communication Log’ tab.

View a staff member's Communication Log in Staff Kiosk at Staff > Staff Details > Communication Log.

Notifications sent to Parent Orbit and Staff Orbit devices are visible via the ‘Communications Logs’ in TASS.web System Admin > Orbit > Orbit Dashboard.

Student Profile Side Menu Options

Related Resources

JavaScript errors detected

Please note, these errors can depend on your browser setup.

If this problem persists, please contact our support.