Generate emails to Students, Parents, Teachers/Employees from various TASS.web or Staff Kiosk programs.
In some programs, Email templates can be set up and used. Email details will be recorded into Communication Logs for auditing purposes.
Click here for an Administrator Note.
The ability to send emails depends on your security permissions across the various programs.
TASS.web email permissions are assigned to individual users in TASS.webSystem Admin > Users > User Maintenance or at a 'role' level in TASS.webSystem Admin > Users > Security Role Permissions.
Email settings, categories, and templates are maintained in TASS.webSystem Admin > Utilities > Email Settings.
1. Generate Emails List
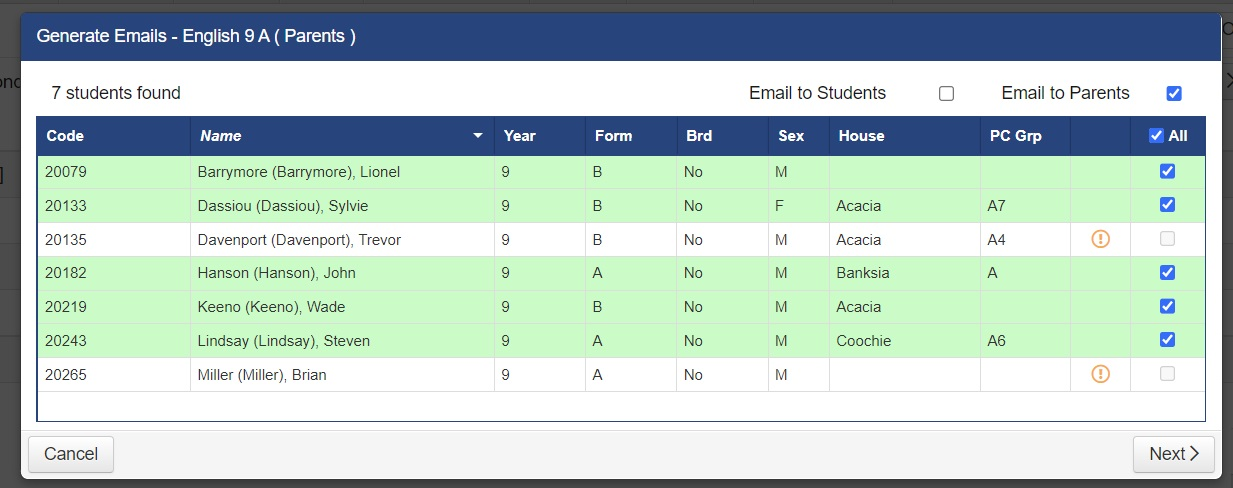
Select the 'Generate Email' (or appropriate) action from the program or listing you wish to email, and a list of results will display.
Depending on the program you are working in, you may have the option to select 'Email to Students' and/or 'Email to Parents.' Alternatively, a resulting parent list or teachers/employees may display.
Deselect any recipients that you do not want to generate an email for.
Click here for an Administrator Note.
The parent contact information displayed is determined by the 'Communication Rules' set up on the student records.
'Communication Rules' provide a 'student-centric' way of defining precisely how different areas of your school communicate with parents. They are especially useful for communication with split families and for families with students who have multiple parenting arrangements.
Staff Kiosk uses the following rules that are set up on each student record in TASS.web:
Staff View - The Parent/Caregiver addresses that teachers will see when using Staff Kiosk.
Staff Correspondence - The Parent/Caregiver addresses that will be used when teachers generate correspondence to parents using Staff Kiosk.
Emergency Contact - The Parents/Caregivers who will be displayed as Emergency Contacts when accessing student medical information using Staff Kiosk.
❗
A Parent/Caregiver must have the 'Staff View' rule to be displayed as an Emergency Contact.
A warning will be displayed if there are no 'Communication Rules' set up on the student record in TASS.web. You should advise your TASS System Administrator.
A ‘yellow alert’ icon will be displayed where an email cannot be generated for the following reasons:
The student, parent or teacher/non-teacher does not have an email address.
The student has no 'Staff Kiosk Correspondence' Communication Rules defined on their Student Record.
Click the 'Next' button to proceed.
2. Compose Email and Send
There are two possible ways that the emailing function will work for you. This has been pre-determined by your school:
Option A. Using SMTP format (Simple Mail Transfer Protocol), or
Option B. Using your email product (e.g. Outlook).
Click here for an Administrator Note
By default, teacher emailing in Staff Kiosk is set to use SMTP. You can enable this for an individual teacher or group of teachers (Roles) using TASS.webSystem Admin > Users > Portal Security Permissions.
The permission that controls this is called 'Enable SMTP Emails' in the 'Other Permissions' section.
The email address that is used in Staff Kiosk for emailing is determined by:
For teachers - The 'School Email' setup in Student Admin > Teacher Records > Teacher Information > Teacherson the 'General' tab. Alternatively, use Student Admin > Teacher Records > Teacher Information > Teacher Grid Entryfor rapid entry.
For non-teachers - The 'School Email' is set up in TASS.webPayroll / HRM > Employee / HR > Employee Information > Employees on the 'General' tab.
For students - The 'Email' is set up in TASS.web Admin > Student Records > Student Information > Studentson the 'General' tab. Alternatively, use Student Admin > Student Records > Student Information > Students Grid Entryfor rapid entry.
For parents - The parent address (es) used and, therefore, the email used is determined by the 'Communication Rules' set up on the student records. This program will use the 'Staff Corr' (Staff Kiosk Correspondence) rules that are set up for each student.
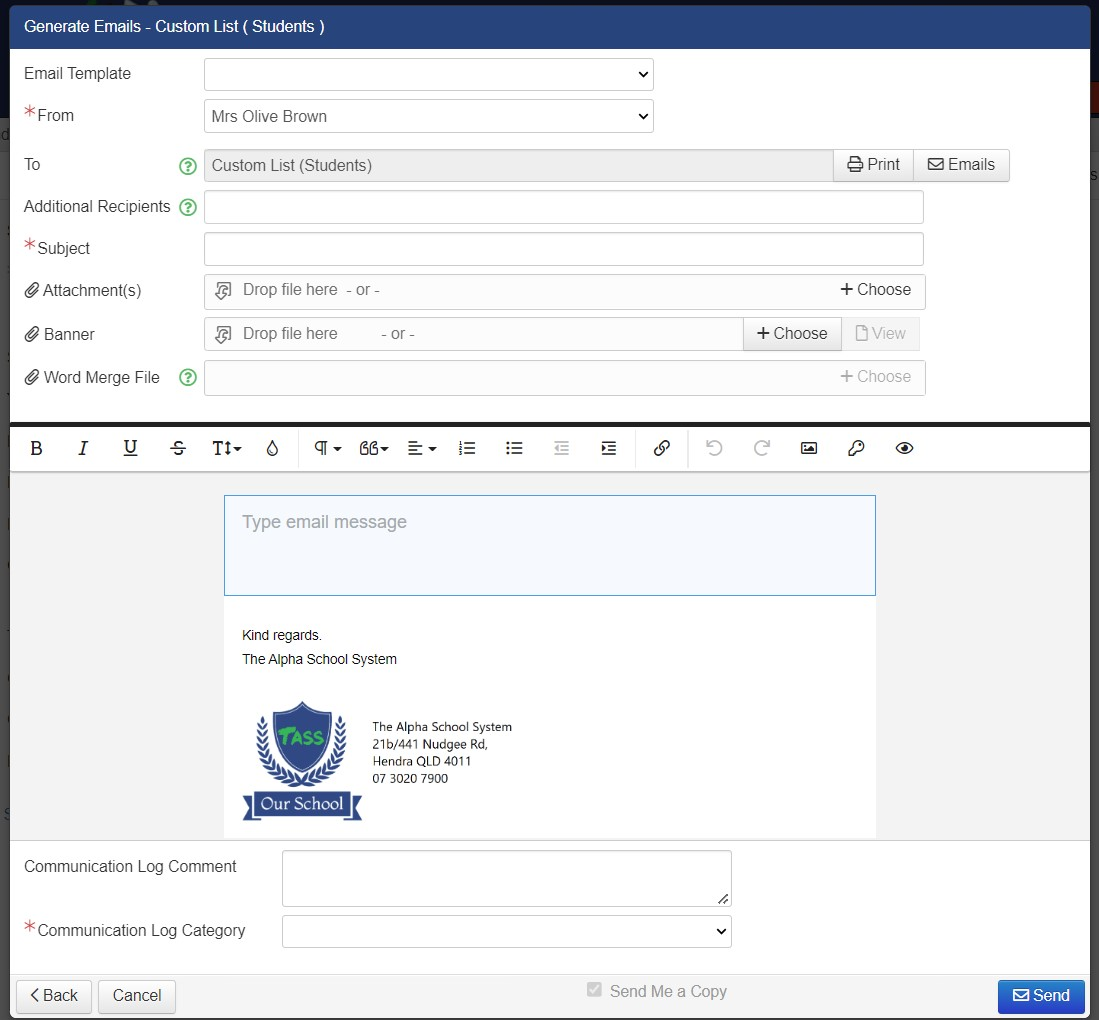
Option A: Using SMTP format (Simple Mail Transfer Protocol)
Field
Description
Email Template
This field will only display for programs where a template may be used. Select the appropriate template and much of the email will be populated as per the template.
Click here for an Administrator Note.
Email Templates are set up in TASS.webSystem Admin > Utilities > Email Settings on the ‘Email Templates’ tab.
*From
This will show your school email address by default. If a generic email address is to be used, e.g. sending newsletters or whole school emails, select from the available options in the drop-down list.
Click here for an Administrator Note.
You can force the system to automatically send a copy email to this person with a list of all of the recipients (below).
Use TASS.web System Admin > Utilities > Email Settings. On the 'Parameters' tab, tick the 'Sender to receive copy Email' option.
You can also force the sending of a copy email to a designated administrator mailbox using the same program.
To
This is a display-only field and will show a description of the group of students, parents or staff to who this email will be sent.
The program will create individual emails. Recipients of this email will not see the email addresses of other recipients or email addresses added into the 'Additional Recipients' field below.
Click the 'Print' button to view a listing of the individual recipients.
In the scenario where a parent will receive more than one email (i.e. One email per student for multiple students), an email will be sent:
Once for each student where keywords are used.
Once where keywords are not used.
Click the 'Emails' button to display a screen containing the email addresses of each recipient. You would use this option to copy and paste email addresses into your school's alternative email product.
‼️
Very Important!
TASS does not recommend the use of this option because:
Emails sent will not be recorded in the Communication Log.
There is no control over where staff copy email addresses to (i.e. The 'To' field instead of the 'BCC' field).
Some Browsers and Email Clients impose limits on data that can be transferred, we recommend that you check that all emails displayed have been transferred before sending.
Click here for an Administrator Note.
To display and use of the 'Emails' button requires the 'View/Copy Emails' permission. Use TASS.webSystem Admin > Users > Portal Security Permissions to enable.
Additional Recipients
Use this field where additional recipients (beyond those already included in the 'To' field above) need to be included in this email.
Additional Recipients can be:
Teachers/Non-Teachers - To add other teachers/non-teachers, type three or more characters of the teacher/non-teacher code, given name, preferred name, surname or department to display a list of possible teachers/non-teachers to choose from. From the list provided, click on the teacher/non-teacher that you want to include in this email.
Teachers of a specific Department - To add teachers of a specific Department, type three or more characters of the Department Description to display a list of possible Departments to choose from. The teachers that are generated in the list will be based on the Department on the general tab of their teacher record found here: TASS.webStudent Admin > Teacher Records > Teacher Information > Teachers.From the list provided, click on the department that you want to include in this email.
Heads of House and House Administrators - To add the 'Heads of House' of a specific House, type three or more characters of the House Description to display a list of possible Houses to choose from. From the list provided, click on the House that you want to include in this email.
Heads of Year and Year Administrators - To add the 'Heads of Year' of a specific Year Group, type the word 'Year' to display a list of possible Year Groups to choose from. From the list provided, click on the Year Group that you want to include in this email.
External - These must be entered manually.
Click here for an Administrator Note.
To allocate teachers into the following:
‘Head of Year' and 'Year Administrators' - Use TASS.webStudent Admin > Parent Records > Setup Information > Parent Records Setup on the 'School Section Years' tab.
'Head of House' and 'House Administrators' - Use TASS.webStudent Admin > Student Records > Setup Information > Student Records Setupon the 'Houses' tab.
PC/Tutor Groups - Use TASS.webStudent Admin > Teacher Records > Teacher Information > Teacher Grid Entry or Student Admin > Teacher Records > Teacher Information > Teachers.
Students are allocated into PC/Tutor Groups in TASS.webStudent Admin > Student Records > Student Information > Student Grid Entry.
For individual Teachers and/or Non-Teachers to appear in this list, they must have a ‘School Email’ entered on their Employee Record in TASS.webPayroll HRM > Employee/HR > Employee Information > Employeeson the ‘General’ tab.
Recipients of this email will not see the other email addresses in this field or the 'To' field above.
*Subject
This is the text that will be included in the 'Subject' line of the email (up to 200 characters).
Attachment
Two options are available to attach files to this email:
Drag and drop a file from your computer.
Use the 'Choose' button to locate the file.
Click here for an Administrator Note
The size of the file that can be attached is defined in TASS.webSystem Admin > Utilities > Email Settings on the 'Parameters' tab.
Banner
Display a banner at the top of your email.
Two options are available to insert the banner into this email:
Drag and drop a file from your computer.
Use the 'Choose' button to locate the file.
Word Merge File
The Word Merge File provides the source data (keyword fields) used for the Mail Merge. It is then automatically converted to a personalised PDF document that is attached to each outgoing SMTP email.
❗
Important!
This field is only be displayed when a Word Merge File has been attached to the email template and the 'PDF Conversion' API has been enabled.
Only specific keyword fields associated with the source can be included in a Word Merge File, these differ for each program and also differ from the keywords that are available for the email message itself.
Click here for an Administrator Note.
Word Merge
Word Merge export files are produced from various TASS.web or Staff Kiosk programs to extract a set of merge field codes and students, parents, or employees' details in a format required to insert into a Word Merge document. Word Merge documents can be used for two purposes:
1. To produce a personalised document for each recipient containing the recipient's own details in place of the merge fields. Example: School enrolment letters are printed for all incoming families. Each letter includes data extracted from TASS.web and is personalised for each recipient, such as the student and parent names and addresses, entry year group etc.
2. To attach to an Email Template A PDF is attached as each email is sent containing the recipient's own details in place of the merge fields. Example: Attendance emails to parents regarding their child's attendance. A PDF attachment is generated and attached at the time of sending the emails, personalised for each recipient.
NOTE: The PDF Conversion API is required to attach Word Merge Files to Email Templates. Word Merge documents can be attached to the following Email Template categories: Attendance, Enrolment, Immunisation Register, Parent Accounts, Parent Lounge Licences, Pastoral Care, Student Immunisations, Student Records, and Transfer Notes (WA).
Create a Word Merge document:
1. Generate the Word Merge export file. Use the selection criteria from the appropriate program to produce a file that includes the desired merge fields headings and recipient details. Select the 'Word Merge file' export button, usually found on the Print tab. If no word merge button exists, use the Excel export option and save as a csv file.
A PDF report entitled 'Students with no Communication Rules' will display if there are issues with your selection. These must be fixed before the export can be processed.
2. Create your Word Merge document.
Follow the steps in Word using the Mailings > Step-by-Step Mail Merge Wizard. Select the word merge export file generated above, and insert merge fields into the document wherever the personalised data will be populated. Preview the document but do not select 'Complete the merge'. Save the document. Print if desired.
3. To attach the Word Merge file to an Email Template: Create an email template and attach the Word Merge document created above.
A Word Merge File can be added to a template email using TASS.webSystem Admin > Utilities > Email Settings > 'Email Templates' tab.
Email Message
This is the text that will be included in the message section of the email (up to 4000 characters) and must be entered before an email can be sent.
Keywords
You can personalise each outgoing email by adding student and/or parent-specific keyword details into the message text. Click the 'Keywords' icon in the toolbar and use the picklist to choose between:
Student Keywords.
Parent Keywords.
Program related Keywords. (Different sets of keywords will display depending on which program the email is being generated from.
The keyword substitution values for gender are defined in TASS.webCommunity >Setup Information using the 'Genders Setup' program.
Preview the email before sending by clicking on the 'eye' icon option in the Froala toolbar.
Signatures in Staff Kiosk
Signatures can be set up in Staff Kiosk 'Preferences' screen, accessed through the drop-down menu next to your name. When your signature is set up, it will automatically appear at the bottom of the email. The school's corporate email signature will be displayed under your own.
Click here for an Administrator Note.
The school's email signature and footer text are set up in TASS.web System Admin > Utilities > Email Settingson the 'Footer Setup' tab.
Communication Log Comment
Use this field to enter an optional description of the email that is being sent. This comment is displayed in the Communication Log only and is not seen by email recipients.
Example: Reminder to students of an upcoming assignment due.
*Communication Log Category
Select the category that this email will be filed under in students and/or teachers/non-teachers Communication Log.
Click here for an Administrator Note
All communications (emails, notifications and SMS) generated from Staff Kiosk are recorded in a Communication Log.
The Communication Log allows you to track and monitor the details of communications including who it has been sent to and whether the communication has been viewed by the recipients.
The Communication Log for a student can be viewed using the Staff KioskStudent Profile > Communication Log.
Communication Log email categories are set up in TASS.webSystem Admin > Utilities > Email Settings on the 'Categories' tab.
You can nominate the email categories that are visible to teachers when viewing records in Staff Kiosk Student > Communication Log using TASS.webSystem Admin > Users > Portal Security Permissions.
Teachers/non-teachers will be able to send emails using any email category that they have permission to view.
The permissions that control the email categories that can be viewed are prepended with [Email Category] in the 'Student' section.
To allow teachers to send emails using any email category (not just the ones they can view), use the 'Send Email to all Categories' permission in the 'Other Permissions' section.
Send Me a Copy
Tick the 'Send Me a Copy' checkbox to receive a copy of the email.
Click the 'Print' button to view a list of the individual recipients.
Click the 'Send' button to send the email.
Option B: Using your Email Product
If you elect to use an alternative email product, a different screen to the one explained above will be displayed. The 'Email' field will display the email addresses of recipients based on the selections made in the previous 'Generate Emails - Lists' screen.
Multiple email addresses will be separated by a semicolon.
Use the 'Select All' button to highlight the email addresses displayed. Copy the email addresses from this field to the clipboard and paste them into your alternative email product (e.g. Outlook). For devices that prefer a comma as a separator, click the 'Use Comma Separator' box before copying to the clipboard.
Alternatively, click the 'Email All' button to launch your school's alternative email product.
‼️
Very Important!
Email addresses will be populated into the 'To' field of your alternative email product (i.e. recipients will see each other's email addresses). TASS does not recommend the use of this option. Some Browsers and Email Clients impose limits on data that can be transferred, we recommend that you check that all emails displayed have been transferred before sending. If your alternative email product fails to launch, please contact your system administrator.
Click here for an Administrator Note
The use of the 'Email All' button requires a default Email Client be configured as a 'mailto' handler in your browser and operating system.
Click the 'Print' button to view a list of the individual recipients.
Click the 'Send' button to send the email.
JavaScript errors detected
Please note, these errors can depend on your browser setup.
If this problem persists, please contact our support.