
EHR - General Tab
Overview
The ‘General’ tab of the HR Employee Record is where you can view and maintain Employee General Details.
This tab can be accessed by navigating to TASS.web Payroll HRM > Employee/HR > Employee Information > Employees.
User Security Permissions
Access to this tab requires the ‘Employees’ security point in the ‘Employee/HR’ section of TASS.web System Admin > Users > User Maintenance or TASS.web System Admin > Users > Security Role Permissions.
Access to the ‘SK Roles’ link requires the ‘--- Staff Kiosk Roles’ security point.
Access to the ‘Ghost Logon’ link requires the ‘--- Staff Kiosk Ghosting’ security point.
Contact your school’s TASS System Administrator for access.
About the General Tab
Fields that require further explanation | |||||||||||||||||||||
Photo | A photo of the employee can be displayed on this tab, for information on how to link employee photos to their employee record. Refer to Setting up Student & Employee Photos for more information. | ||||||||||||||||||||
Employee Code | Enter a unique Employee Code. Teacher Codes, TASS.web User IDs and Employee Codes We recommend using unique Employees Codes that do not match any past ‘Employee Codes’, ‘Teacher Codes’ from Teacher Records and TASS.web 'User ID' codes from the User Maintenance records. | ||||||||||||||||||||
Person Number | It is important to use the search function to see if this 'Person' is already in the database, e.g. A Past Student or Current Parent. If you find this 'Person' is already in the database, by linking this new employee record to the existing 'Person', you will not create a duplicate Community 'Person' record. If this 'Person' is not already in the database, leave this field blank, and the system will create a new 'Person' record in Community. | ||||||||||||||||||||
Teacher Code | This field is not editable here. The link is maintained using TASS.web Student Admin > Teacher Records > Teacher Information > Teachers. Once a link between an employee and teacher record has been saved, a 'View' and 'Edit' hyperlink will appear next to this field on the employee record. This provides a quick way to access the linked teacher record from the employee record that you are working on. | ||||||||||||||||||||
Deceased | Yes/No. When a person is marked as ‘Deceased’ in TASS.web, and ‘Deceased Notifications’ are enabled in TASS.web Community > Setup Information > Community Parameters, the following email template is sent to all users with the ‘Edit' permission enabled for the relevant Person Entity record area. This 'Edit’ permission point can be assigned to users in TASS.web Users > User Maintenance and/or Security Role Permissions. The email is sent from the 'No Reply Email' address in TASS.web Finance > General Ledger > Setup Information > Company Information.
The ‘Deceased' flag for a person is automatically updated in TASS.web Community when the following actions occur in the person’s TASS.web Entity record:
| ||||||||||||||||||||
Supplier Code | Where this employee is paid from Accounts Payable (e.g. As a contractor) rather than through the Payroll, enter or look up their 'Supplier Code' from Accounts Payable. Once a link between an employee and supplier record has been saved, a 'View' hyperlink becomes available next to this field on the employee record when it is in view mode. This provides a quick way to access the linked supplier record from the employee record that you are viewing. | ||||||||||||||||||||
* Gender | This will be automatically derived based on the 'Title' entered above (where it can) and can be overridden. | ||||||||||||||||||||
Alternate ID | A 40 character (maximum) field to record alternative identification information for the employee, such as a unique barcode or magnetic swipe card number. | ||||||||||||||||||||
* Title | The options available in this dropdown list have been created by your school using TASS.web Payroll/HRM > Employee/HR > Setup Information > Employee/HR Setup on the 'Titles' tab. Choose the appropriate title for this employee. Editing this field will also update the 'Initials' field on the Community Person Record. | ||||||||||||||||||||
Marital Status | The options available in this drop-down list have been created by your school using TASS.web Payroll/HRM > Employee/HR > Setup Information > Employee/HR Setup on the 'Marital Status' tab. Choose the appropriate marital status for this employee. | ||||||||||||||||||||
* Initials | Optional. This field is a maximum of 5 characters. Editing this field will also update the 'Initials' field on the Community Person Record. | ||||||||||||||||||||
Driver Licence | Driver licence number. | ||||||||||||||||||||
* Surname | A 50 character (maximum) field to enter the Employee's legal surname name. Editing this field will also update the 'Surname' field on the Community Person Record. | ||||||||||||||||||||
* First Name | A 50 character (maximum) field to enter the Employee's first name. Editing this field will also update the 'First Name' field on the Communityy Person Record. | ||||||||||||||||||||
Other Names | Optional. A 50 character (maximum) field to enter the Employee's additional name's, e.g. Middle Name/s. Editing this field will also update the 'Other Names' field on the Community Person Record. | ||||||||||||||||||||
* Preferred Name | Optional. A 50 character (maximum) field to enter the Employee's alternative name. Editing this field will also update the 'Preferred Name' field on the Community Person Record. | ||||||||||||||||||||
* Name Suffixes | Optional. A 30 character (maximum) field to enter the Employee's name suffixes, e.g. B.Com CPA. Editing this field will also update the 'Name Suffixes' field on the Community Person Record. The name suffixes entered here can be printed on PD Certificates. | ||||||||||||||||||||
Start Date | The date that the employee started at the school. | ||||||||||||||||||||
Termination Date | This will flag this employee as 'Terminated' for lookups and listings. It is also used by the system to process the termination of an employee. For further information, refer to How to Terminate an Employee(s). | ||||||||||||||||||||
* Reason for Termination | When a Termination Date is entered this field will become active. Select the Reason for Termination when applicable. For further information, refer to How to Terminate an Employee(s). | ||||||||||||||||||||
Employment Status | Casual, Part Time or Full time. | ||||||||||||||||||||
Position Text | A 20 character (maximum) field to describe the employee's position, e.g. Head of Department. This field should not be confused with the 'Position Code' field on the 'Payroll Details' tab. The 'Position Code' field is used by the system to determine the employee's rate of pay. | ||||||||||||||||||||
Previous Payroll ID | The ID from a Previous Payroll System if applicable. | ||||||||||||||||||||
Kiosk Password | Non-teaching employees can be given access to the Staff Kiosk portal. Enter the password that they will be given for their initial access to Staff Kiosk here. The password can be a combination of characters, numbers and symbols up to 128 characters. Click the ‘SK Roles’ link to add the employee to an appropriate Staff Kiosk ‘User Role’ group. User Roles groups are configured in TASS.web System Admin > Users > Portal Security Permissions. Click the 'Login History' link to display a list of this employee's Staff Kiosk login history. The pop-up will display the last 30 logins. Use the 'Print All' button to generate a listing of this employee's entire login history. Important! There is no need to enter a password here for Employees who are linked to a Teacher record. In this scenario it is the password on the Teacher record that is used by Staff Kiosk. If your school is using LDAP or SAML to authenticate Staff Kiosk login then the password entered here will be overridden by their LDAP/SAML password. Click the ‘Ghost Logon' link to log into Staff Kiosk as this Employee. The permissions that have been given to the selected Employee will apply to you during the Staff Kiosk session. This can be valuable when trialing or implementing Staff Kiosk programs and settings, allowing you to check functionality prior to rolling out to staff. It will also be helpful when assisting employees who are having issues in Staff Kiosk. When the Ghost Logon has been used to access Staff Kiosk as an employee, the username of the TASS.web user will be recorded in the Audits Log Grid with the text GHOST. See How do I give an employee access to Staff Kiosk? for more information | ||||||||||||||||||||
* Date of Birth | Mandatory. This field cannot be edited when this employee's record is involved in a pay run which is in progress. | ||||||||||||||||||||
School Email | Use this field to record the Employee's internal school email address. This email address will be used when emails are generated using various TASS programs. Changes to this field will also appear on the Teacher record when the Employee and Teacher records are linked. | ||||||||||||||||||||
Signature | Use this field to add an employee's signature. Signatures added here can be used when generating Academic Reports. If the Employee is linked to a Teacher Record. This field also updates the ‘Signature’ field in TASS.web Student Admin > Teacher Records > Teacher Information > Teachers on the ‘General’ tab. Important! This is an attachment field. The image must conform to the following standards: File Type: The file type needs to be either jpeg, jpg, bmp, png or gif. Image Size: Minimum size: 60 pixels tall and up to 300 pixels wide. Maximum size: 100 pixels tall and up to 600 pixels wide. File Name: The file name must be the same as the employee code. File Size: The file size must be less or equal to the file size limit set in the tassdoc.ini file in bytes. If the file size of the attachment is greater than an error message will be displayed. File Attached: The file must not be empty. | ||||||||||||||||||||
Indigenous Status | Use this field to record the employee's 'Indigenous Status' (a requirement for Census (Aus)). Options include:
For more information, refer to:
| ||||||||||||||||||||
Main Activity | Use this field to record the employee's 'Main Activity' (a requirement for Census (Aus)), i.e. The particular task that an employee performs during the day. Options include:
For more information, refer to:
If staff are ineligible to be included in these categories, leave this field blank. | ||||||||||||||||||||
Position Title | A 100 character (maximum) field to enter the employee's full position title, e.g. Acting Deputy Principal - Administration. The position title entered here can be printed on PD Certificates. Click the ‘History’ link to view the selected Employee's previous 'Position Title/s'.
Click ‘Print All’ to produce the ‘Position Title History’ report in PDF format. | ||||||||||||||||||||
Supervisor | Supervisor information is used by the following Staff Kiosk programs to determine each employee's supervisor:
Enter or look up the employee who is the supervisor of this employee. Important! This person cannot be:
A ‘yellow alert’ icon will display where the supervisor is no longer a current employee. About the Supervisor Hierarchy The Supervisor Hierarchy is an organisational chart that lists every employee's immediate supervisor(s) and their position within the hierarchy. It can be run via TASS.web Payroll HRM > Payroll > Employee Information > Employees. From the Employees search screen, click ‘GO’, then click the ‘Supervisor Hierarchy’ icon at the top of the screen. The report uses the 'Supervisor' and 'Supervisor 2' fields on each employee's record to determine their position in the hierarchy.
Example of the Supervisor Hierarchy Report 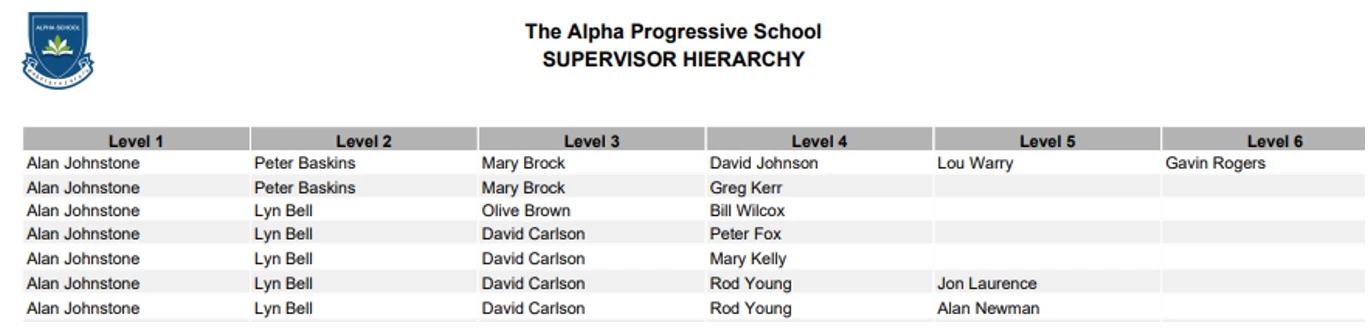 The Organisational chart below (not produced by TASS) reflects the above Supervisor Hierarchy Report from TASS. 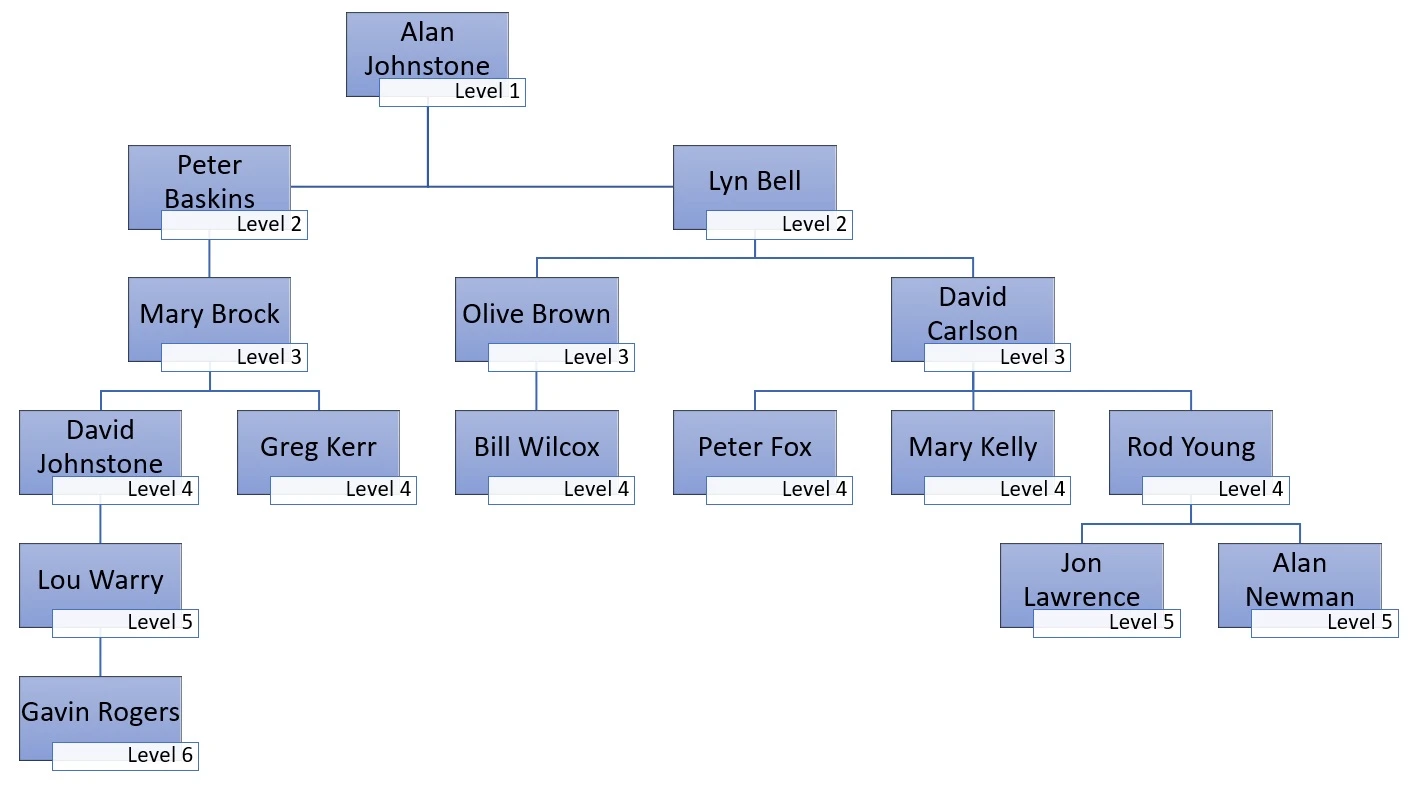 The Supervisor Hierarchy report can be provided to administrators who are responsible for managing Online Leave Applications and PD Activities in Staff Kiosk, as the approval flows for these programs reference the Supervisor Hierarchy. Online Leave Applications When an employee submits an online Leave Application, the approval workflow begins, requiring each approver to approve the leave in the hierarchy order. Each Leave / Other Type can be set up to include any or all of three approver workflows: Example Online Leave Application Approval Workflow: For 'Sick Leave', each employee must have: 1st) 2 Supervisor approvals Gavin Rogers applies for sick leave.
PD Activities When an employee adds a PD Activity that requires approval, their immediate supervisor can approve it. Example PD Activity Approval Workflow: Gavin Rogers adds a PD activity in Staff Kiosk.
If an employee has both 'Supervisor' and 'Supervisor 2' fields populated, either can approve the leave application or PD Activity. | ||||||||||||||||||||
Supervisor 2 | Where there is a second supervisor, enter or look up the employee who is the second supervisor of this employee. Important! This person cannot be:
A ‘yellow alert’ icon will display where the supervisor is no longer a current employee. About the Supervisor Hierarchy The Supervisor Hierarchy is an organisational chart that lists every employee's immediate supervisor(s) and their position within the hierarchy. It can be run via TASS.web Payroll HRM > Payroll > Employee Information > Employees. From the Employees search screen, click ‘GO’, then click the ‘Supervisor Hierarchy’ icon at the top of the screen. The report uses the 'Supervisor' and 'Supervisor 2' fields on each employee's record to determine their position in the hierarchy.
Example of the Supervisor Hierarchy Report The Organisational chart below (not produced by TASS) reflects the above Supervisor Hierarchy Report from TASS. The Supervisor Hierarchy report can be provided to administrators who are responsible for managing Online Leave Applications and PD Activities in Staff Kiosk, as the approval flows for these programs reference the Supervisor Hierarchy. Online Leave Applications When an employee submits an online Leave Application, the approval workflow begins, requiring each approver to approve the leave in the hierarchy order. Each Leave / Other Type can be set up to include any or all of three approver workflows: Example Online Leave Application Approval Workflow: For 'Sick Leave', each employee must have: 1st) 2 Supervisor approvals Gavin Rogers applies for sick leave.
PD Activities When an employee adds a PD Activity that requires approval, their immediate supervisor can approve it. Example PD Activity Approval Workflow: Gavin Rogers adds a PD activity in Staff Kiosk.
If an employee has both 'Supervisor' and 'Supervisor 2' fields populated, either can approve the leave application or PD Activity. | ||||||||||||||||||||
Last Update By / Last Update On | The TASS.web user to last edit this employee will be displayed along with the date and time the record was edited. Click the 'View' link to display the changes. | ||||||||||||||||||||
Click ‘Save’ to save the data into the TASS.web database.