
PR - Employees
Overview
The 'Employees' program in the TASS.web Payroll module enables you to carry out the following actions related to Payroll Employee Records:
This program can be accessed by navigating to TASS.web Payroll HRM > Payroll > Employee Information.
Employee Records are available in two separate areas of TASS.web.
Payroll Employee Records are accessible and maintained in TASS.web Payroll HRM > Payroll > Employee Information > Employees (this program).
HR Employee Records are accessible and maintained in TASS.web Payroll HRM > Employee/HR > Employee Information > Employees.
Both 'Employees' programs feature similar tabs for recording employee information, but each area (Employee/HR and Payroll) offers distinct functionality for its specific purpose.
User Security Permissions
Access to this program is controlled by the ‘Employees’ security point for Payroll in TASS.web System Admin > Users > User Maintenance or TASS.web System Admin > Users > Security Role Permissions. Contact your school’s TASS System Administrator for access.
The visibility of tabs in this program is managed by a combination of ‘Employee/HR’ and ‘Payroll’ permissions. Refer to the relevant sub-article about the relevant tab for more information.
Payroll Access
If your school is payroll-enabled, the employees in this program correspond to the payroll codes accessible to the user.
You can assign payroll-specific access permissions in TASS.web Payroll HRM > Payroll > Setup Information > User/Payroll Access to specify which Employee Records each user can access. Once granted access to a payroll, users can view the employees assigned to it.
This access does not override the User Security Permissions above, which still control accessible tabs and menu paths.
Add a New Employee Record
To enter a new employee record, click the 'New' icon to display a blank ‘Employee - ADD’ screen.
The program caters for two possible data entry scenarios:
Employees who are not linked to an existing Teacher record.
Employees who are linked to an existing Teacher record.
When an Employee record is linked to a Teacher record, the subsequent maintenance of Address details and Phone Numbers must be performed on the Employee record. It is not possible to change any of these details directly on the Teacher record.
The 'Employee - Add' screen displays the following tabs.
Enter your New Employee data into the required fields.
* A red asterisk will appear on mandatory fields.
Click the ‘Save’ button when complete.
When a new record is saved to the database, and the screen refreshes, the following additional tabs will also be displayed to allow the viewing and editing of further details on the Employee record.
View and Edit an Employee Record
Selection Screen
To view or edit an Employee record, use the selection screen to search for records in the database.
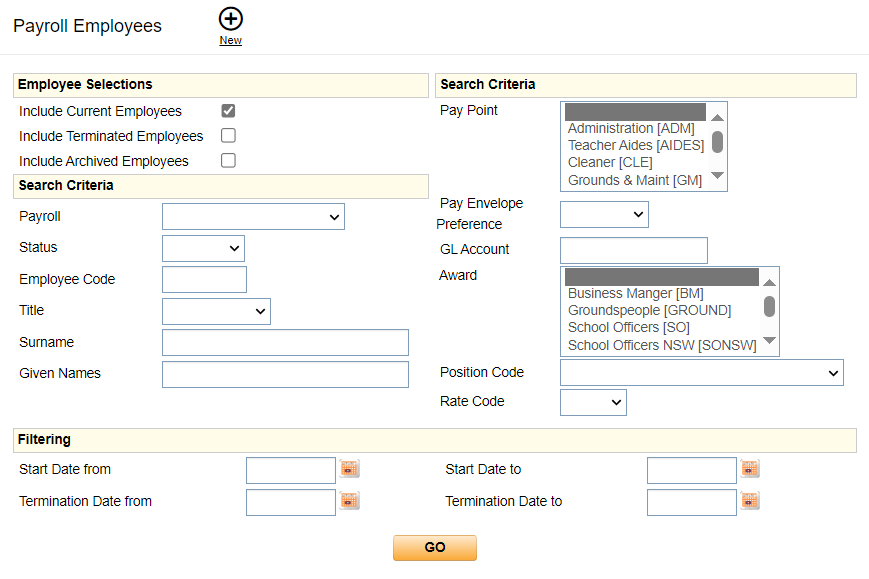
The selection screen is divided into three areas:
Employee Selections – Use the tick boxes to search for Current, Terminated or Archived Employees.
A 'Terminated' employee is defined as one who has a 'Termination Date' and has the TS flag 'T' (Terminated) but has not yet been archived.
An 'Archived' employee is defined as a 'Terminated' employee whose records have been transferred to the archive tables due to running the 'Year End Reset' program.
Search Criteria – Use one or more of the lists to filter your selection by:
Payroll
Status (full-time, part-time or casual)
Employee Code
Title
Surname or Given Name
Pay Point
Pay Envelope Preference (electronic or printed)
GL Account
Award
Position Code
Rate Code
‘Pay Point' and ‘Award’ are multi-select fields. Holding down the 'Shift' key while clicking on your options enables a range selection; holding down the 'Ctrl' key allows individual selection of additional fields.
Use your keyboard’s '*' asterisk symbol to perform a multiple-character wildcard search in the ‘Surname’ and ‘Given Name’ fields.
Refer to the Search Engine article for more information on the searches that can be conducted using this feature.
Filtering – Use any 'Date from' to 'Date to' fields to select Employee records based on Start Date or Termination Date.
Click 'GO' to produce a list screen with employee records based on your selection criteria.
Payroll Employees List Screen
This list screen displays the employee records matching your search criteria initially sorted by employee surname and given name.
The records on this screen can be re-sorted by clicking on the underlined heading links.
Click the 'View' or 'Edit' action links to access the employee record.
Payroll Access
If your school is payroll-enabled, the employees in this program correspond to the payroll codes accessible to the user.
You can assign payroll-specific access permissions in TASS.web Payroll HRM > Payroll > Setup Information > User/Payroll Access to specify which Employee Records each user can access. Once granted access to a payroll, users can view the employees assigned to it.
This access does not override the User Security Permissions above, which still control accessible tabs and menu paths.
Select the ‘Print' icon to output your search results to a 'Payroll Employee Listing'.
This listing offers extensive options that can be enabled at runtime. These settings can be saved as your own report 'Configuration' profiles. Other users cannot access a 'Configuration' you create, and vice versa, because each 'Configuration' depends on the individual user's security permissions, which control the fields that can be included.
To use a previously saved report configuration, select it from the 'Use a Previously Saved Configuration' picklist and click 'Next'.
The 'Use a previously saved configuration' picklist will only be available if a saved configuration exists.
To create a new configuration, click the 'Next' button without selecting an option from the 'Use a Previously Saved Configuration' picklist.
Enter your runtime options for the program.
To save the runtime options that you have entered as a re-usable report configuration, enter a meaningful description into the 'Save this Configuration as' field on the 'Process' or 'Print' tab.
You can delete a report configuration by selecting it from the picklist, clicking the 'Next' button, and then clicking the 'Delete' option.
You can modify an existing configuration by selecting it, making the necessary changes to the run-time options, then clicking 'GO' on the 'Process' or 'Print' tab. You need to ensure the 'Save this Configuration as' field is populated with the report configuration name. This field is populated automatically when an existing configuration is selected.
By default, the standard report exports the following data from the Employee Records: Employee Code, Title, Surname, Given Names, Payroll Number, Employment Status, Start Date, Termination Date, Award, Pay Point, and Position. You can add Additional Fields to the listing using the options outlined below.
Various sorting and formatting options are also available, and you can select the type of file layout you wish to use.
The ‘Payroll Employee Listing’ can be used as a report to check employee permanent pay details. To do this, tick the 'Print Permanent Pay Details' box at the bottom of the 'Payroll Employee Listing' screen. You can then choose to include all paycodes or select paycodes for each Employee who will be printed on the report. You can also select additional fields that relate to permanent pay details to print on your report.
Saved Configurations | Use a Previously Saved Configuration | Select a previously saved report configuration from the drop-down list if you wish to use it. This section appears only if you have previously saved a configuration using the ‘Save this Configuration as’ section below. |
Sort By | Select the order for data display in your listing. Use the picklist to sort by one of the following options:
| |
Formatting Options | Export to PDF Export to Excel Export to Word | Choose the destination of your listing. This can be a PDF, Microsoft Excel® or Microsoft Word® file. |
Show Table Borders | Use the 'Show Table Borders' checkbox to add borders to the table in the report and improve the readability of your listing. | |
Alternative Row Colours | Use the 'Alternate Row Colours' checkbox to show alternating colours for each row and improve the readability of your listing. Alternate Row Colours are not available when exporting to Excel®. | |
Portrait/Landscape | Select your preferred page orientation: 'Portrait' or 'Landscape'. | |
Employee Additional Fields | Select the additional data fields to include in your report by highlighting them with a mouse click. Hold down the 'Shift' key to select a range of fields; hold down the 'Ctrl' key to select multiple individual fields. You can include the following additional information in the listing: --General Info--: Date of Birth, Drivers Licence No, First Name, Gender, Indigenous Status, Initials, Main Activity, Marital Status, Name Suffix, Other Names, Position Text, Position Title, Preferred Name, Previous Payroll ID, Reason for Termination, School Email, Supervisor, Supervisor 2, Supplier Code. --Payroll Details--: Pay Envelope Pref., GL Account, Auto Pay, Rate Code, Base Hours, F.T.E., Rate of Pay, Allowances per Period, Rate including Allowances, Period Salary, Annual Salary, Last Review Date, Next Review Date, Hours/Days reqd for Review, Hours/Days since Last Review. --Tax & Bank Details--: Pay Method, BSB Number, Account Number, Account Name, TFN Status, TFN Declaration Date, TFN Enquiry Date, TFN Interim Notice, Tax Free Threshold claimed, STSL Debt, HLP, SSL or TSK Debt, SESS Debt, Rebate, Zone Rebate, Residency Tax Status, Country of Origin, Medicate Levy Exemption, Medicare Levy Reduction, Medicare Levy Surcharge, Tax Scale, Tax Scael Category, Tax Scale Option, Report TFND STP Pay Event, TFND Reported Details, Signed TFND received. --Address Info--: Address Line 1, Address Line 2, Town/Suburb, State, Postcode, Country, Country Code, Address barcode, Home Phone, Work Phone, Mobile, Email, SMS Enabled. --Next of Kin--: Name, Relationship, Address Line 1, Address Line 2, Town/Suburb, State, Postcode, Country, Home Phone, Work Phone. | |
Online Timesheet Details | Print Online Timesheet Details | Select this checkbox to include the employees' Online Timesheet details in the listing. |
Only include employees with Online Timesheet Details | Select this checkbox to include only employees with online timesheet information in the listing. | |
Work Schedule Details | Print Work Schedule Details | Select this checkbox to include the employees' Work Schedule(s) in the listing. When the ‘Print Work Schedule Details’ option is selected. Work Schedules days export as numbers in the 'Payroll Employee Listing'. e.g. 1 = Monday; 2 = Tuesday; 3 = Wednesday; 4 = Thursday; 5 = Friday; 6 = Saturday; 7 = Sunday. This option exports only to Excel format. |
Only include employees with Work Schedule Details | Select this checkbox to include only employees with work schedule information in the listing. | |
Permanent Pay Details | Print Permanent Pay Details | Select this checkbox to include permanent pay details in the listing, including the employee's Paycode and Paycode Description. |
Paycodes | Select the paycodes to be included in the listing. Hold down the 'Shift' key to select a range of fields; hold down the 'Ctrl' key to select multiple individual fields. | |
Only include employees with selected Paycodes | Select this checkbox to include only employees with the selected paycodes in the listing. | |
Additional Fields | Select the additional data fields to include in your report by highlighting them with a mouse click. Hold down the 'Shift' key to select a range of fields; hold down the 'Ctrl' key to select multiple individual fields. You can include the following additional information in the listing: Hours/Quantity, Rate Amount, Position, GL Account, Rate Code, Period End, Balance Due, and Periods. | |
Save this Configuration as | If this field is populated with a value and you click 'GO', the current report configuration will be saved as the report name entered in this field. When this field is used, the report configuration is saved in the Payroll Employee Listing user interface's ‘Use a Previously Saved Configuration’ section. | |
Click on 'GO' to create the output file.
Bank Details Audit
To produce a report that details changes made to the bank account details on employee records within a specified date range, click the 'Bank Details Audit' button on the 'Payroll Employees List' screen in this program.
This report will include changes to the Employee BSB and account number made by all users on the 'Tax & Bank' and 'Permanent Pays' tabs in this program within the date range that you enter.
An empty audit report will be output where no audit records are found for the specified date range.
Check Employee Data
The 'Check Employee Data' button is only available when the Single Touch Payroll is enabled.
Click this button to run the program and check that the data on employee records matches ATO requirements. If data exceptions are found, a PDF report is generated.
This program will only check the employee records displayed on the 'Payroll Employees List' screen.
Data exceptions must be fixed to enable your Pay Runs to be completed.
This program checks the employee fields 'Surname', 'Address Line 1', 'Town/Suburb', 'State', 'Postcode', 'Date of Birth', 'Employment Status', and 'Tax File Number'.
This process is run automatically by the 'Generate Employee Data' action in TASS.web Payroll/HRM > Payroll > Pay Run Processing > Single Touch Payroll Processing.
Supervisor Hierarchy
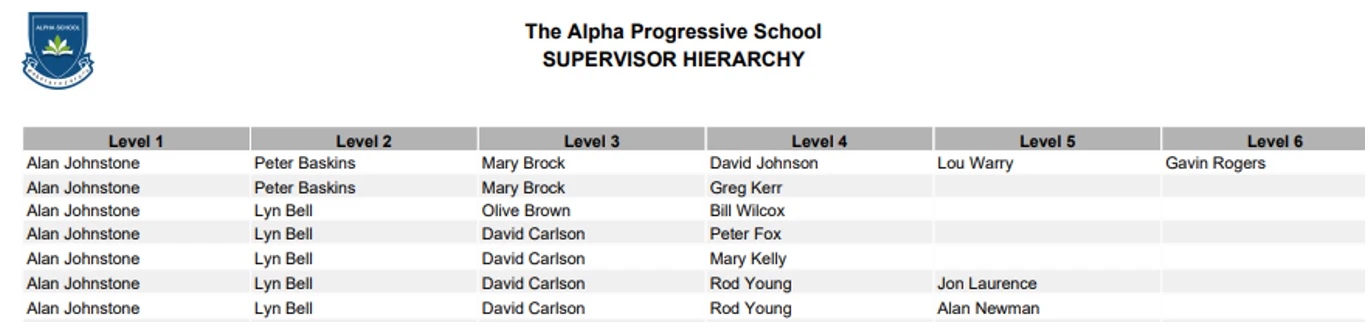
Click the 'Supervisor Hierarchy' button to produce a report detailing each Employee's supervisor chain.
About the Supervisor Hierarchy
The Supervisor Hierarchy is an organisational chart that lists every employee's immediate supervisor(s) and their position within the hierarchy. It can be run via TASS.web Payroll HRM > Payroll > Employee Information > Employees. From the Employees search screen, click ‘GO’, then click the ‘Supervisor Hierarchy’ icon at the top of the screen.
The report uses the 'Supervisor' and 'Supervisor 2' fields on each employee's record to determine their position in the hierarchy.
If an employee has no Supervisor entered, they will appear in the Level 1 column.
Two employees cannot report to each other. This creates an infinite loop, and an error report will be produced when viewing the Supervisor Hierarchy.
If an employee has both 'Supervisor' and 'Supervisor 2' fields populated, their name will appear twice on the report.
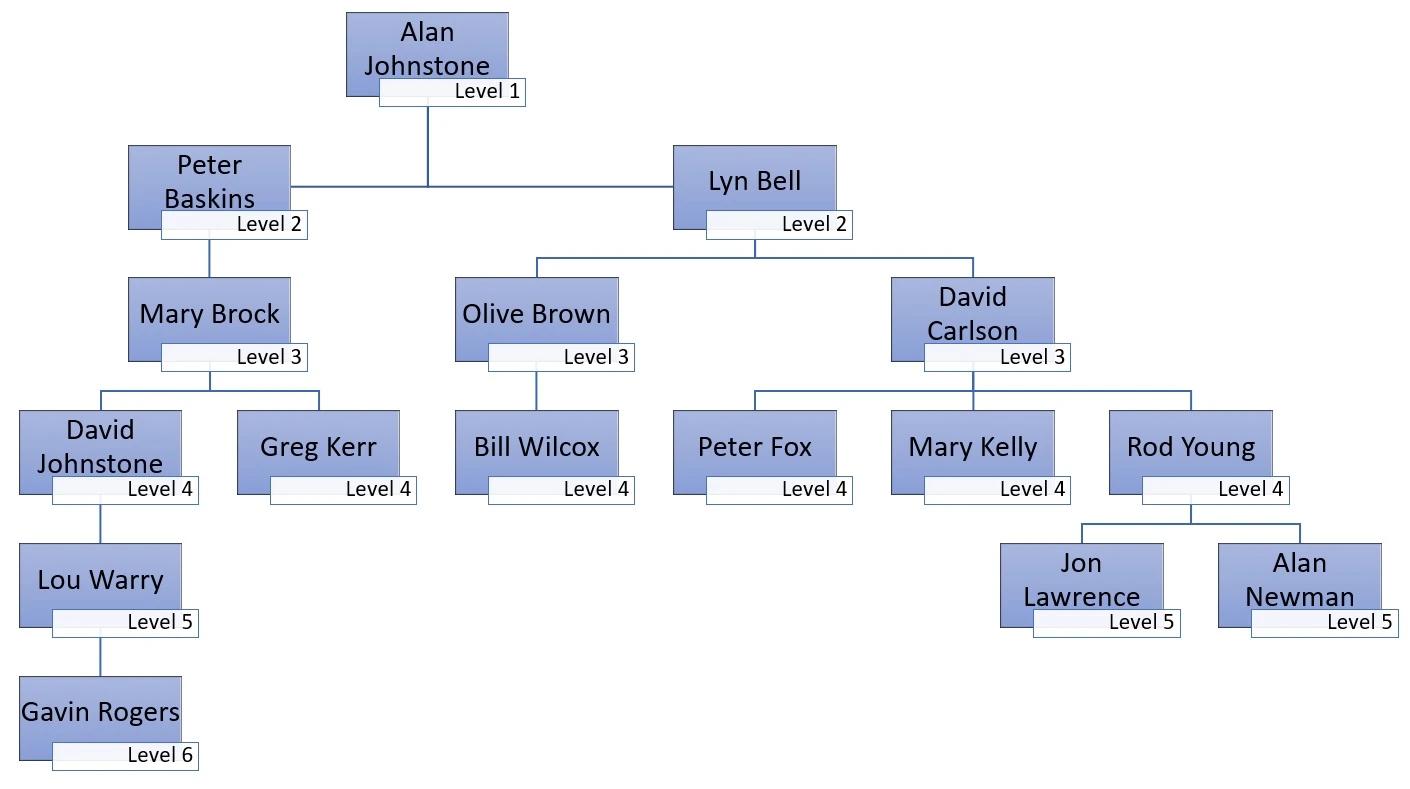
Example of the Supervisor Hierarchy Report
The Organisational chart below (not produced by TASS) reflects the above Supervisor Hierarchy Report from TASS.
The Supervisor Hierarchy report can be provided to administrators who are responsible for managing Online Leave Applications and PD Activities in Staff Kiosk, as the approval flows for these programs reference the Supervisor Hierarchy.
Online Leave Applications
When an employee submits an online Leave Application, the approval workflow begins, requiring each approver to approve the leave in the hierarchy order.
Each Leave / Other Type can be set up to include any or all of three approver workflows:
1st) the number of approvers, including the employee's immediate Supervisor(s), and any number of people up the employee's hierarchical structure.
2nd) the employee's Supervisor at a certain level, allowing lower-level supervisors to be skipped.
3rd) a final designated approver, separate to the Supervisor Hierarchy.
Example Online Leave Application Approval Workflow:
For 'Sick Leave', each employee must have:
1st) 2 Supervisor approvals
2nd) Level 2 approval
3rd) Olive Brown is the designated final approver for all Sick Leave applications.
Gavin Rogers applies for sick leave.
His immediate Supervisor, Lou Warry, the first of 2 supervisor approvers, receives the application by email and he approves.
David Johnstone, the second of 2 supervisor approvers, then receives the application by email and he approves.
Peter Baskins, as the Level 2 approver, then receives the application by email and he approves.
Olive Brown, as the designated approver, receives the application by email and she approves.
Gavin Rogers receives an email as each approval occurs.
PD Activities
When an employee adds a PD Activity that requires approval, their immediate supervisor can approve it.
Example PD Activity Approval Workflow:
Gavin Rogers adds a PD activity in Staff Kiosk.
His immediate Supervisor, Lou Warry, logs into Staff Kiosk and changes the status of the activity to Approved.
If an employee has both 'Supervisor' and 'Supervisor 2' fields populated, either can approve the leave application or PD Activity.
Work Schedules Grid
The ‘Work Schedules Grid' allows bulk edits to Employee work schedules and provides users with the tools to upload them from a CSV file. From here, you can also export Work Schedule information to Excel.
Work Schedules' apply to part-time and full-time employees who do not follow a standard Monday to Friday work week and specify their workdays and hours.
They are also utilised in the Online Leave Applications system to stop these staff from submitting leave requests for days they are not scheduled to work.
An example of using Work Schedules is a part-time employee who works Monday, Tuesday and Friday in the first week but only Thursday and Friday in the second week.
User Security Permissions
Access to this icon requires ‘Edit’ permission to be enabled on the ‘--- Payroll Details tab’ security point in TASS.web System Admin > Users > User Maintenance or TASS.web System Admin > Users > Security Role Permissions.
The grid shows the same employees as the Payroll Employees List screen, sorted by surname, first name, and code. Click the column headings to sort in ascending or descending order.
Employees with existing Work Schedules data will see this information populated in the grid. Employees without Work Schedules data will have blank columns.
You can use the ‘Weeks' and 'Days’ display filters to define which Work Schedule Weeks and Days appear in the grid. These filters are not available after cells have been modified.
Grid Column | Description |
|---|---|
Status | This column indicates the status of each row. When work schedule hours are added and the Employee does not have an existing work schedule, the When an Employee has an existing work schedule and work hours are modified or deleted, the |
Code | The Employee Code. |
Surname | The surname of the employee is from their employee record. |
First Name | The first name of the employee is from their employee record. |
Alert column | This column displays information and alerts. Hover over the ‘Info’ icons to see more details. For example, if there are Draft or Unapproved Applications for this employee, an info icon will appear here, indicating that you cannot edit them. |
Work Schedule Weeks / Days | These columns display the rotation weeks and days in the work schedule for all employees. In the corresponding cells for each ‘Work Schedule' week and day, enter the number of hours the employee is scheduled to work each day in '000.00’ format. The cell values must be between 0.00 and 999.99, or blank. Click a cell, then select the ‘Fill Down' button at the top of the screen to copy the hours to the bottom of the selected column. Alternatively, click and drag the bottom right corner of the cell down the column to replicate the data across the desired cells. 'Work Schedule' Weeks are defined in TASS.web Payroll HRM > Payroll > Setup Information > Payroll Setup on the 'Schedule' tab. Where outstanding applications with a 'Draft' or 'Unapproved' status are present, the employee's 'Work Schedule' will be disabled. Before changes can be made, outstanding applications must be actioned using Staff Kiosk Payroll/HR > My Staff Leave/Other Applications. |
Actions | Click the Click the |
Click ‘Save’ when you have finished making your changes.
You can use the 'Restore' button to return the data in the grid to your last save point.
If the employee’s Base Hours and/or Employment Status have changed, these can be updated via the 'Base Hours' field on the ‘Payroll Details' tab and the 'Employment Status’ field on the 'General’ tab of TASS.web Payroll HRM > Payroll > Employee Information > Employees.
Upload Work Schedules
Click the ‘Upload’ button to upload a CSV file containing the employee work schedules.
The upload file must be in CSV format and include the following columns in this order:
Column # | Column Header Row | Cell Contents |
|---|---|---|
A | Code | The employee code. If your employee codes have leading zeros, ensure your CSV file includes them as well, e.g., 00002565. |
B | Surname | The employee’s surname |
C | First Name | The employee’s first name |
D,E,F… etc. | Week / Day | In the corresponding cells for each ‘Work Schedule' week and day, enter the number of hours the employee is scheduled to work each day in '000.00’ format. The cell values must be between 0.00 and 999.99, or blank. You may need to adjust the format of each cell in your CSV file to '000.00’. Example Column D = W1/Mon Column E = W1/Tue Column F = W1/Wed Column G = W1/Thu Column H = W1/Fri Column I = W1/Sat Column J = W1/Sun Column K = W2/Mon Column L = W2/Tue Column M = W2/Wed Column N = W2/Thu Column O = W2/Fri Column P = W2/Sat Column Q = W2/Sun The number of Week / Day columns must be the same as the Grid screen. |
Export the data using the 'Export' button. Enter the new work schedule hours in '000.00' format. Save your file as a CSV, then import the new data using the 'Upload' button.
Fields that require further explanation | |
|---|---|
Upload | Click ‘+ Choose’ to select the CSV file you want to upload. |
Upload Null Values | This field allows you to choose what happens when the uploaded file does not include hours for some columns. Select ‘Yes’ to overwrite existing hours in the grid when cells are blank. Select ‘No’ to retain the current data in the grid when cells are blank. |
File contains Header Row | Select this checkbox if your CSV file has a header row. Unselect this checkbox if your CSV file does not have a header row. |
Click ‘GO’ to upload your data.
You can use the 'Restore' button to return the data in the grid to your last save point.
Click ‘Save’ to save your changes in the TASS.web database.
Export Work Schedules
Click the ‘Export’ button to export Employee Work Schedule data in an Excel XLSX format.
Select which employees you want to include in the export. You can include all employees from the grid or only the editable employees, then click ‘GO’. After the file generates, click the ‘Download’ button to save it to your computer’s default download location.
Delete an Employee Record
To delete an Employee Record, open it by clicking ‘Edit’, then click the ‘Delete’ icon at the top of the screen.
Important!
TASS does not recommend deleting an employee record unless it was created in error and has no data or security permissions attached. This historical data is necessary for audit purposes.
If the employee has been terminated, follow How to Terminate an Employee(s).
You cannot delete an Employee Record if it has attached data or a linked Teacher Record. If data links to the Employee Record, a warning lists the areas containing the data. If no data is attached, you will be prompted with 'Are you sure you want to delete this Employee?' Click 'Yes' to confirm deletion.
Important!
Before deleting an Employee Record, review and remove the employee’s user security permissions for Staff Kiosk via TASS.web System Admin > Users > Portal Security Permissions and TASS.web via TASS.web System Admin Users > User Maintenance or TASS.web System Admin > Users > Assign Security Roles.
Employee Record Tabs
You can use the tabs below to add, update, and manage employee and payroll information.
The visibility of the tabs is controlled by ‘Employee/HR’ and ‘Payroll’ permissions in TASS.web System Admin > Users > Security Role Permissions or User Maintenance.
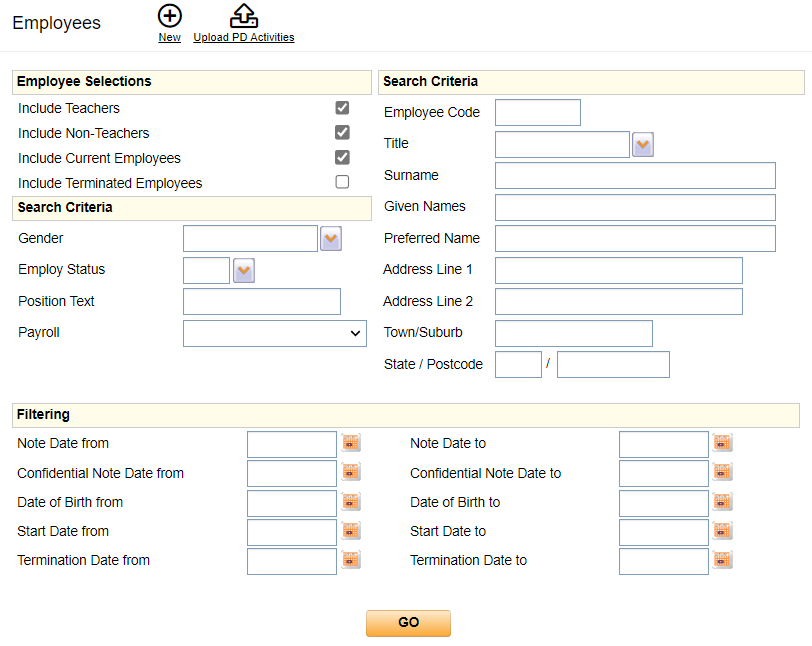
An alternative way of accessing the Employee Records tabs is to use the search screen available through TASS.web Payroll/HRM > Employee/HR > Employee Information > Employees.
The search screen in the Employee/HR program is more oriented towards using the human resources (HR) type filters to select employee records. It includes the Upload PD Activities feature, whereas the Payroll program has payroll-type filters and additional functionality such as the Bank Details Audit and Check Employee Data.
Regardless of your chosen menu path, both programs' employee-related tabs are the same.
Employee/HR Employees Search Screen
Payroll Employees Search Screen
Regardless of your chosen menu path, the Employee related tabs are the same in both programs. The visibility of tabs is controlled by the ‘Employee/HR’ and ‘Payroll’ permissions in TASS.web System Admin > Users > Security Role Permissions.
