
EHR - Employees
Overview
The 'Employees' program in the TASS.web Employee/HR module enables you to carry out the following actions related to HR Employee Records:
This program can be accessed by navigating to TASS.web Payroll HRM > Employee/HR > Employee Information.
Employee Records are available in two separate areas of TASS.web.
HR Employee Records are accessible and maintained in TASS.web Payroll HRM > Employee/HR > Employee Information > Employees (this program).
Payroll Employee Records are accessible and maintained in TASS.web Payroll HRM > Payroll > Employee Information > Employees.
Both 'Employees' programs feature similar tabs for recording employee information, but each area (Employee/HR and Payroll) offers distinct functionality for its specific purpose.
User Security Permissions
Access to this program is controlled by the ‘Employees’ security point for Employee/HR in TASS.web System Admin > Users > User Maintenance or TASS.web System Admin > Users > Security Role Permissions. Contact your school’s TASS System Administrator for access.
The visibility of tabs in this program is managed by a combination of ‘Employee/HR’ and ‘Payroll’ permissions. Refer to the relevant sub-article about the relevant tab for more information.
Payroll Access
If your school is payroll-enabled, the employees in this program correspond to the payroll codes accessible to the user.
You can assign payroll-specific access permissions in TASS.web Payroll HRM > Payroll > Setup Information > User/Payroll Access to specify which Employee Records each user can access. Once granted access to a payroll, users can view the employees assigned to it.
This access does not override the User Security Permissions above, which still control accessible tabs and menu paths.
Add a New Employee Record
To enter a new employee record, click the 'New' icon to display a blank ‘Employee - ADD’ screen.
The program caters for two possible data entry scenarios:
Employees who are not linked to an existing Teacher record.
Employees who are linked to an existing Teacher record.
When an Employee record is linked to a Teacher record, the subsequent maintenance of Address details and Phone Numbers must be performed on the Employee record. It is not possible to change any of these details directly on the Teacher record.
The ‘Employee - ADD’ screen displays the following tabs:
Enter your New Employee data into the required fields.
* A red asterisk will appear on all mandatory fields.
Click the ‘Save’ button when complete.
When a new record is saved to the database and the screen refreshes, the following additional tabs will also be displayed to allow the viewing and editing of additional details on the Employee record.
View and Edit an Employee Record
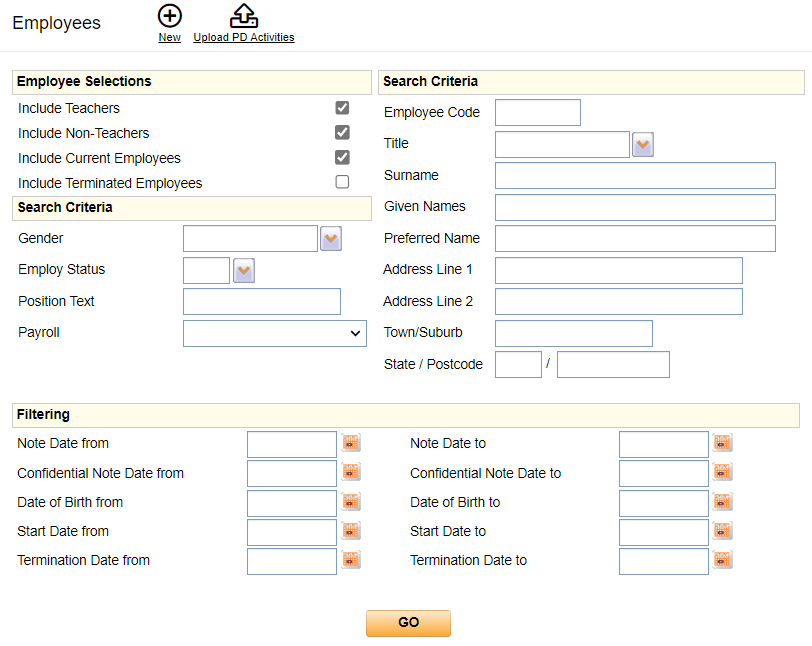
Employee Selection Screen
To view or edit an employee record, use the selection screen to search for records in the database.
This screen includes a feature to 'Upload PD Activities'. More information about this feature is available in a section below.
The selection screen is divided into three areas:
Employee Selections – Use the tick boxes to search for teachers, non-teachers, and current, terminated, or archived employees.
A 'Terminated' employee is defined as one who has a 'Termination Date' and has the TS flag 'T' (Terminated) but has not yet been archived.
An 'Archived' employee is defined as a 'Terminated' employee whose records have been transferred to the archive tables as a result of running the 'Year End Reset' program.
Search Criteria – Use one or more of the search criteria options to filter your selection by:
Gender
Employ Status (full-time, part-time or casual).
Position Text
Payroll
Employee Code
Title
Surname
Given Name
Preferred Name
Address (Address Line 1, Address Line 2, Town/Suburb, State, Postcode).
‘Gender', 'Employ Status’ and ‘Title’ are multi-select fields. Holding down the 'Shift' key while clicking on your options enables a range selection, holding down the 'Ctrl' key allows individual selection of additional fields.
Use the '*' asterisk symbol on your keyboard to perform a multiple-character wildcard search in the ‘Position Text’, ‘Surname’ and ‘Given Name’, ‘Preferred Name’ and Address-related fields.
A multiple-character wildcard search looks for zero or more characters in a search. The symbol cannot be the first character in the search string but it can be used in the middle or at the end of a search string.
Example
To find records where the surname begins with 'Be...' and has zero or more characters in the field, enter 'be*' and press 'Enter', or
To find records where the surname begins with 'Be...', and ends with 's', enter 'Be*s' and press 'Enter'.
Filtering – Use any of the 'Date from' to 'Date to' fields to select employee records based on 'Note Dates', 'Date of Birth', 'Employment Start Date' or 'Termination Date'.
Click ‘GO’ to produce a list screen with employee records based on your selection criteria.
Employees List Screen
This list screen displays the employee records matching your search criteria initially sorted by employee surname and given name. The records on this screen can be re-sorted by clicking on the underlined heading links.
Click the 'View' or 'Edit' action links to access the employee record.
Payroll Access
If your school is payroll-enabled, the employees in this program correspond to the payroll codes accessible to the user.
You can assign payroll-specific access permissions in TASS.web Payroll HRM > Payroll > Setup Information > User/Payroll Access to specify which Employee Records each user can access. Once granted access to a payroll, users can view the employees assigned to it.
This access does not override the User Security Permissions above, which still control accessible tabs and menu paths.
Select the 'Print' icon to output your search results to an 'Employee Listing'.
Various sorting and formatting options are displayed, and you can select the type of file layout you wish to use. Additional fields can be added to the report.
Click on 'Run' to create the report.
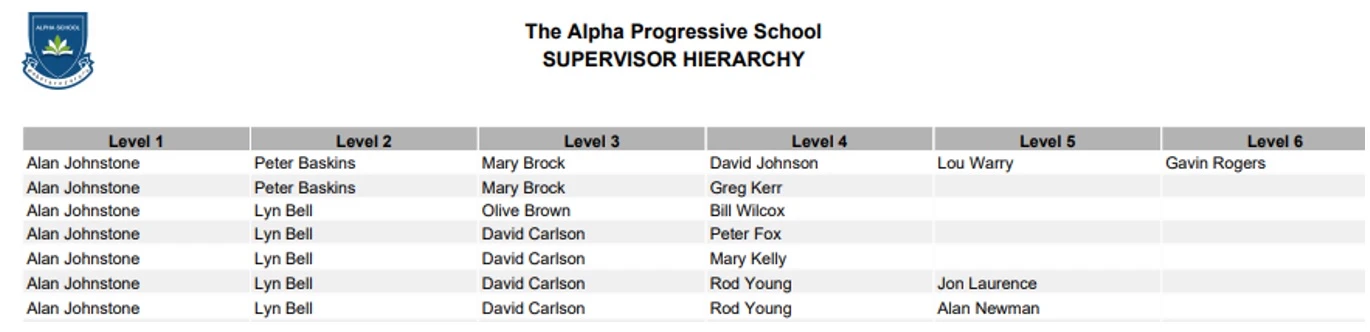
Supervisor Hierarchy
Click the 'Supervisor Hierarchy' button to produce a report that details the supervisor chain for each employee.
About the Supervisor Hierarchy
The Supervisor Hierarchy is an organisational chart that lists every employee's immediate supervisor(s) and their position within the hierarchy. It can be run via TASS.web Payroll HRM > Payroll > Employee Information > Employees. From the Employees search screen, click ‘GO’, then click the ‘Supervisor Hierarchy’ icon at the top of the screen.
The report uses the 'Supervisor' and 'Supervisor 2' fields on each employee's record to determine their position in the hierarchy.
If an employee has no Supervisor entered, they will appear in the Level 1 column.
Two employees cannot report to each other. This creates an infinite loop, and an error report will be produced when viewing the Supervisor Hierarchy.
If an employee has both 'Supervisor' and 'Supervisor 2' fields populated, their name will appear twice on the report.
Example of the Supervisor Hierarchy Report
The Organisational chart below (not produced by TASS) reflects the above Supervisor Hierarchy Report from TASS.
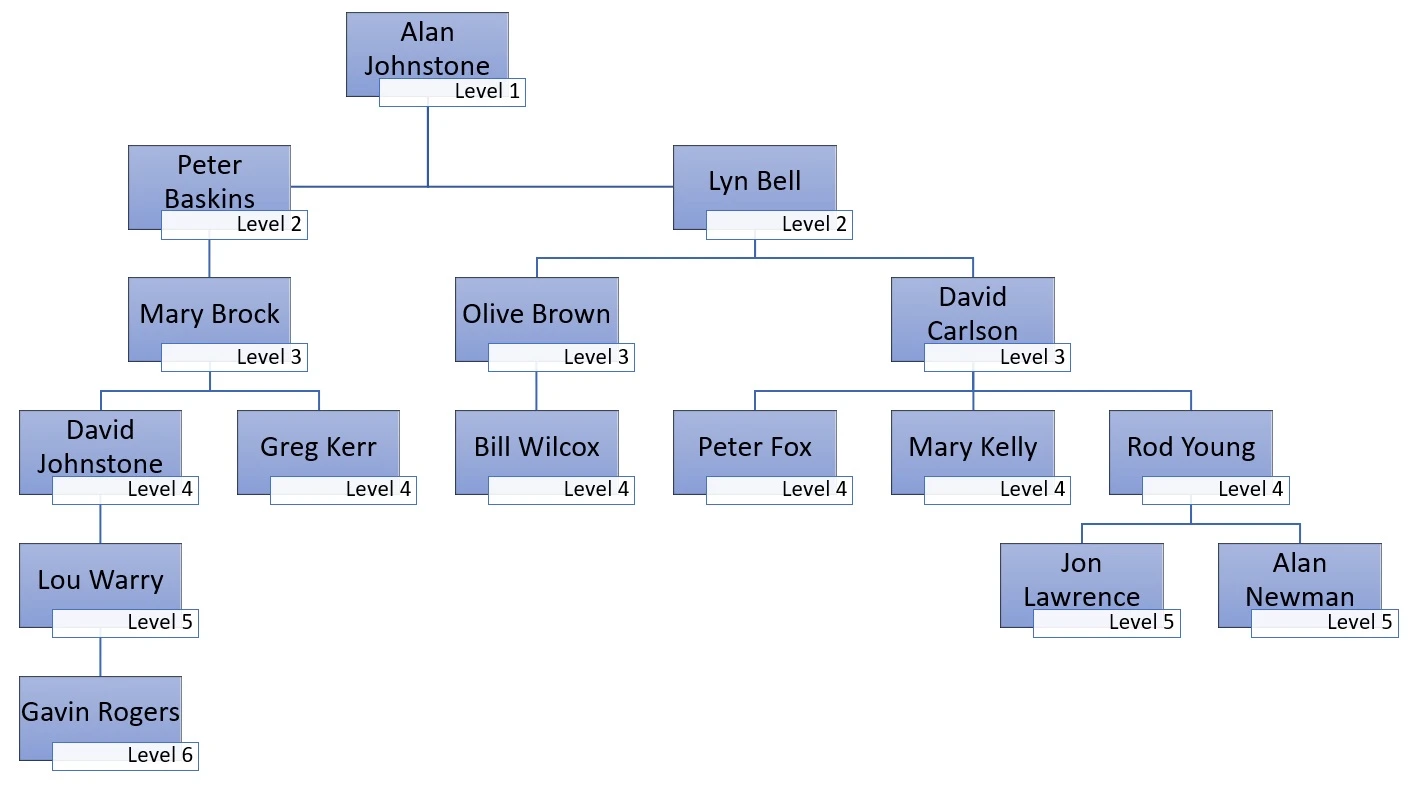
The Supervisor Hierarchy report can be provided to administrators who are responsible for managing Online Leave Applications and PD Activities in Staff Kiosk, as the approval flows for these programs reference the Supervisor Hierarchy.
Online Leave Applications
When an employee submits an online Leave Application, the approval workflow begins, requiring each approver to approve the leave in the hierarchy order.
Each Leave / Other Type can be set up to include any or all of three approver workflows:
1st) the number of approvers, including the employee's immediate Supervisor(s), and any number of people up the employee's hierarchical structure.
2nd) the employee's Supervisor at a certain level, allowing lower-level supervisors to be skipped.
3rd) a final designated approver, separate to the Supervisor Hierarchy.
Example Online Leave Application Approval Workflow:
For 'Sick Leave', each employee must have:
1st) 2 Supervisor approvals
2nd) Level 2 approval
3rd) Olive Brown is the designated final approver for all Sick Leave applications.
Gavin Rogers applies for sick leave.
His immediate Supervisor, Lou Warry, the first of 2 supervisor approvers, receives the application by email and he approves.
David Johnstone, the second of 2 supervisor approvers, then receives the application by email and he approves.
Peter Baskins, as the Level 2 approver, then receives the application by email and he approves.
Olive Brown, as the designated approver, receives the application by email and she approves.
Gavin Rogers receives an email as each approval occurs.
PD Activities
When an employee adds a PD Activity that requires approval, their immediate supervisor can approve it.
Example PD Activity Approval Workflow:
Gavin Rogers adds a PD activity in Staff Kiosk.
His immediate Supervisor, Lou Warry, logs into Staff Kiosk and changes the status of the activity to Approved.
If an employee has both 'Supervisor' and 'Supervisor 2' fields populated, either can approve the leave application or PD Activity.
Upload PD Activities
An alternative to manually entering PD Activities (Professional Development) for employees is to prepare the PD data using a Microsoft Excel® spreadsheet, save it as a CSV file, and use the 'Upload PD Activities' button at the top of the Employee Selection Screen.
The spreadsheet must be saved in comma-delimited (CSV) format and contain the following columns:
No. | Field Name | Type/Size | Field Details |
|---|---|---|---|
A | Employee Code | Char (40) | Mandatory. It must be a valid 'Employee Code' |
B | Activity Details | Char (200) | Mandatory. The details of the PD Activity |
C | Start Date | Date | Mandatory. |
D | Finish Date | Date | Mandatory. It must be same or later than 'Start Date' |
E | Duration | Decimal | Mandatory. It can be a decimal value up to 2 decimal points precision |
F | Status | Char (3) | Mandatory. It must be a valid 'PD Activity Status Code'. |
G | Type of PD Activity | Char (3) | Optional. If not null, it must be a valid 'PD Activity Type code' |
H | Provider | Char (3) | Optional. If not null, it must be a valid 'PD Activity Provider code' |
I | Cost | Decimal | Mandatory. It can be 0.00 or any positive value greater than zero. Do not format with currency symbol or commas. |
J | Other Costs | Decimal | Mandatory. It can be 0.00 or any positive value greater than zero. Do not format with currency symbol or commas. |
K | UD Flag 1 | Char (1) | Optional. Can only be included if this field is set up. If included, it must be a single uppercase alphabetic character or a whole number in range 0-9 |
L | UD Flag 2 | Char (1) | Optional. Can only be included if this field is set up. If included, it must be a single uppercase alphabetic character or a whole number in range 0-9 |
M | UD Flag 3 | Char (1) | Optional. Can only be included if this field is set up. If included, it must be a single uppercase alphabetic character or a whole number in range 0-9 |
N | UD Flag 4 | Char (1) | Optional. Can only be included if this field is set up. If included, it must be a single uppercase alphabetic character or a whole number in range 0-9 |
O | UD Flag 5 | Char (1) | Optional. Can only be included if this field is set up. If included, it must be a single uppercase alphabetic character or a whole number in range 0-9 |
P | UD Table Ref 1 | Char (3) | Optional. Can only be included if this field is set up. If included, it must be a valid code setup for this field. |
Q | UD Table Ref 2 | Char (3) | Optional. Can only be included if this field is set up. If included, it must be a valid code setup for this field. |
R | UD Table Ref 3 | Char (3) | Optional. Can only be included if this field is set up. If included, it must be a valid code setup for this field. |
S | UD Table Ref 4 | Char (3) | Optional. Can only be included if this field is set up. If included, it must be a valid code setup for this field. |
T | UD Table Ref 5 | Char (3) | Optional. Can only be included if this field is set up. If included, it must be a valid code setup for this field. |
U | UD Text 1 | Char (100) | Optional. Can only be included if this field is set up. If included, it can be any text string up to a maximum of 100 characters. Do not include commas in the text. |
V | UD Text 2 | Char (100) | Optional. Can only be included if this field is set up. If included, it can be any text string up to a maximum of 100 characters. Do not include commas in the text. |
W | UD Text 3 | Char (100) | Optional. Can only be included if this field is set up. If included, it can be any text string up to a maximum of 100 characters. Do not include commas in the text. |
X | UD Text 4 | Char (100) | Optional. Can only be included if this field is set up. If included, it can be any text string up to a maximum of 100 characters. Do not include commas in the text. |
Y | UD Text 5 | Char (100) | Optional. Can only be included if this field is set up. If included, it can be any text string up to a maximum of 100 characters. Do not include commas in the text. If there is no data in this cell, enter a single apostrophe as a place holder. |
Other Info:
| |||
Use the 'Choose File' button to locate the CSV file that you intend to upload.
Click the 'GO' button.
The system will validate the file to ensure that it meets the format described above.
If validation is unsuccessful, the program will produce an exception report. You will need to address the issues in the .csv file and re-import the data.
Delete an Employee Record
To delete an Employee Record, open it by clicking ‘Edit’, then click the ‘Delete’ icon at the top of the screen.
Important!
TASS does not recommend deleting an employee record unless it was created in error and has no data or security permissions attached. This historical data is necessary for audit purposes.
If the employee has been terminated, follow How to Terminate an Employee(s).
You cannot delete an Employee Record if it has attached data or a linked Teacher Record. If data links to the Employee Record, a warning lists the areas containing the data. If no data is attached, you will be prompted with 'Are you sure you want to delete this Employee?' Click 'Yes' to confirm deletion.
Important!
Before deleting an Employee Record, review and remove the employee’s user security permissions for Staff Kiosk via TASS.web System Admin > Users > Portal Security Permissions and TASS.web via TASS.web System Admin Users > User Maintenance or TASS.web System Admin > Users > Assign Security Roles.
Employee Record Tabs
You can use the tabs below to add, update, and manage employee and payroll information.
The visibility of tabs is controlled by ‘Employee/HR’ and ‘Payroll’ permissions in TASS.web System Admin > Users > Security Role Permissions.
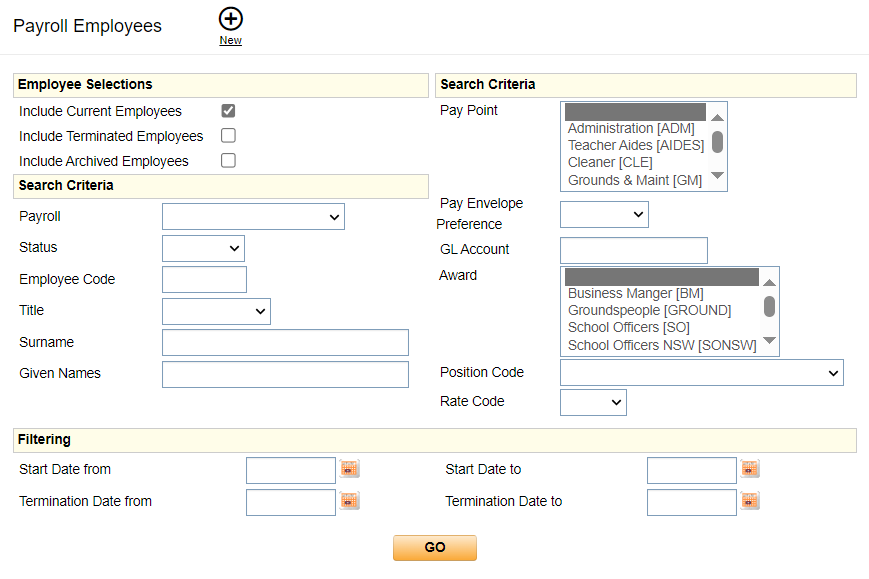
An alternative way of accessing the Employee Records Tabs to use the search screen available through TASS.web Payroll/HRM > Payroll > Employee Information > Employees.
The search screen in the Payroll program is more oriented towards using the payroll type filters and additional functionality, such as the Bank Details Audit and Check Employee Data, whereas the Employee/HR program uses human resources type filters to select employee records and includes the Upload PD Activities feature.
Regardless of your chosen menu path, both programs' employee-related tabs are the same.
Employee/HR Employees Search Screen
Payroll Employees Search Screen
Regardless of your chosen menu path, the Employee related tabs are the same in both programs. The visibility of tabs is controlled by the ‘Employee/HR’ and ‘Payroll’ permissions in TASS.web System Admin > Users > Security Role Permissions.
