Markbook - Activity Assessment
Overview
To access the Activity Assessment screen:
Go to Staff Kiosk program Assessment > Markbook,
Select the relevant Reporting Period, and
Click the 'Activity Assessment' link next to the subject class that you wish to enter data.
The Activity Assessment screen is also available in Staff Kiosk Assessment > Enter Results and Comments.
When the ‘View Activity Assessment’ option is selected from the ‘Subject Class Selection Screen’, this screen operates in a ‘View Only' mode, meaning that it resembles the ‘Activity Assessment’; however, the result entry cells are disabled, and the following elements are inaccessible to prevent any editing: hamburger menus, the ‘Save’, ‘Restore’, and ‘Edit Maximum Results’ buttons, along with the ‘Activity Comment’ and ‘Subject Comment’ icons. For more information about accessing 'View Only’ mode Reporting Periods, refer to the 'Reporting Periods Selection Screen’ article.
User Security Permissions
Users can access Activity Assessment when the 'Markbook’ permission is assigned in TASS.web System Admin > Users > Portal Security Permissions > Staff Kiosk > Assessment section.
From the ‘Activity Assessment’ screen, you can:
View Student Names, Class Details, Student Codes, ID photos, Dates of Birth and Genders.
Enter and maintain raw score results for Assessment Activities.
Calculate Activity Total Scores, Final Results and Overall Subject Grades automatically using a combination of Objective Weightings, Maximum Results and Calculation Rules.
Enter and maintain Activity Total Scores.
Enter and maintain Final Results.
Enter and maintain Overall Subject Grades.
Export your data to an existing Excel® spreadsheet.
Upload Final Results and Overall Subject Grades from an Excel® spreadsheet.
View Statistics for Average and Standard Deviation.
Enter and maintain Activity Comments.
Enter and maintain Subject Comments.
Print to PDF, Excel® or Word®.
The Activity Assessment screen data can be accessed and modified in multiple program areas.
During the Reporting Period, the Activity Objective Results and Activity-based Comments entered on the Activity Assessment screen can be viewed and edited in:
Student Cafe My Activities > Curricular (view only).
Parent Lounge Student Details > Curricular Activities (view only).
Staff Kiosk Student > Curricular Activities (view only).
Staff Kiosk Assessment > Activity Planner
Refer to the Curricular Activities and Activity Planner articles for more information.
During the Reporting Period, the Final Results and Overall Subject Grades entered on the Activity Assessment screen can also be viewed and edited in:
TASS.web Student Admin > Student Records > Students > ‘Results’ tab (view only).
Staff Kiosk Assessment > Markbook > Results Grid (Final Result and Overall Subject Grade only)
Staff Kiosk Assessment > Markbook > Enter Results and Comments
Staff Kiosk Assessment > Enter Results and Comments
When the Reporting Period has ended the Final Results, Overall Subject Grades and Subject-based Comments can be published to:
Student Cafe My History > Academic Reports
Student Cafe My History > Final Results
Parent Lounge Student Details > Academic Reports
Parent Lounge Student Details > Academic Results & Comments
Staff Kiosk Student > Academic Reports
Staff Kiosk Student > Academic Results & Comments
Refer to Academic Reporting Checklist - End of Reporting Period for more information.
Check out these videos to see this program in action!
▶️ Introduction to Markbook Activity Assessment
▶️ Calculating Results in Markbook
▶️ View and Maintain Assessment Activities in Staff Kiosk
▶️ Assess and Enter Results for Assessment Activities in Staff Kiosk
Screen Elements
Element 3: Assessment Activities
Element 5: Overall Subject Grades
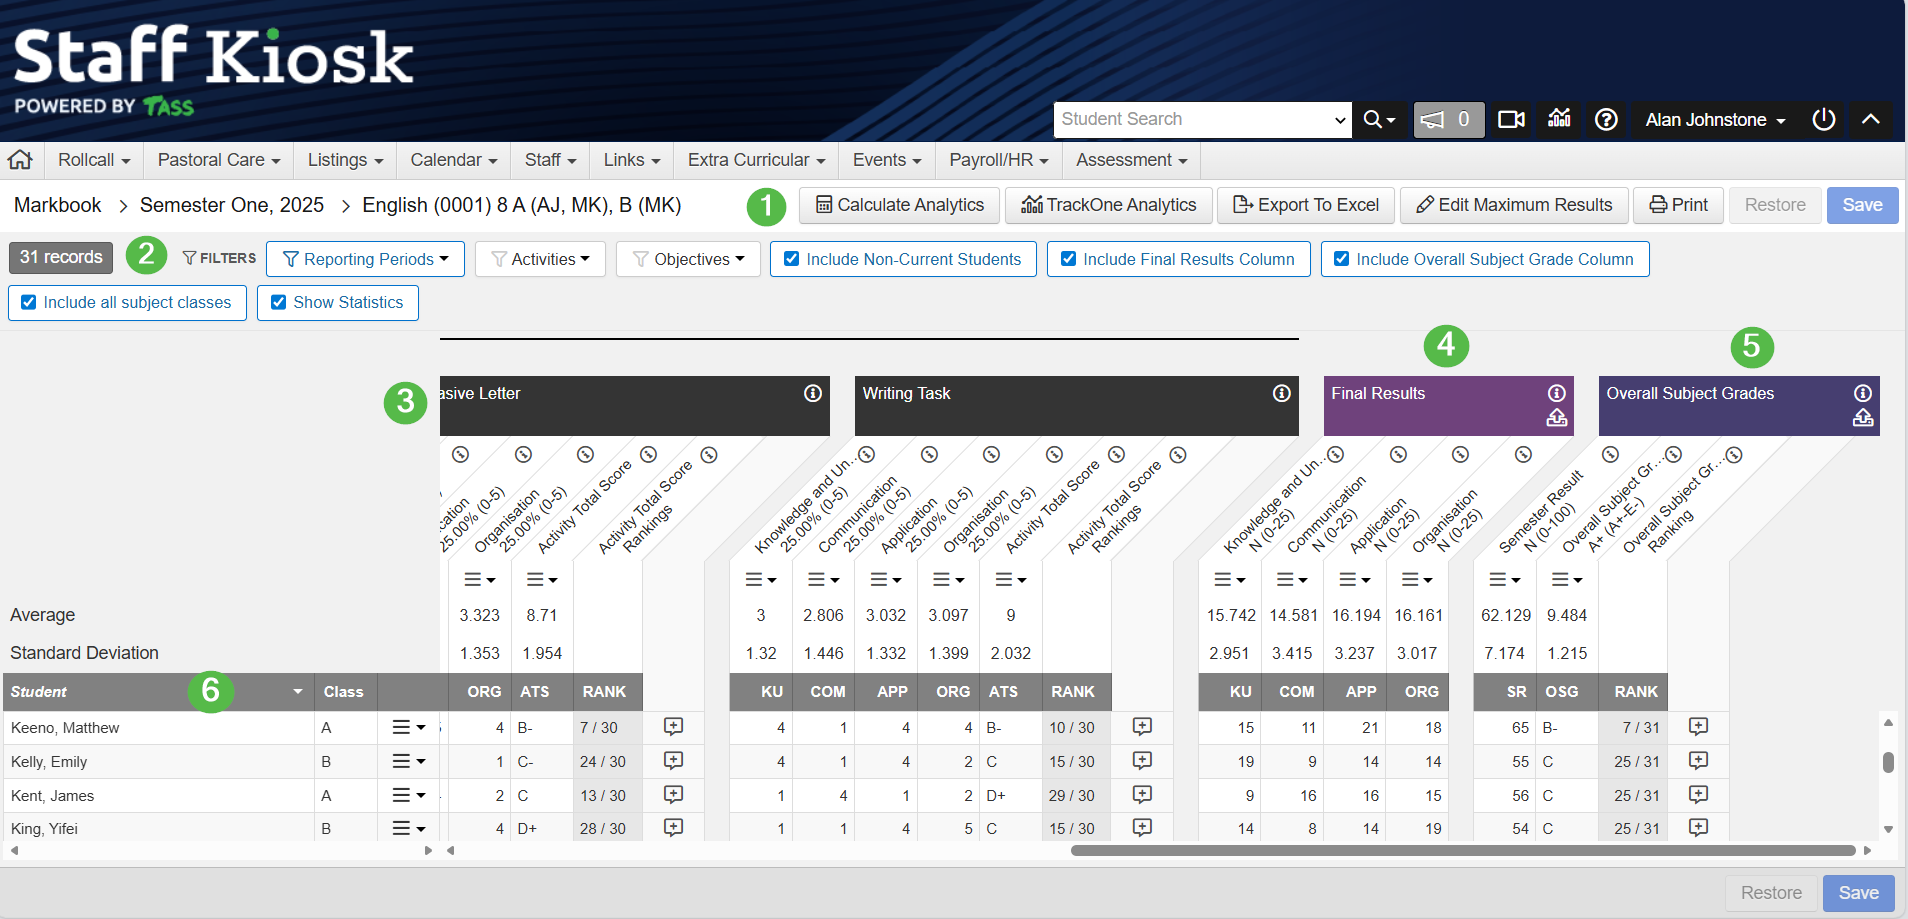
Element 1: Action Buttons
Example

Calculate Analytics | Clicking this button calculates the Activity Total Score and Overall Subject Grade analytics used for rankings, and populates this data into the ‘Rank’ columns. This button also updates the class analytics for Activity Total Scores in Staff Kiosk Assessment > Activity Planner. | |||||
TrackOne Analytics | When TrackOne integration has been set up and flagged to display in Markbook, the TrackOne analytics button takes the user to the class's continuous assessment results screen in TrackOne. TrackOne Analytics The ‘TrackOne Analytics’ button is enabled by ticking the 'Enable access to TrackOne Learning Analytics from Staff Kiosk Markbook' option in TASS.web System Admin > Utilities > API Gateway Maintenance > TrackOne Studio Integration. Refer to the TrackOne Integration Checklist. | |||||
Export to Excel | This option is used where you need to utilise a more complicated formula than is available in Markbook to calculate Final Results and/or Overall Subject Grades. Markbook data can be exported as is and merged into an existing Excel spreadsheet that contains the calculation formula that you use. Step 1: Create or locate the Excel template with the required formulae. e.g. English 11 Semester 2 template. Step 2: Enter results for each Activity.
Step 3: Select data to export
Step 4: Export to Excel
Once uploaded, the spreadsheet data will display on screen.
The export includes several rows of headings, so you may want to trial this function to see how the data exports, and then decide how best to set up or modify your spreadsheets. Supported Excel Formulas This is a list of the Excel formulas that are currently supported by the 'Upload' function in Markbook. The tool that is used to facilitate an upload is based on the API/libraries provided by Apache POI V3.9, and which comes bundled as part of your CF11 Server. Therefore the availability and successful operation of these formulas during upload are entirely reliant on this function. Before you use any of these formulas extensively in your Excel templates, we strongly recommend that you test a limited upload to check that they function correctly. Further information about Apache POI is available at http://poi.apache.org/index.html.
| |||||
Edit Maximum Results | The maximum results can be edited for each Activity Objective with a number range Assessment Method. As Maximum Results are changed, the effects on the Final Results and Overall Subject Grades objectives are shown, where those Objectives use addition-based calculation rules. Where an Objective is used across multiple activities and included in Final Results, the combined maximum result total must equal the objective’s Final Result maximum result total. Where an Objective is used across multiple activities and included in the Overall Subject Grade, the combined maximum result total must equal the objective’s Overall Subject Grade maximum result total. Example 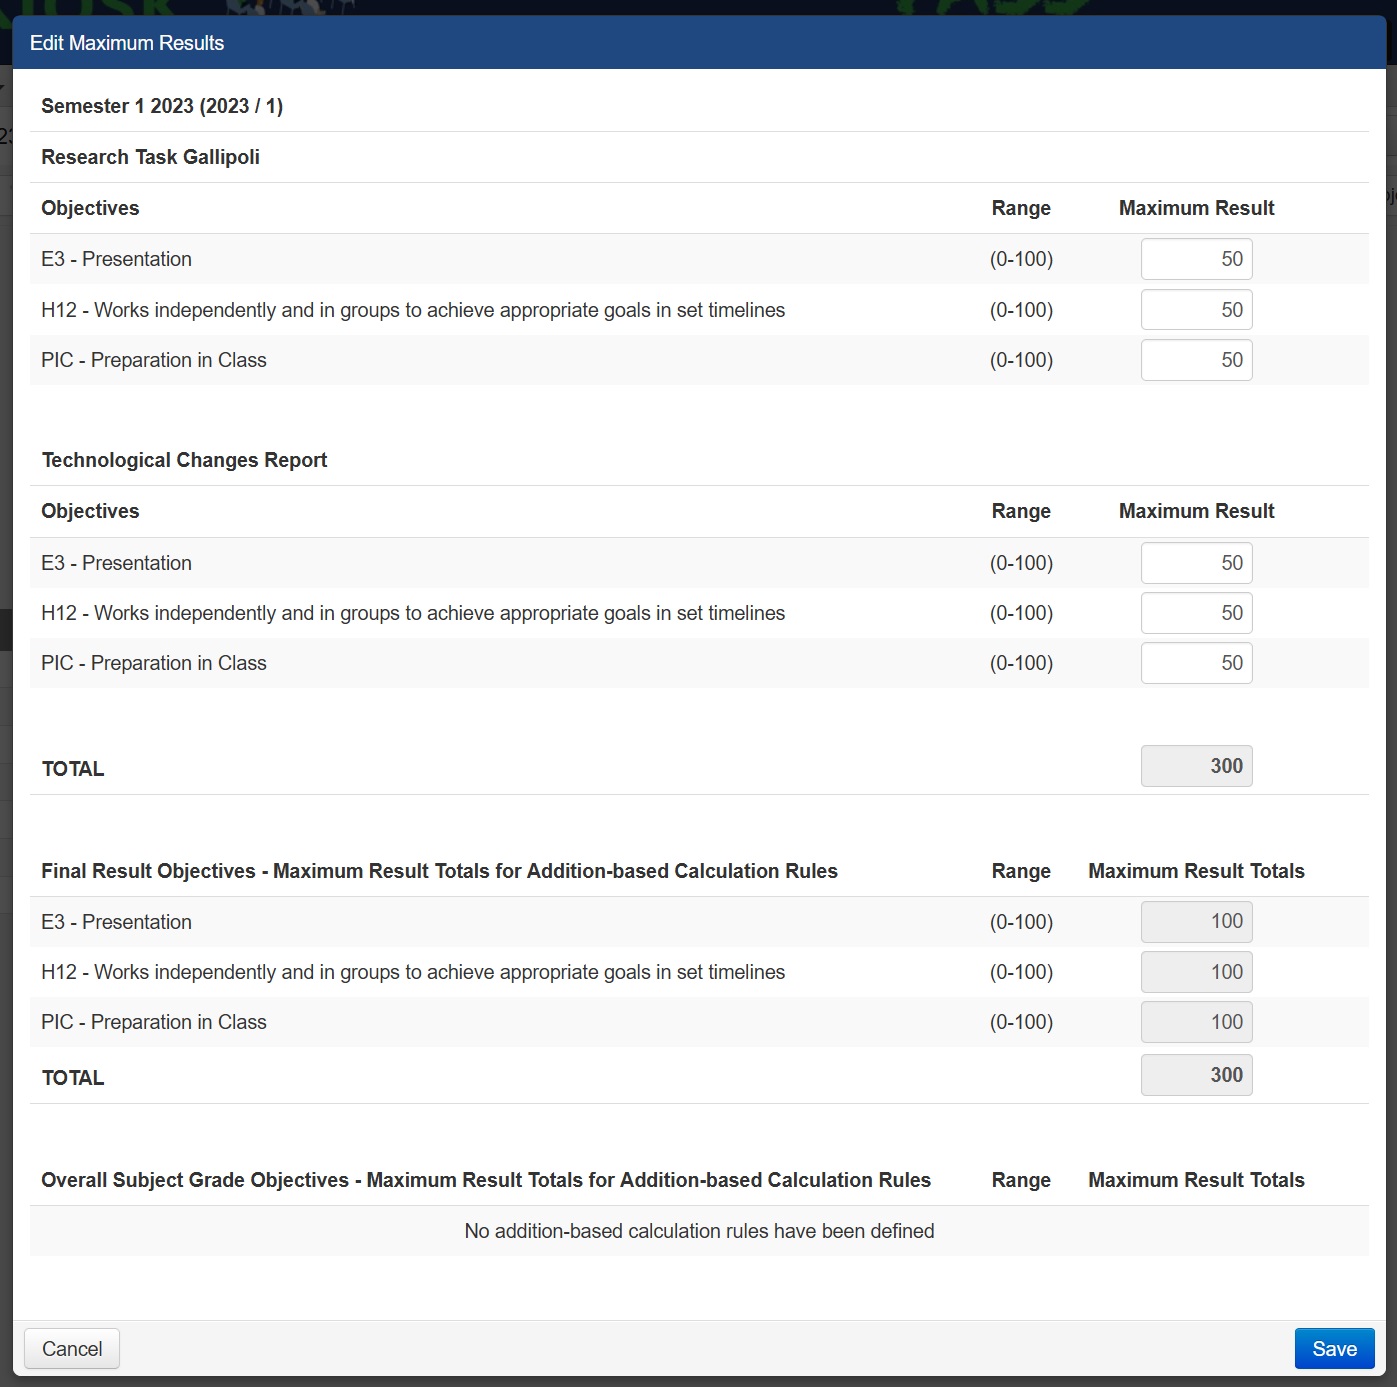 | |||||
Print the onscreen data to PDF, Word, or Excel. Formatting and Additional Fields options are available. | ||||||
Restore | The ‘Restore’ button becomes active when data has been entered or edited. It allows you to restore the data to the last saved point, removing any unsaved data. | |||||
Save | The ‘Save’ button becomes active when data has been entered or edited, prompting you to save the changes. |
Element 2: Display Options
Example

Reporting Periods | Markbook opens by default to the Reporting Period that was selected on the previous screen and displays the information relevant to this Reporting Period. If further Reporting Periods are open to the user, these may be selected from the Reporting Periods filter, whereby the activities applicable to the additional Reporting Period also display. Results from past periods display for informational purposes and cannot be entered/edited from the selected period. |
Activities | All Activities relevant to the selected Reporting Period display by default. The Activities filter allows for selecting only the Activities that you wish to see in the Markbook. |
Objectives | All Objectives relevant to the selected Reporting Period display by default. The Objectives filter allows for selecting only the Objectives that you wish to see in the Markbook. |
| By default, only students that are currently at the school will be displayed. To display students who have left the school (non-current), tick this box. |
| The Include Final Results Column is ticked to by default the first time you access the Markbook screen for each subject. Unticking the box hides the Final Results element from view. This setting will be remembered the next time you access the Markbook - Activity Assessment screen for this subject. |
| The Include Overall Subject Grade Column checkbox is ticked by default the first time you access the Markbook screen for each subject. Unticking the box hides the Overall Subject Grade element from view. This setting will be remembered the next time you access the Markbook - Activity Assessment screen for this subject. |
| The default Student listing includes the students who are in the selected Teacher's Subject Class. The Include all subject classes checkbox is displayed to subject Department HODS and Department Administrators, allowing them to display students from all classes of the subject. When the Include all subject classes checkbox is ticked:
Include all subject classes The ‘Include all subject classes' option is available to users listed as a Subject Department HOD or Department Administrator in TASS.web Student Admin > Student Records > Setup Information > Student Records Setup on the 'Subject Depts.’ tab. |
| Tick the Show Statistics checkbox to display the Average and Standard Deviation calculations for the list of students for each activity above the Student listing. Final Results statistics are also displayed, where the results are number-based. |
Element 3: Assessment Activities
Key points:
Objectives and their display order are determined by the subject's Result Format in TASS.web and the Activity Setup in Staff Kiosk.
Activities are displayed in the order of the Activity due date, with the earliest appearing first.
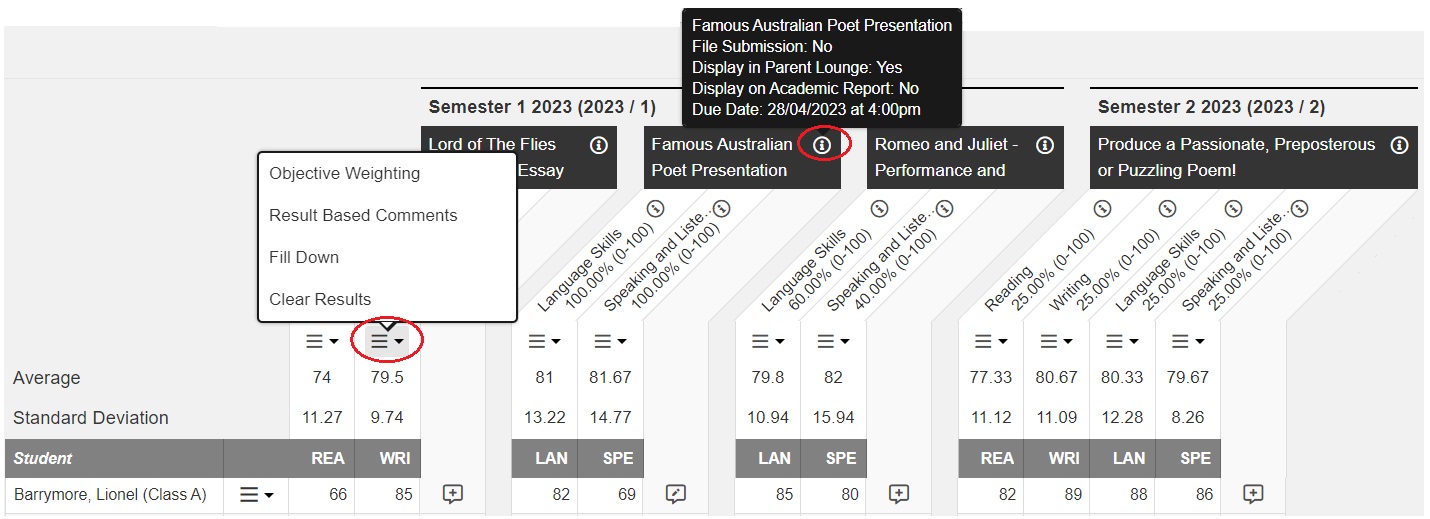
Where multiple Reporting periods have been selected through the Reporting Periods filter, the activities are grouped by Reporting Period (e.g. Semester 1 and Semester 2).Hover over the ‘info’ icon next to the Activity Name to see:
Activity Name
File Submission status
Display in Parent Lounge status
Display on Academic Report status
Due Date information
Under each Activity name, the following information displays:
Objective description (e.g. 'Language Skills')
Weighting (e.g. 60%)
Assessment Method Prompt (in brackets) (e.g. '0-100')
The Student's Activity Status will update to 'Assessed' when all Activity Objective results, and the Activity Total Score (if enabled) are entered into Markbook.
When the Student's Activity Status is already marked as 'Assessed', and an Activity Objective result or the Activity Total Score (if enabled) is removed, the Activity Status will change back to 'Submitted/Completed'.
The hamburger menu under each Activity gives further actions and information.
The Average and Standard Deviation information for each Activity displays when the 'Show Statistics' option has been ticked.
The code of each Objective displays below the hamburger menu.
The ‘Activity Total Score’ column is visible if you nominated to ‘Calculate Activity Total Score’ when creating the Activity.
You can sort the Activity Objective Results in ascending or descending order by clicking the column header.
The ‘Rankings’ column is visible when the ‘Activity Total Score Rankings in Markbook' checkbox is enabled for the Result Period in TASS.web Student Admin > Academic Reporting > Setup Information > Assessment Setup on the 'Result Periods’ tab. Activity Analytics (including Cohort Rankings) are calculated upon save.
Example
For more information, see Markbook - Enter or Calculate Activity Results.
Element 4: Final Results
Key points:
The Final Results Objectives and their display order are determined by the subject's Result Format in TASS.web.
Under each Objective, the following information displays:
- Objective description (eg 'Reading')
- Assessment Type (eg 'N')
- Assessment Method Prompt (in brackets) (eg '0-100')Final Results can be entered manually, uploaded from an excel spreadsheet, or calculated by the system using Calculation Rules.
The hamburger menu under each Objective gives further actions and information.
The Average and Standard Deviation information for each Activity displays when the 'Show Statistics' option has been ticked.
The code of each Objective displays below the hamburger menu.
You can sort the Final Result Objectives in ascending or descending order by clicking the column header.
For more information, see Markbook - Enter or Calculate Final Results.
Element 5: Overall Subject Grades
Key points:
The Overall Subject Grades Objectives and their display order are determined by the subject's Result Format in TASS.web.
Under each Objective, the following information displays:
- Objective description (eg 'Semester 2 Result')
- Assessment Type (eg 'A+')
- Assessment Method Prompt (in brackets) (eg 'A+-E-')Overall Subject Grades can be entered manually, uploaded from an excel spreadsheet, or calculated by the system using Calculation Rules.
The hamburger menu under each Objective gives further actions and information.
The Average and Standard Deviation information for each Activity displays when the 'Show Statistics' option has been ticked.
The code of each Objective displays below the hamburger menu.
Subject Comments can be entered via the ‘comment’ icon.
You can sort the Overall Subject Grade Objectives in ascending or descending order by clicking the column header.
The ‘Rankings’ column is visible when the ‘Overall Subject Grade Rankings in Markbook' checkbox is enabled for the Result Period in TASS.web Student Admin > Academic Reporting > Setup Information > Assessment Setup on the 'Result Periods’ tab.
For more information, see Markbook - Enter or Calculate Overall Subject Grades.
Element 6: Student List
Key points:
By default, the students from the selected subject class display.
Students from the same Subject but in other classes can be displayed by ticking the Include all subject classes box. (Permissions are required for this level of access and are determined in TASS.web.)
Students display if the Subject is listed in the Subjects screen in their Student Record in TASS.web, regardless of whether they have been assigned to any Activities, and regardless of their entry or exit dates.
Student name format is determined in TASS.web.
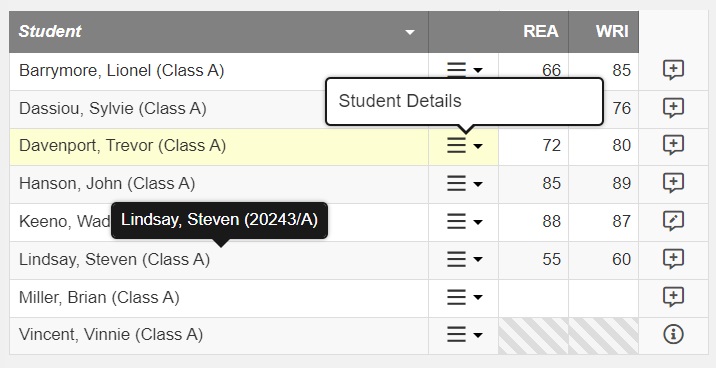
Hover over the student's name to see the Student Code.
The hamburger menu includes a 'Student Details' link to display further student information.
Example