
ENR - Enrolments Worksheet
Overview
The Enrolments Worksheet program allows you to:
See a holistic view of your enrolment numbers for future year(s) separated into the various 'stages' of your enrolment process.
Drill-down to the individual enrolment records and make changes 'on the fly'.
Advance selected students to the next enrolment stage.
Generate a Heatmap of selected students.
View and compare projected enrolment numbers against budgeted numbers.
Communicate with new enrolments and future parents via email or Word® Merge.
Print a report of enrolment numbers.
Print a report of next year's projected student numbers.
Print a report of enrolled students within a selected enrolment stage.
Save a report configuration so that you can re-run the report/export at a later date with the same report runtime options and additional fields.
Check out the ▶️ Enrolments Worksheet and Budget Video for more information.
Selection Criteria
The first screen allows the entry of selection criteria to filter the data that displays in the worksheet.
This includes:
'Entry Year'
'Gender'
'Family Status'
'Boarder'
'Campus'
'House'
'School Section',
Enrolment cycle ‘Stages' that are created in TASS.web Student Admin > Enrolments > Setup Information > Enrolments Setup on the 'Status’ tab.
'Cancelled Flag'.
You can also elect to filter for enrolment records that have certain 'Priorities' (e.g. Parent is a past student) or that have a defined range of 'Priority Points' (e.g. Greater than 20).
For example, you may be looking to create a worksheet that includes future students who are:
Looking to start in a particular year.
Female.
Coming into the junior school campus.
Are at the 'Place Offered' stage.
Alternatively, you can enter the 'Entry Year' only to get a complete enrolment picture for that year.
Click the 'GO' button to generate your worksheet.
Enrolment Numbers Tab
This tab displays the enrolment numbers based on the selection criteria you entered in the previous screen.
The enrolment numbers are sorted into Entry Year Groups (rows) and 'stages' of your enrolment process (columns).
Example
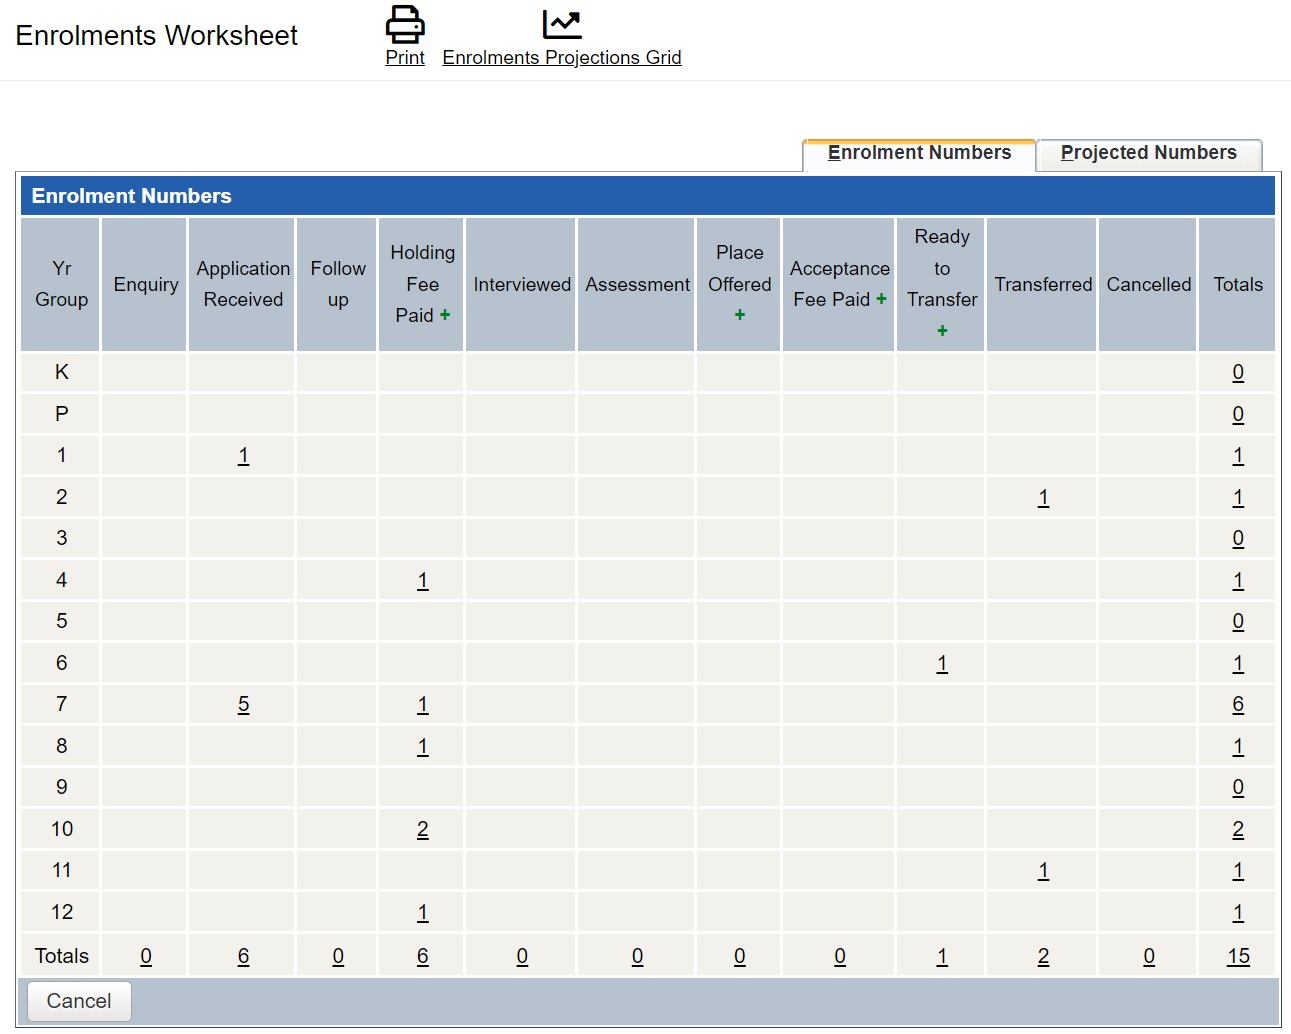
Use the 'Print' button at the top of the screen to produce a list of the enrolment numbers that are displayed. Options are available to print new enrolment numbers only and/or the projected numbers (which includes the current students advanced by a year). If you choose to print the projected numbers you can also elect to include the projected numbers chart.
From the 'Enrolment Numbers' tab, you can also drill-down by clicking on any of the underlined (active link) numbers.
This will display a list of all future students at that point in the enrolments worksheet.
Example
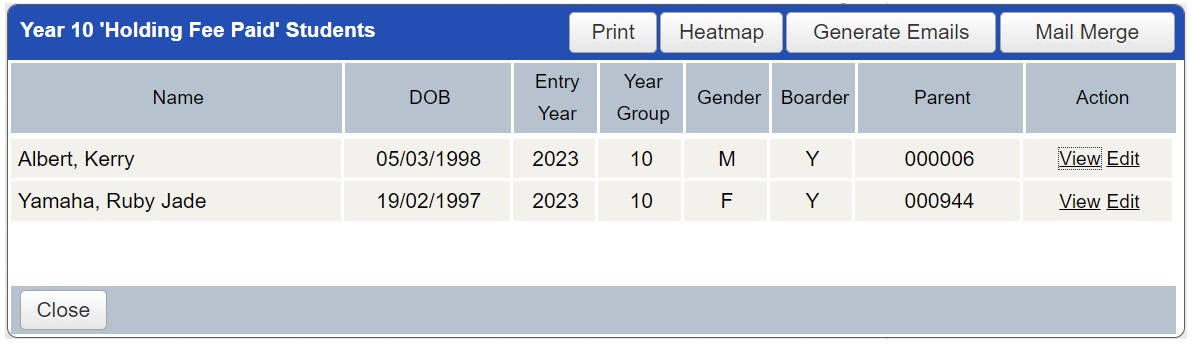
From there you can:
Drill-down to view or edit individual enrolment using TASS.web Student Admin > Enrolments > Enrolment Information > Enrolments > Viewing and Editing Enrolment Records.
Print a listing of students displayed.
Generate emails.
Create letters, labels or emails using the 'Mail Merge' option.
'Advance' students in bulk to the next enrolment stage.
Generate Emails
Use the ‘Generate Emails’ button to email Enrolled Parents based on your selections.
The ‘Generate Email’ option is only available when SMTP Emails has been enabled. For more information, refer to How to Enable SMTP Emailing and Set Up Communication Log Permissions.
The list of the future students who will be sent the email displays.
Deselect any of the students that you do not want to create emails for using the checkboxes.
Use the 'Email to Students' and 'Email to Parents' options at the top of the screen to nominate whether this email will be sent to students, parents or both.
The parent contact information used when generating emails is determined by:
The 'Communication Rule' defined in the 'Communication Type for SMTP Emails' field in TASS.web Student Admin > Enrolments > Setup Information > Enrolments Setup on the 'Enrolments' tab.
The 'Communication Rules' set up on each future student's Enrolment record.
An alert symbol displays where an email cannot be generated for the following reasons:
The student or parent does not have an email address.
The student does not have the required Communication Rules defined on their Enrolment record.
Click the 'Next' button to proceed.
There are two possible ways that the emailing function will work for you. This has been pre-determined by your school:
Using SMTP format (Simple Mail Transfer Protocol), or
Using your email product (e.g. Outlook).
Using SMTP Format (Simple Mail Transfer Protocol)
Important!
For more information, refer to 'How to Enable SMTP Emailing and Set Up Communication Log Permissions'.
Email Template | Choose an email template from the drop-down list. The email templates available in this list are maintained using TASS.web System Admin > Utilities > Email Settings on the ‘Email Templates' tab, and assigned to the 'Enrolment (ENROL)’ category. If an email template is selected, the following fields below will be pre-populated based on the template:
|
From | This is a display-only field and will show your school email address. If a generic email is to be used, select from the available options in the drop-down list. The generic emails in this list are maintained in TASS.web System Admin > Utilities > Email Settings on the 'Generic Emails' tab. |
To | This is a display-only field and will show a description of the group of students and/or parents to who this email will be sent. The program will create individual emails. Recipients of this email will not see the email addresses of other recipients or email addresses added into the 'Additional Recipients' field below. Click the 'Print' button to view a listing of the individual recipients. |
Additional Recipients | Use this field where additional recipients (beyond those already included in the 'To' field above) need to be included in this email. To add other teachers/non-teachers, type three or more characters of the teacher/non-teacher code, given name, surname or department to display a list of possible teachers/non-teachers to choose from. From the list provided, click on the teacher/non-teacher that you want to include in this email. Recipients of this email will not see the other email addresses in this field or the 'To' field above. |
Email Subject | This is the text that will be included in the 'Subject' line of the email. (200 characters). |
Attachment | Two options are available to attach files to this email:
|
Word Merge File | This field is only displayed when a Word Merge file has been defined in the email template and the PDF Conversion API has been enabled. The Word Merge file will be merged with the student information then converted to a PDF document that will be attached to each SMTP email. Word Merge Word Merge export files are produced from various TASS.web or Staff Kiosk programs to extract a set of merge field codes and students/parents/employees details in a format required to insert into a Word Merge document.
Create a Word Merge document:
A PDF report entitled 'Students with no Communication Rules' will display if there are issues with your selection. These must be fixed before the export can be processed.
|
Email Message | This is the text that will be included in the message section of the email (4000 characters). To personalise this email, use the 'Keywords' option in the toolbar to add student and parent-specific details into the message text. Use the 'Alert' icon option to view a preview of the email. |
Communication Log Comment | Use this field to enter an optional description of the email that is being sent. This comment is displayed in the Communication Log only and is not seen by email recipients, e.g. Invitation to Orientation Day for new enrolments for the following year. |
Communication Log Category | The following student based communications are recorded in a Communication Log:
Internal teacher/non-teacher communications generated in Staff Kiosk are also recorded in a Communication Log. The categories for Student Notes visible in the Communication Log are determined by user permissions. The Communication Log allows you to track and monitor the details of communications including who it has been sent to and whether the communication has been viewed by the recipients. The Communication Log for a student can be viewed using Staff Kiosk Student Profile > Communication Log. The Communication Log for an enrolled student can be viewed using TASS.web Student Admin > Enrolments > Enrolment Information > Enrolments on the ‘Communication Log’ tab. |
Using Your Email Product
If you elect to use an alternative email product, a different screen to the one explained above will be displayed. The 'Email' field will display the email addresses of recipients based on the selections made in the previous 'Generate Emails' screen.
Multiple email addresses will be separated by a semicolon.
Use the 'Select All' button to highlight the email addresses displayed. Copy the email addresses from this field to the clipboard and paste them into your alternative email product (e.g. Outlook).
For devices that prefer a comma as a separator, tick the 'Use Comma Separator' checkbox before copying to the clipboard.
Alternatively, click the 'Email All' button to launch your school's alternative email product.
Very Important!
Email addresses will be populated into the 'To' field of your alternative email product (i.e. recipients will see each other's email addresses). TASS does not recommend the use of this option.
Some Browsers and Email Clients impose limits on data that can be transferred, we recommend that you check that all emails displayed have been transferred before sending.
If your alternative email product fails to launch, please contact your system administrator.
Advance
The 'Advance' function will allow the user to 'Advance' Enrolments with an Enrolment Status of Stage 6 (Often setup as 'Place Offered') or Stage 7 (Often set up as 'Place Accepted') to the next 'Enrolment Status'.
Examples:
Place Offered (Stage 6) > Place Accepted (Stage 7).
Place Accepted (Stage 7) > Ready to Transfer (Stage 8).
This process will also update the relevant 'Enrolment Status' flag to 'Y' and update the status date to the current date.
Select the 'Advance' button to view the 'Advance Enrolment Status' screen.
Use the checkboxes in the 'Exclude' column to remove any students who you do not want to advance.
Click the 'GO' button to proceed.
Important!
The preceding mandatory enrolment stages must be completed before the enrolment record can be advanced.
Heatmap
Important!
Only available when Address Validation is enabled in TASS.web System Admin > Utilities > API Gateway Maintenance.
Click the 'Heatmap' button to display a 'Student Enrolments Map' screen with the longitude and latitude of the enrolled student's default address plotted on the map.
There are two display options of the 'Student Enrolments Map' screen:
Cluster.
Locations of enrolled students will be represented by clusters displayed with the number of enrolled students in each cluster. Where a location falls outside of a cluster, a pin will be displayed.
The colour of the cluster indicates the concentration of enrolled students. Zooming in on the map will display smaller clusters.Heatmap.
Clusters of the enrolled student's location will be represented by colours. The brighter the colour the higher the concentration of enrolled students in that area.
Sort Options
The default is for the report to sort by Surname.
Alternatively, you can elect to sort by 'Date of Application', 'Entry Year Group', 'Entry Year', 'Holding Fee Paid' or 'Priority Points (Descending)'.
Formatting Options
Choose the 'destination' of the report. This can be to Adobe® PDF viewer, Microsoft Excel® or Microsoft Word®.
Show Table Borders and Alternative Row Colours | The 'Table Borders' and 'Alternate Row Colours' options can enhance the readability of the report but are not available if the listing destination is Excel®. |
Include Descriptions or Include Codes | This option allows you to choose whether codes or descriptions will be printed on your report. An example of a 'Parent Occupation' may be:
It relates to the following fields:
|
Additional Fields
Select 'Additional Fields' to include in your listing by highlighting them with a mouse click.
The 'Student Code', 'Name', 'Application Date', 'Entry Yr Group' and 'Entry Yr' fields are automatically included and are not available for selection.
Holding down the 'Shift' key while clicking on your options permits a range selection, holding down the 'Ctrl' key enables selection of discrete (individual) criterion.
Save this Configuration as
This report/export has extensive options that can be activated via run-time settings. These settings can be saved as your own report 'Configuration' profiles. A report 'Configuration' that you create can't be accessed by another user and vice versa. This is because each 'Configuration' is dependent on the individual user's security permissions that determine the fields that can be included.
If this field is populated with a value and you click 'GO', the current report/export settings will be saved using the configuration name entered in this field.
To use a previously saved report configuration, select it from the 'Use a Previously Saved Configuration' picklist and click 'Next'.
The 'Use a previously saved configuration' picklist will only be available if a saved configuration exists.
To create a new configuration, click the 'Next' button without selecting an option from the 'Use a Previously Saved Configuration' picklist.
Enter your runtime options for the program.
To save the runtime options that you have entered as a re-usable report configuration, enter a meaningful description into the 'Save this Configuration as' field on the 'Process' or 'Print' tab.
You can delete a report configuration by selecting it from the picklist, clicking the 'Next' button, and then clicking the 'Delete' option.
You can modify an existing configuration by selecting it, making the necessary changes to the run-time options, then clicking 'GO' on the 'Process' or 'Print' tab. You need to ensure the 'Save this Configuration as' field is populated with the report configuration name. This field is populated automatically when an existing configuration is selected.
Mail Merge
Click on the 'Mail Merge' button to prepare a mail merge, an email list, labels or a combination of Word Merge file and email list for the selected future parents.
Sort By
This will determine the order in which the labels will be printed and the data order for the merge files.
Address Options
Use this section to define the addresses to use for your labels/merge.
Option 1 - Use Communication Rules
'Communication Rules' provide a 'student-centric' way of defining precisely how different areas of your school communicate with parents. They are especially useful for communication with split families and for families with students who have multiple parenting arrangements.
For more information, refer to How to Handle Split Family Arrangements.
Communication Types | Choose the appropriate 'Communication Rule' to use for this labels/letter merge. The program will default to the 'TASS.web Correspondence' rule. For more information on the rules available, refer to Addresses and Communication Rules. |
Option 2 - Select Addresses
This methodology for communicating with parents can be used as an alternative to 'Communication Rules'. However, it is strongly recommended that your school investigates implementing 'Communication Rules' as a more precise method of communicating with parents.
Primary Copy Address | This will use the default address (or the email address that is contained in this address block if you are emailing). You can change this to any of the other address blocks on the parent record. If you use an address other than the school default address, the system will look at the address that you enter here first and if it doesn't find any detail, it will then revert to using the default address. The school default address will be highlighted with an '*'. This Address Only Another scenario is that you ONLY want to produce labels/merge files for parents who have an entry in a particular address block. To achieve this tick the 'This Address Only' checkbox and choose the relevant address to use. Use Lives With (OLD) Address This option is based on the redundant 'Lives With (OLD)' field on the 'General' tab in TASS.web Student Admin > Student Records > Student Information > Students. This functionality becomes redundant from TASS.web v43.1 onwards. This is because the 'Lives with' indicator for students has been moved to the 'Address and Communication Rules' tab. 'Communication Rules' provide a 'student-centric' way of defining precisely how different areas of your school communicate with parents. They are especially useful for communication with split families and for families with students who have multiple parenting arrangements. For further details, refer to How to Handle Split Family Arrangements. If your school is using a version of TASS.web that is v43.1 or later, and you are still using this field, you should implement 'Communication Rules' as soon as possible. This option will be removed from the program in a future TASS.web release. |
Additional Copies/Labels | This allows you to nominate one or more additional address(s) to include as additional copies for your labels/merge files. This field allows the selection of multiple addresses by holding down the 'Ctrl' key whilst clicking on the required addresses. |
Additional label/copy to Student 'Lives With (OLD)' Address | This can be used to create an additional copy of the labels or data in the merge file for the parent based on the redundant 'Lives With (OLD)' field on the 'General' tab in TASS.web Student Admin > Student Records > Student Information > Students. For further explanation, refer to 'Use Lives With (OLD) Address' in this table above. |
Other Options
This area of the screen determines how the labels will print for families with more than one student. You can elect to produce a single label, email or line in a merge file or multiple labels, emails or lines in a merge file.
The choice that you make here, does not affect the options that you selected in the 'Address Options' above. Therefore, if you chose to produce multiple copies above that will still occur.
Include Description / Include Codes | Use these options to nominate whether the codes or descriptions of user-definable fields will be included in your Word Merge. |
Exclude parents with email address (Labels & Word Merge only) | You would use this field if you have already used the 'Email' option to communicate with parents (who have email addresses) and now want to produce labels or a Word Merge file for the rest (who don't have email addresses). Important! Make sure that you have the same address options selected when you run the email process and the PDF (printed) process. |
Additional Fields (Word Merge only)
If you are producing a Word Merge file you can select additional fields to include by highlighting them with a mouse-click. The 'Given Names', 'Surname', 'House' and 'Form Class' fields are automatically included and are not available for selection.
Output Options
AMAS File | This creates a file in a format that is suitable for uploading into certain AMAS (The Address Matching Approval System) software products. We currently support Postman®. |
Word Merge – TXT File | Generate a To include additional fields in your Word Merge highlight the appropriate fields from the 'Additional Fields (Word Merge only)'. Holding down the 'Shift' key while clicking on your options permits a range selection, holding down the 'Ctrl' key enables selection of discrete (individual) criterion. Word Merge Word Merge export files are produced from various TASS.web or Staff Kiosk programs to extract a set of merge field codes and students/parents/employees details in a format required to insert into a Word Merge document.
Create a Word Merge document:
A PDF report entitled 'Students with no Communication Rules' will display if there are issues with your selection. These must be fixed before the export can be processed.
|
Word Merge - Excel® File | You would use this if you prefer to use Excel® as your source for merging with a Word® letter or label template. This can be a better option if you have commas in your data. |
This will only create an email list for parents who have an email address based on the 'Address Options' that you selected above. Important! This option is not available when SMTP Emails have been enabled; instead, use the 'Generate Emails' button in the previous screen. Once the list has rendered on your screen, use copy and paste to include it in your email. | |
Labels Report | Use the 'Labels Report' button to print labels in a format suitable for adhesive labels. This printout suits Avery DL14 or Unistat 38937 label formats. |
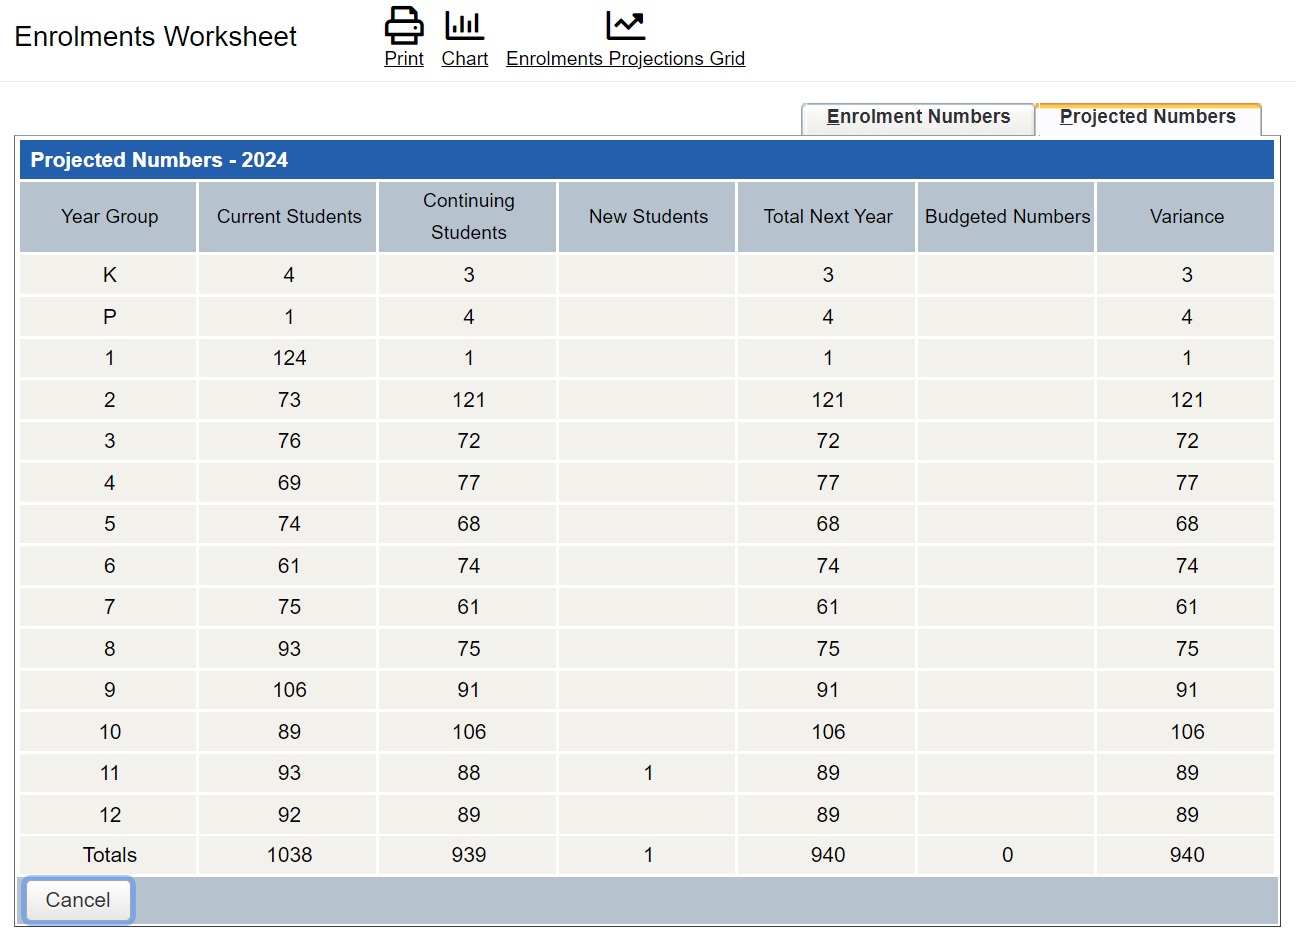
Projected Numbers Tab
This tab provides you with a tool to project next year's student numbers by comparing actual student numbers against future and budgeted student numbers.
Example
Fields that require further explanation | |
Year Group | This column displays the year group based on the academic years that are created in TASS.web Student Admin > Parent Records > Parent Records Setup on the 'School' tab and the 'Reference Year Group' in TASS.web Student Admin > Student Records > Set Up Information > Student Records Setup on the 'Student Records' tab. |
Current Students | This column displays your school's current student numbers by 'Year Group'. |
Continuing Students | This column displays current students advanced by one year level. It will exclude students who have a 'Next Year' flag of 'Finished', 'Leaving' or 'Re-Entering'. The 'Next Year' field is maintained using TASS.web Student Admin > Students > Student Information > Students on the 'General' tab. Current students who have a 'Next Year' flag of 'Repeating' will remain in the same year group in this column. |
New Students | This column displays future students who are at Stage 7 and 8 of the enrolment cycle (normally called 'Acceptance Fee Paid' and 'Ready to Transfer'). |
Total Next Year | This column combines the number of students from the 'Continuing Students' and 'New Students' columns to provide a total projected number for next year. |
Budgeted Numbers | This column will display the school's budgeted student numbers for next year. For example, the number of students the school can take in for each year group. 'Budgeted Numbers' are maintained in TASS.web Student Admin > Enrolments > Setup Information > Enrolments Budget. |
Variance | This column is used to compare total projected student numbers (for next year) against budgeted student numbers. |
Click the 'Chart' button at the top of the screen to graphically view the school's budgeted student numbers against the total number of students for next year.