
Activity Planner - Activity Assessment Screen
Overview
The Staff Kiosk Activity Planner, Activity Assessment Screen allows you to:
View the Students who are assigned to the selected Activity.
Print a listing of Students who are assigned to the selected Activity.
Review and edit the Activity material created by Teachers.
Attach an assessment rubric for the Activity.
Change dates on the Activity.
Grant Extensions (to a group of students).
Add additional students to the Activity.
Transfer responsibility for the Activity to another Teacher.
Send Notifications to Students or Parents when:
A student has failed to submit the Activity.
A student has achieved a designated Final Grade for an Activity.
Access the 'Class Analysis Grid'.
Unassign the Activity.
Define the Calculation Rule used to calculate the 'Activity Total Score'.
Change the Activity status for students (including marking a student as absent from an Activity).
Flag non-file submission Activities as being completed by students.
Change the flag that determines if parents can see the Activity in Parent Lounge and Parent Orbit.
View or print an 'Activity Assessment Grid' showing the status of all Activities for all students in the class.
View all ‘Activity Assessment Files’ submitted by Students. Check for Word Count and Plagiarism and Add Annotations.
Download a copy of all Activity Assessment Files ‘Drafts’ or 'Finals'.
Check out the ▶️ View and Maintain Assessment Activities and ▶️ Assess and Enter Results for Assessment Activities videos to see this program in action!
From the Activity Assessment Screen, you can click the ‘Assess’ link, which will take you to the Assess Student Screen where you can:
View and download Activity files that a student has uploaded via Student Café.
Upload an Activity file on the student's behalf.
Mark the Rubric for the Activity using Annotations.
Provide feedback to students on Drafts and Final submissions using Comments or Annotations.
Upload Annotated Activity Feedback to Student Café, Parent Lounge and Parent Orbit.
Review and enter Comments for the Activity
Comments that are displayed in Student Café, Parent Lounge and Parent Orbit, and
Comments that are only visible to the Teacher.
Review and enter raw score Results for assessable Activities (that use Assessment Criteria Objectives or Standalone Criteria).
Calculate the 'Activity Total Score'.
Change the Activity status for students (including marking a student as absent from an Activity).
Remove a student from the Activity.
Grant Extensions (to a single student).
Columns Displayed
Columns that require further explanation | ||||||||||||||||
Student Name | This column displays the student’s Surname, Preferred Name. Hover over the students’s names to see Surname, First Name, Other Name. | |||||||||||||||
Draft Date | This column will only appear for Activities that require students to submit a draft. | |||||||||||||||
Due Date | This is the due date for the students to complete the Activity by. | |||||||||||||||
Completed | For file submission Activities this is the date that the student submitted his/her final work. For non-file submission Activities, this is the date that:
| |||||||||||||||
Final Grade | This is the grade for the Activity that becomes visible to students in Student Café and parents in Parent Lounge and Parent Orbit. Setting up a 'Final Grade' on an Activity is optional. | |||||||||||||||
Activity Total Score | This column will be displayed instead of the 'Final Grade' column (above) if you nominated to 'Calculate Activity Total Score' when creating this Activity. The grade that is displayed here, will be a calculation based on the individual criteria used to mark this Activity. An example of a typical calculation might be:
For more information, refer to the 'Activity Total Score Calculation Rules' section below. | |||||||||||||||
Activity Status | This column will display the status (or progress) of each student for this Activity. It can also be used to update students' 'Activity Status' individually, or in bulk. To change the 'Activity Status' for an individual student:
To change the status of multiple students:
Tick the checkbox in the ‘Activity Status’ column heading to select all students displayed.
The 'Activity Status' will display in red if the date and time for the action have passed. | |||||||||||||||
 | There are 2 columns (between the 'Activity Status' and the 'Action' columns) that will display a 'speech bubble' icon when a comment has been entered against a student's Activity. Two types of comments can be added as a notation to a student's performance on an Activity:
Comment for Student A comment entered in this section of the screen will be visible to students in Student Café and parents in Parent Lounge (if you have nominated that this Activity is to be visible to parents). Students will be able to view these comments in Student Café based on the following:
Tick the 'Show comment in Student Café immediately' checkbox at the bottom of the 'Assess Student' screen to display a student's comment and 'Final Feedback' file in Student Café before the 'Due Date'.
Teacher Comment A comment entered in this section of the screen is for your reference. It will not be displayed to students or parents. ‘Teacher Comments’ can only be viewed by the Teachers who wrote them, Heads of Department, Department Administrators, and users with the TASS.web Portal Security Permission to view all Assessment Activities. You can use comments from the school's comment bank or your own personal comment bank. For more information on 'Comment Banks', refer to Student Admin > Academic Reporting > Setup Information > Reporting Setup on the 'Comments' tab. When the ‘Format Comments’ icon is clicked, student names will as per the ‘NAME keyword substitution format' setting in TASS.web Student Admin > Academic Reporting > Setup Information > Reporting Setup on the 'Reporting Parameters’ tab. Hover over the top of these icons to view the 'Comment for Student' or the 'Teacher Comment'. | |||||||||||||||
 | A 'bar chart' symbol will display when Progressive Assessment Analytics are available for the Student and have been generated for the Activity. Hover over the bar chart to review Analytics for each student. For each student, potential analytics include the result, average and rank for each Objective (including the Activity Total Score if enabled for the activity). The date and time the Analytics were run will be displayed next to the 'Activity Name' in the top left corner of the screen. If the Activity has been set for all subject classes, you can change the statistics from a single class perspective to a cohort perspective. This option is only available when Progressive Assessment analytics have been generated for this Activity. Analytics can be generated by the HOD or Department Administrator in Staff Kiosk Assessment > Activity Planner. Hover over the ‘Graph’ icon and click 'Generate'. Refer to the 'Columns Displayed' section of the Activity Planner article for more information. Progressive Assessment analytics can be generated by HODs and Department Administrators using Staff Kiosk Assessment > Activity Planner. When generated, they become visible to teachers in the Staff Kiosk program Assessment. They can also become visible in Parent Lounge or Student Café. The flags that determine whether Progressive Assessment analytics are visible in Student Café and Parent Lounge are maintained in TASS.web Student Admin > Academic Reporting > Setup Information > Reporting Setup on the 'Analytics' tab. 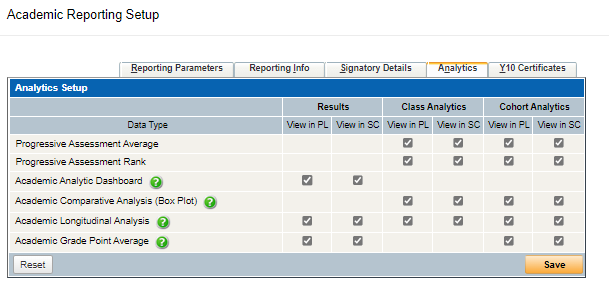 A student who has a 'Comparative Reporting' flag set to 'Exclude' in TASS.web Student Admin > Student Records > Student Information > Students on the 'General' tab, will not be included in analytics calculations. A student who has a 'Comparative Reporting' flag set to 'Don't Include' in TASS.web Student Admin > Student Records > Student Information > Students on the 'General' tab, will be included in analytics calculations but these statistics will not be available in Parent Lounge or Student Café. | |||||||||||||||
Action | Use the 'Assess' link to access an individual 'Assess Student' screen. Click here for an example of an 'Assess Student screen' for a file submission Activity. Click here for an example of an 'Assess Student screen' for an Online Test Activity. Click here for an example of an 'Assess Student screen' for a non-file submission Activity. Important! If the Activity contains Assessment Criteria Objectives and was assigned in a previous reporting period, editing is not allowed. A 'View' link will be displayed. | |||||||||||||||
Activity Assessment Screen Buttons
Show All Classes
This checkbox will only appear when an Activity has been subject-based assigned.
For example, English Year 11 comprises three classes: A, B, and C, and the Activity was assigned to all three classes at the same time.
This checkbox is only available to HODs and Department Administrators.
Select the ‘Show All Classes’ checkbox to display all students across all classes to which this Activity has been assigned.
Download
This button will only appear for file submission Activities.
Click this button to create a .zip file containing:
'Student Draft' files (where the Activity has been set up to require a draft from students).
'Student Final' files.
Hover over the 'Download Drafts' or 'Download Finals' options to view how many submissions are available to download.
Each student file in the .zip file will be labelled with the 'Student Code' and 'Student Name'.
Examples
CLAR002 – Clark, Andy – Draft.docx
CLAR002 – Clark, Andy – Final.docx.
Each time you use the 'Download' options it will create a new .zip file.
Grids
Activity Assessment Grid | This option will be active for Activities with Assessment Criteria Objectives. It provides you with a tool to:
To enter each individual's raw scores (grades) for students, use the dropdown lists or enter the score directly. Alternatively, you can enter the first score in a column and use the fill down option 'down arrow' icon. Then go back and make changes for individual students within the column. When decimal places are specified for the Rounding Rule, the manual data input fields are restricted to the number of decimal places specified by the rule. Once all results have been entered, click the 'Calculate Activity Total Score' button to calculate a total score for each student based on the results for each 'Assessment Criteria'. Example An example of a typical calculation might be:
To calculate an 'Activity Total Score', a Calculation Rule must first be applied. Use the 'Calculation Rule' button to do this. For more information, refer to the section 'Activity Total Score Calculation Rules' below. Entering Comments To enter a comment, hover over the 'speech bubble' icon and click inside the box. When you are finished typing, use the tab key or click outside the comment box. Two types of comments can be added as a notation to a student's performance on an Activity:
Comment for Student A comment entered in this section of the screen will be visible to students in Student Café and parents in Parent Lounge (if you have nominated that this Activity is to be visible to parents). Students will be able to view these comments in Student Café based on the following:
Tick the 'Show comment in Student Café immediately' checkbox at the bottom of the 'Assess Student' screen to display a student's comment and 'Final Feedback' file in Student Café before the 'Due Date'.
Teacher Comment A comment entered in this section of the screen is for your reference. It will not be displayed to students or parents. ‘Teacher Comments’ can only be viewed by the Teachers who wrote them, Heads of Department, Department Administrators, and users with the TASS.web Portal Security Permission to view all Assessment Activities. You can use comments from the school's comment bank or your own personal comment bank. For more information on 'Comment Banks', refer to Student Admin > Academic Reporting > Setup Information > Reporting Setup on the 'Comments' tab. When the ‘Format Comments’ icon is clicked, student names will as per the ‘NAME keyword substitution format' setting in TASS.web Student Admin > Academic Reporting > Setup Information > Reporting Setup on the 'Reporting Parameters’ tab. Feedback You can also use this section of the screen to attach a feedback file, which then becomes visible to the student in Student Café and optionally to parents in Parent Lounge and Parent Orbit. Two options are available to attach a file to this Activity:
Important! Raw scores (grades) are not automatically saved to the database. It is strongly recommended that you save your 'Assessment Grid' regularly. If you make a mess, use the 'Restore' button to undo your changes. Unsaved data will be lost.
You can create a PDF document, Excel file or Word document of your 'Assessment Grid' by clicking on the 'Print' button. | |||||||||||||||
Activity Assessment Files | This option will be active for 'File Submission' type Activities. It provides a tool to simultaneously display, review and provide feedback using annotation on the files that have been submitted by students for this Activity. To view all activity files for the cohort, tick the 'Show all Classes' first before loading the grid. Filter the activity files displayed using the 'Submission Type' option at the top of the grid. For each file displayed, you can:
Click here for more information on annotation. You can create a PDF document, Excel file or Word document report of your Activity Files Grid by clicking on the 'Print' button. |
You can produce a report with details for each student displayed in the 'Activity Assessment' screen including:
'Dates'.
'Status'.
'Final grade'.
Sort By
Sort the order in which the records are displayed by nominating your preference:
'Student Code'.
'Student name'.
'PC/Tutor Group'.
'Class' (where the option 'Show all Classes' has been selected).
'Date Completed'.
'Activity Status'.
Formatting Options
The 'Formatting Options' panel allows you to choose the destination of the report. This can be to Adobe® PDF viewer, Microsoft Excel® or Microsoft Word®.
The dropdown list allows you to determine whether the report will display the students' 'Given Name', 'Preferred Name' or 'Both'.
Select the 'GO' button to generate the report.
Hamburger Menu
Use the 'hamburger menu' button to perform the following functions for this Activity:
Change Dates.
Group Extension.
Add Extra Students.
Edit Activity.
Transfer Activity (to another teacher).
Notify.
Class Analysis Grid.
Unassign Activity.
View Class Analytics.
Activity Total Score Calc Rule
Change Dates
Use this button to:
Change the 'Preview Date', 'Start Date', 'Draft Date' (if applicable), 'Due Date' and 'Delay Date' for this Activity.
Change the flag that determines whether parents can see the Activity in Parent Lounge program Student Details > Curricular Activities.
Change the 'Allow Late Submissions' flag.
Subject-Based Activities
If this Activity has been subject-based assigned, the 'Change Dates' program will allow you to modify Activity dates for each subject class the Activity has been assigned to.
For example, English Year 11 comprises of three classes; A, B and C and the Activity has been assigned to all three classes.
To do this, the 'Show All Classes' option must be selected in the previous screen first before opening the 'Change Dates' program.
You can:
Update Activity dates and flags for the first class and copy the details to the remaining classes using the 'Copy to all classes' button, or
Update each subject classes Activity dates and flags individually. Use the 'plus symbol' icon to expand the screen and see the additional subject classes and corresponding date fields.
Fields that require further explanation | |
Display in Parent Lounge | Use this field to indicate if parents will be able to see this Activity in Parent Lounge program Student Details > Curricular Activities. The ‘Display in Parent Lounge’ checkbox only controls the visibility of the Activity in Parent Lounge Student Details > Curricular Activities program. When the ‘Display in Parent Lounge’ checkbox is unticked, the Activity information will still be available in the 'My Assessments' Calendar Feed within the Parent Lounge Calendar > eDiary program. |
Allow Late Submissions | This field is only active when the 'Are students required to submit a file' is set to 'Yes' for the Activity. By default, this will be ticked, and students will be allowed to submit this Activity in Student Café past the designated due date and time. Untick this to disallow late submissions of this Activity by students. Students will receive the following message when they submit their work late: 'The Due date has passed, and your work will be flagged as Late.' When you access the student's Activity via Staff Kiosk Assessment > Activity Planner on the 'Activity Assessment' screen and click the 'Assess' button in the 'Action' column, a 'red alert' symbol will be displayed indicating that the student file was submitted late. When a parent accesses the student's Activity via Parent Lounge Student Details > Curricular Activities and click the active link on the 'Activity Name', a 'red alert' symbol will be displayed indicating that the student file was submitted late. |
Preview Date and Time | This is the date and time that basic details relating to this Activity will be displayed to students in Student Café and (optionally) parents in Parent Lounge. From this date and time until the 'Start Date' and 'Start Time' (that you enter directly below), the following Activity details will be available to students and (optionally) parents:
Basic details for this Activity will also be visible to students in their eDiary (Student Café) on the date and time you enter here. |
Start Date and Time | This is the date and time that basic details relating to this Activity will be displayed to students in Student Café and (optionally) parents in Parent Lounge. From this date and time until the 'Start Date' and 'Start Time' (that you enter directly below), the following Activity details will be available to students and (optionally) parents:
Basic details for this Activity will also be visible to students in their eDiary (Student Café) on the date and time you enter here. |
Draft Required | Tick this checkbox if you require students to submit a draft for this Activity. |
Draft date and time | If you ticked the 'Draft Required' checkbox directly above, you must enter the date and time that students must submit a draft copy for this Activity. |
OR select Draft Date by timetable lesson | An alternative to entering a draft date and time (above) is to have the system calculate them based on an upcoming lesson. Use the drop-down list to select the lesson by which the students must complete the draft for this Activity, and the program will automatically calculate the date and time. |
Due Date and Time | This is the date and time that students must submit a final copy of this Activity. If this is a 'File Submission' Activity, students will not be able to use Student Café to submit a file after this date and time (unless late submissions have been allowed). An 'Activity Due' reminder will also be visible to students in their eDiary (Student Café) on the date and time you enter here. |
OR select Due Date by timetable lesson | An alternative to entering a due date and time (above) is to have the system calculate them based on an upcoming lesson. Use the drop-down list to select the lesson by which the students must complete the Activity, and the program will automatically calculate the date and time. |
Delay Results | By default, at the time that you enter results and comments against each student's completed work, they will be visible to students in Student Café and (optionally) parents in Parent Lounge. Use this field to nominate the same delayed date and time that all students in the class will be able to see their results and comments for this Activity. For example, the Activity is due on Tuesday, and the results will be available on Friday, giving you a few days to complete marking for the entire class. |
Delay Date and Time | This is the date and time that results and comments for this Activity will be visible to students in Student Café and (optionally) parents in Parent Lounge. |
Click the 'Save' button to apply the changed dates to the Activity.
Group Extension
You would use this instead of the 'Change Dates' button in situations where:
The date change (extension) is not for the entire class, or
You want the date change (extension) highlighted to students and parents (extension dates are displayed in orange in Student Café and Parent Lounge with a hover-over).
An alternative to manually entering an extended due date and time is to have the system calculate it based on an upcoming lesson. Use the drop-down list to select the lesson that students' must complete this Activity by and the program will automatically calculate the date and time for you.
You can also use this screen to cancel existing extensions.
The program will alert you to any students who already have extensions granted for this Activity. Click 'View' to display the students and the extension dates.
Extensions cannot be granted to students who have already completed the Activity.
The 'Group Extension' option is not available when the 'Show all Classes' option has been selected.
Add Extra Students
The most likely use for this is to assign this Activity to a new student in your class.
If the Activity contains Assessment Criteria Objectives, then only students who belong to this class and who do not already have the Activity assigned to them will be available in the 'Choose from these Students' column.
If the Activity contains a standalone assessment or is not assessable, then use the filters to select the additional student(s) to add to this Activity.
The 'Add Extra Students' option is not available when the 'Show all Classes' option has been selected.
Edit Activity
Use this button to edit the details of an assigned Activity.
The 'Edit Assigned Activity' screen will allow you to:arning
Edit the 'Activity Name'
Edit the 'Activity Outline'
Update or remove Resources already attached to the Activity.
Add new Resources to the Activity.
Edit the 'Weighting' applied to Assessment Criteria Objectives.
Edit the 'Max Score' applied to Assessment Criteria Objectives.
Add and remove Assessment Criteria Objectives.
Optionally, update the original Activity record in the Learning Object Repository with your changes (excluding Resources).
The 'Edit' button is not available for standalone assessment Activities.
Subject-Based Activities
If an Activity has been subject-based assigned, the 'Edit' button will only be available to HODs and Department Administrators.
For example, English Year 11 comprises of three classes; A, B and C and the Activity has been assigned to all three classes
When editing an Activity that has been subject-based assigned, you will be editing the Activity details for ALL classes the Activity has been assigned to. A warning will be displayed at the bottom of the screen 'This Activity has been assigned to multiple subject classes. By editing this Activity, you will be editing the details for all classes'.
Click the 'View Classes' link to see which classes the Activity has been assigned to and will be affected by any changes.
Fields that are potentially editable | |
* Activity Name | Use this field to edit the Activity Name. |
* Activity Outline or Instructions | Use this field to edit the outline or instructions for the Activity. |
Attach Existing Resources | This field will display any Resources that are attached to the assigned Activity. To remove a Resource, click the cross next to the Resource name.  There are 2 ways that you can attach existing Resources in the Learning Object Repository to this assigned Activity:
|
Attach New Resources | Use this field to:
There are 2 ways that you can attach a new Resource to this Activity:
Any file that you attach using this field will be saved as a Resource in the Learning Objects Repository under the same 'Subject Area', 'Year Group' and 'Topic' as this Activity. |
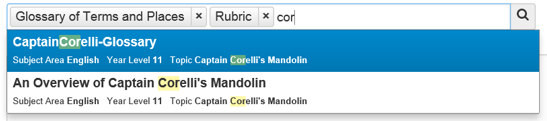
Attach Existing Rubric | This field will display the existing Rubric that is attached to the Activity. Click the ‘magnifying glass’ icon to search for and select existing Rubics. |
Attach New Rubric | Use this field to attach a new Rubric to the Activity. There are 2 ways that you can attach a new Rubric to this Activity:
|
Display on Academic Report? | Tick this checkbox to display the Activity on Academic Reports. |
Calculate Activity Total Score? | Tick this checkbox to allow the Activity Total Score to be calculated. |
Assessment Criteria | Providing that there are no results entered for an Objective, you can:
You can also add additional Objectives to the Activity. |
Update original Activity record in the Learning Object Repository | Tick this box to apply your changes to the original Activity record that resides in the Learning Object Repository. This does not include any new Resources that you attach. Only the Owner of the original Activity (in the Learning Object Repository) will have access to this field. |
Transfer Activity (To Another Teacher)
Use this button to transfer the responsibility of this Activity to another teacher.
The teachers who will be available in the drop-down list for you to transfer the Activity to, depend on whether the Activity contains Assessment Criteria Objectives.
If there are no Assessment Criteria Objectives in the Activity, then all teachers will be available.
If there are Assessment Criteria Objectives in the Activity, then only teachers who are set up to take this subject class (teachers who you team-teach with you) will be available.
The 'Transfer Activity' option is not available when the 'Show all Classes' option has been selected.
Notify
The ‘Notify’ button is used to:
Notify parents via email or create a Word® Merge File when a student has not submitted an Activity or have been granted an extension.
Notify parents via email or create a Word® Merge File when a student has achieved a designated Final Grade for an Activity.
Notify students via email when they have achieved a designated Final Grade for an Activity.
Notify students via email when they have not submitted an Activity or have been granted an extension.
By not selecting an 'Activity Status' or 'Final Grade' filter you can also use this program as a general notification tool.
The 'Notify' option is not available when the 'Show all Classes' option has been selected.
Notify Options
Use this section of the screen to nominate whether this notification goes to parents or students.
Send to Parent | If this option is selected, the program will use the address information from the parent record. For more information, refer to section 'Formatting Options (Parents Only)' above. |
Send to Student (email only) | If this option is selected the program uses the email address from the student record. |
Filter By
You can select the students to be included in this notification based on one or more 'Activity Status' or 'Final Grades'.
Hold down the 'Ctrl' key whilst making selections to select more than one field.
Only the 'Activity Statuses' and 'Final Grades' currently applied to students in this activity will be available for selection.
Formatting Options (Parents Only)
The parent address(es) used for each student is determined by the 'Communication Rules' set up on the student's records.
A warning will appear at the top of the screen to alert you of any students who don't have a 'Communication Rule' set up for 'Staff Corr' (Staff Kiosk Correspondence) and therefore will not be included in your correspondence. Click the 'Details…' link to find out who those students are.
Additional Fields (Word Merge only)
These are only relevant if you select the 'Word Merge File' option below. Select the field to include in the merge by highlighting it with a mouse click.
Hold down the 'Ctrl' key whilst making selections to search on more than one field.
Buttons
Use the buttons at the bottom of the screen to create your merge or email:
See ‘How to Generate Emails’ for more information. | |
Word Merge File | You can use this to prepare a Word Merge File (and a subsequent letter) to all parents. However, the most likely scenario for using this would be where you want to create an email for the parents who have valid email addresses and a Word Merge for the rest. To achieve this tick the 'Exclude parents with email address' box and click the 'Word Merge File' Button. This will create a Then click the 'Email' button and use the SMTP function to send emails to the rest. Word Merge Word Merge export files are produced from various TASS.web or Staff Kiosk programs to extract a set of merge field codes and students/parents/employees details in a format required to insert into a Word Merge document.
Create a Word Merge document:
A PDF report entitled 'Students with no Communication Rules' will display if there are issues with your selection. These must be fixed before the export can be processed.
|
Class Analysis Grid
Use this button to produce a grid-style display or printout of students' statuses or final grades for all Activities that have been assigned to this subject class.
This is an example of the 'Class Analysis Grid' screen:
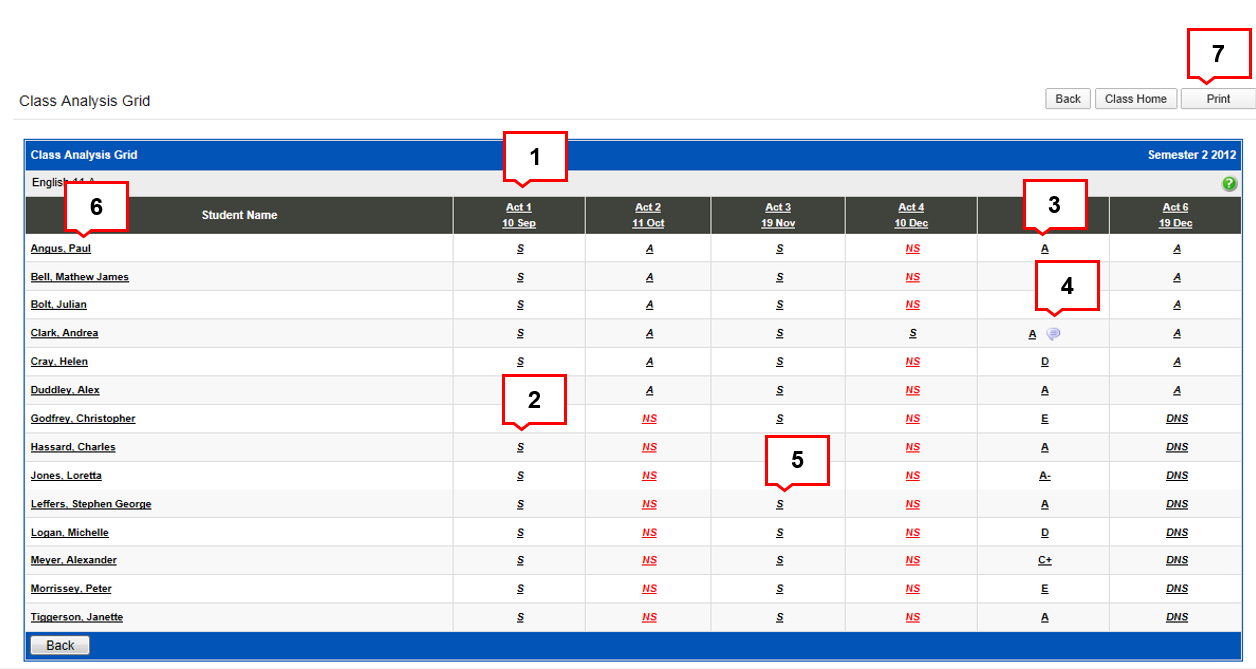
Options available to you from this screen:
Hover over 'Act #' for a description of the Activity, or click on the click on‘Act #’ to be redirected to the Staff Kiosk Assessment > Activity Planner > Activity Assessment Screen.
The codes indicating each student's status for an Activity are displayed in Italics. Hover over the code for the description of the status.
If a Final Grade Objective has been defined in Staff Kiosk Assessment > Parameters (Setup) and a result has been entered for this Objective for the Activity, the Final Grade will be displayed instead of the status.
If a Teacher Comment has been entered for a student on an Activity, a 'speech bubble' symbol will be displayed. Hover over this to read the comment.
Click on any status code or Final Grade to access the 'Assess Student' screen for that Activity.
Click on a student’s name to access a grid with only that student's Activities.
Click on the 'Print' button to produce a PDF, Excel® or Word® file containing details from your 'Analysis Grid'. The Excel® option allows you to include comments that were entered for the students.
Unassign Activity
You would use this to unassign this Activity for all students.
Examples
When:
You have accidentally assigned the wrong Activity.
It is a non-assessable Activity that has been completed and you want to remove it from the student's view in Student Café.
Important!
Un-assigning an Activity will remove all grades and student-submitted files.
If you have selected the 'Show all Classes' option, the Activity will be un-assigned from ALL students in ALL classes this Activity has been assigned to.
Activity Total Score Calculation Rule
The ‘Activity Total Score Calc Rule’ option in the hamburger menu is only available if you nominated to 'Calculate Activity Total Score' when creating this Activity.
If you forgot, you can still switch this on using Staff Kiosk Assessment > Activity Planner > Activity Assessment Screen and the 'Edit Activity' option in the hamburger menu.
To calculate a total score for an Activity, the system needs details on how to calculate it.
Example
A typical example might be:
Criteria 1 | Criteria 2 | Criteria 3 | Total Score | |
|---|---|---|---|---|
Result | A | B | C | B |
Calculation Rule | 5 | 4 | 3 | 12/3 = 4 |
The ‘Rule' section displays the rules your school has set up for you to use. The ‘Rule Details’ section displays further details about the selected rule.
In addition to the Calculation Rule, there are 2 ways that the total score can be calculated. Use the radio buttons to select the method that you want to use to calculate the Activity Total Score.
Calculate Activity Total Score using weighted Activity Raw Scores |
Example A typical example might be:
| |||||||||||||||||||||||||||||||||||
Calculate Activity Total Score using addition (ignores Weightings) | This option is available only when the Activity is marked using a Numeric Range. To calculate the total score, the system will:
Example A typical example might be:
|
Select a Rule, then click the 'Allocate' button to apply the rule and method of calculating the 'Activity Total Score' to this Activity.
Coming Soon!
From v01.2026.06.200 onwards, Rounding Rules can be applied to Activity Total Scores. Refer to the TASS Release Notes for more information.
The ‘Rounding Rule' section displays the Rounding Rules your school has set up for you to use. The ‘Rounding Rule Details’ section displays further details about the selected rule.
Select a Calculation Rule and a Rounding Rule, then click the 'Allocate' button to apply the rule and method of calculating the 'Activity Total Score' to this Activity.
Activity Total Scores can also be set up, applied and calculated in Staff Kiosk Assessment > Markbook > Activity Assessment.
Activity Total Scores can also be calculated from Staff Kiosk Assessment > Activity Planner > Assess Student Screen and the ‘Activity Assessment Grid’ mentioned above.
View Class Analytics
The ‘View Class Analytics’ option will display in the hamburger menu when Progressive Assessment Analytics are available for the Students and have been generated for the Activity.
The ‘View Class Analytics’ screen displays the Class Results, Average and Ranks.
Tick the ‘Cohort’ checkbox to display cohort-based analytics.
Click ‘Print’ to generate the Analytics Report in PDF, Word or Excel format.
Progressive Assessment analytics can be generated by HODs and Department Administrators using Staff Kiosk Assessment > Activity Planner.
When generated, they become visible to teachers in the Staff Kiosk program Assessment.
They can also become visible in Parent Lounge or Student Café.
The flags that determine whether Progressive Assessment analytics are visible in Student Café and Parent Lounge are maintained in TASS.web Student Admin > Academic Reporting > Setup Information > Reporting Setup on the 'Analytics' tab.
A student who has a 'Comparative Reporting' flag set to 'Exclude' in TASS.web Student Admin > Student Records > Student Information > Students on the 'General' tab, will not be included in analytics calculations.
A student who has a 'Comparative Reporting' flag set to 'Don't Include' in TASS.web Student Admin > Student Records > Student Information > Students on the 'General' tab, will be included in analytics calculations but these statistics will not be available in Parent Lounge or Student Café.