
MER - Self Registration Tab (SU)
Overview
The ‘Self Registration’ tab in the Medical Setup program allows you to configure the features available in the student Illness Self Registration (ISR) system as well as automatic notifications when a student checks into sick bay.
The student Illness Self Registration (ISR) system allows students to sign themselves in and out of the school sickbay. It will add a student medical record when they sign in, and a discharge record when they sign out, via a kiosk device located in the sickbay. It is designed to work with a touch screen and a magnetic swipe card reader. A docket printer can also be used to generate illness slips.
It is accessed via the same URL as the school's ASR portal, i.e. https://[domain].tassweb/external/asr.
Once opened, there may be four button options, depending on which portals are set up at your school:
Attendance Self Registration (ASR)
Illness Self Registration (ISR)
Appointment Self Registration (APPSR)
Check In / Out (SCIO)
Automatic Notifications
When ticked, these checkboxes send notification templates to parents via email, alert notification or SMS when the Illness Record is created via Illness Self Registration.
When enabled notifications are sent to parents listed as 'Emergency Contacts' on the student's 'Addresses and Communication Rules' tab.
- An email will be sent to parents
Uses text and keywords from TASS.web System Admin > Utilities > Email Settings > System Email Template > Student in Sick Bay Notification to generate and send customised emails to the student's Emergency Contacts.
- An Alert will be created to Parent Lounge for the parents
Uses text and keywords from the 'SMS Details' field in TASS.web Student Admin > Medical Records > Setup Information > Medical Setup on the ‘Medical’ tab to generate and send customised Alert Notifications to the student's Emergency Contacts in Parent Lounge and the Parent Orbit app.
- An SMS will be sent to the parents
Uses text and keywords from the ‘SMS Details' field in TASS.web Student Admin > Medical Records > Setup Information > Medical Setup on the ‘Medical’ tab to generate and send customised SMS to the student's Emergency Contacts with SMS notifications enabled on their Parent Record on the 'Address’ tab.
To utilise this feature, the school must have an SMS Gateway set up in TASS.web System Admin > Utilities > API Gateway Maintenance > External APIs > SMS Gateway APIs.
Important!
SMS messages are not free. Your school will be charged a fee by your SMS provider for each message that is sent.
Your school must have an SMS Gateway configured to send SMS from this program. Refer to the SMS Notification Setup Checklist for details.
For more information on ASR, refer to How to Setup Student Self Registration Portals.
Process
The process for a student using the ISR system is as follows:
The student will be initially prompted to swipe their ID card. Alternatively, if the student does not have their ID card present, they can select 'I don't currently have my ID card with me' to authenticate using their school username and password.
Option: An email can be sent to the school's medical records contact with details of any failed login attempts (when configured).
Once authenticated, the student will be presented with a number of conditions from which they can select the reason for their sickbay visit. Some reasons can be configured to request further information from the student, e.g. If you allow a generic reason of 'Other' to be available, then you may want the student to type in more details of why they are visiting sickbay.
The reasons (or medical conditions) that are displayed in the ISR portal are set up and enabled by the school in TASS.web program Student Admin > Medical Records > Setup Information > Medical Setup on the 'Conditions' tab.
The condition buttons' order of appearance are set using 'ISR Sort Order'.
Requests for further information (comments) are set using the 'ISR Comment Flag'.
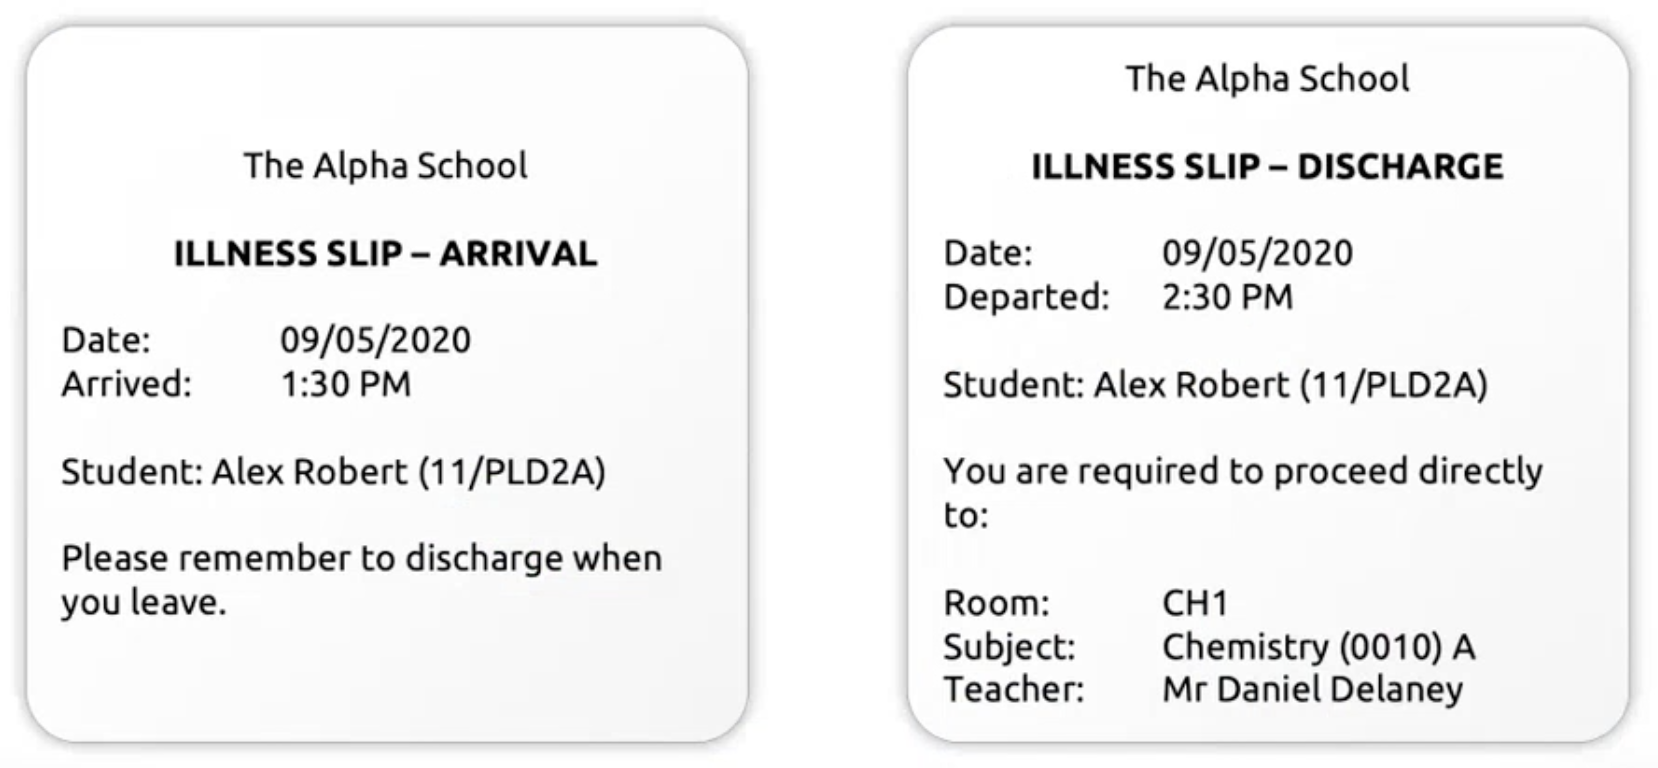
Tapping 'Confirm' will record the registration and print an 'Arrival' slip (with a timestamp).
Option: An email confirmation can be sent to the student (when configured).
When the student is well enough to discharge, they will need to return to the ISR portal and log in.
They will be presented with options to either discharge from their previous registered condition or register a new one.
Assuming they are discharging themselves, they tap on the 'Next' button. The student will then be presented their timetable on-screen, with their next class highlighted.
There are options to 'Cancel', 'Change' or 'Discharge Now'.
Tapping 'Discharge Now' will generate a discharge slip (with a timestamp)—it will also have the student's next class printed on it.
The 'Self Registration' tab is used to configure the 'Illness Self Registration' (ISR) portal.
Fields that require detailed information | |
|---|---|
Enable Illness Self Registration | Tick this checkbox to enable ISR. This can be changed only in 'Add' (New) or 'Edit' modes. |
Self Registration Password | When 'Enable Illness Self Registration' is ticked, this field becomes mandatory. The password can be a combination of characters, numbers and symbols up to 128 characters |
Student Identifier for ISR Logon | When 'Enable Illness Self Registration' is ticked, this field becomes mandatory. From the associated picklist select:
|
Tolerance for next period (Minutes) | When 'Enable Illness Self Registration' is ticked, this field becomes mandatory. Set a time tolerance for period end during which the student should proceed to their next class e.g. 10 minutes to the end of the class. Using the ISR Portal, when a student discharges themselves from sickbay, they will be presented with their timetable so that they know where to go next. If the student's current study period ends within the tolerance time set here, then the student will be asked to proceed directly to their next class (it is printed on their discharge slip 'You are required to proceed directly to:...'). |
Docket Printer | Select the Docket Printer used for printing Illness slips. The docket printer picklist will be populated with printers that have a device type of 'Network Docket Printer' or 'Epson Intelligent Docket Printer' as configured in TASS.web System Admin > Utilities > Printer Definitions. |
Email details of failed login attempts | Tick this checkbox to send an automated email to the school's medical records contact with details of any failed login attempts. The medical records contact email is defined on the 'Medical' tab on (this) the Medical Setup program. Example To: <
|
Email Illness confirmations to students | Tick this checkbox to allow an illness confirmation email to be sent to the student. Example To: < Message: This message is to confirm that you used the Illness Self Registration system today to enter an illness record. The details of the illness record are: Medical Condition: Injury |