
Resources
Overview
Resources can be digital files such as PDF documents, PowerPoint® presentations, Word® documents, etc.
Resources can be:
Assigned to a class in Staff Kiosk programs:
Assessment > Learning Objects (Maintain & Assign)
Homepage > My Timetable. Use the Hamburger menu and select 'Create Resource(s)',
Rollcall > Class Rollcall. Use the Hamburger menu and select 'Create Resource(s)',
Assessment > My Classes.
Assigned to a custom group of students in Staff Kiosk program:
Assessment > Learning Objects (Maintain & Assign).
Attached to an Activity in Staff Kiosk programs:
Assessment > Learning Objects (Maintain & Assign).
Homepage > My Timetable. Use the Hamburger menu and select 'Create Activity'.
Rollcall > Class Rollcall. Use the Hamburger menu and select 'Create Activity'.
An example of a Resource that is attached to an Activity could be a rubric that outlines to the students what they need to do to achieve a certain mark.
Attached to a Question (using Staff Kiosk Assessment > Learning Objects (Maintain & Assign)).
Attached to a Blog (using Staff Kiosk Assessment > Blogs).
Create a Resource Screen
Learning Object Repository Detail
Subject Area | The Subject Area is important as it will determine the second level in the Learning Object Repository that this Learning Object will be filed under. Example 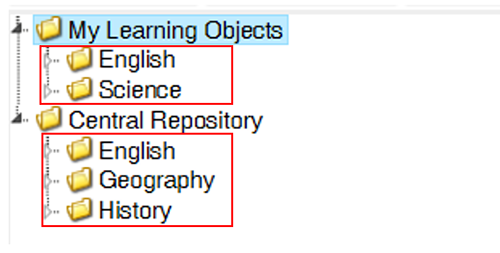 Subject Areas are set up in TASS.web Student Admin > Student Records > Setup Information > Student Records Setup on the 'Subject Areas' tab. |
Add to My Learning Objects OR | This field determines the first/top level folder in the Learning Object Repository that this Learning Object will be filed under. Example 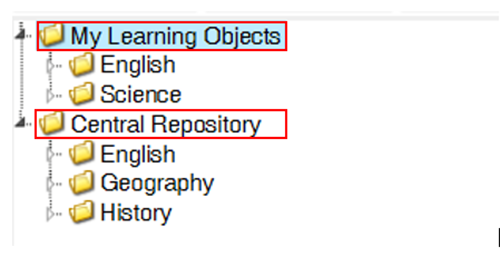 This Learning Object Repository is best described as a filing cabinet for Learning Objects. Every Learning Object that you create by using either Staff Kiosk Assessment will be filed in this repository. The repository is divided into:
Add to My Learning Objects By selecting this option, this Learning Object will be added to your personal 'My Learning Objects' repository. It will not be added to the school's Central Repository for sharing with other teachers. Add to Central Repository By selecting this option, this Learning Object will be added to the school's Central Repository under the Subject Area you have chosen. This Learning Object will be visible to all teachers in Staff Kiosk Assessment > Learning Objects (Maintain & Assign). Where this field is disabled, the following message will display “Central Repository has not been set up for the Subject Area that you have chosen”. Administrator Note: You can determine the availability and default for this button by using TASS.web Student Admin > Student Records > Setup Information > Student Records Setup on the 'Subjects Areas' tab. This field will be the default option where a Central Repository has been set up for the Subject Area that the teacher has chosen and the school has indicated that content created for this Subject Area, should be added to the Central Repository. |
Add to Central Repository | This field determines the first/top level folder in the Learning Object Repository that this Learning Object will be filed under. Example This Learning Object Repository is best described as a filing cabinet for Learning Objects. Every Learning Object that you create by using either Staff Kiosk Assessment will be filed in this repository. The repository is divided into:
Add to My Learning Objects By selecting this option, this Learning Object will be added to your personal 'My Learning Objects' repository. It will not be added to the school's Central Repository for sharing with other teachers. Add to Central Repository By selecting this option, this Learning Object will be added to the school's Central Repository under the Subject Area you have chosen. This Learning Object will be visible to all teachers in Staff Kiosk Assessment > Learning Objects (Maintain & Assign). Where this field is disabled, the following message will display “Central Repository has not been set up for the Subject Area that you have chosen”. Administrator Note: You can determine the availability and default for this button by using TASS.web Student Admin > Student Records > Setup Information > Student Records Setup on the 'Subjects Areas' tab. This field will be the default option where a Central Repository has been set up for the Subject Area that the teacher has chosen and the school has indicated that content created for this Subject Area, should be added to the Central Repository. |
Year Group | This is important as it will determine the third level in the Learning Object Repository that this Learning Object will be filed under. Example 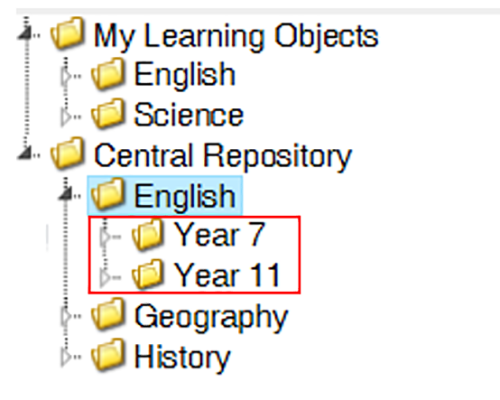 |
Topic | This is important as it will determine the fourth level in the Learning Object Repository that this Learning Object will be filed under. Example 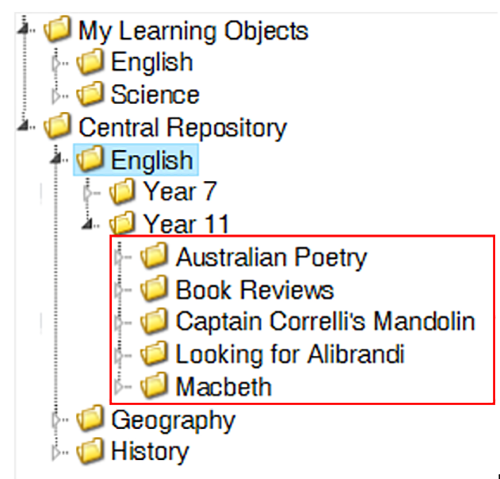 A topic is best described as a unit of work. For example in English, students may be studying a topic of Poetry. If you have chosen to add this Learning Object in the Central Repository, this field will provide a list of Topics that already exist in the Central Repository for the Subject Area you have selected. Where you have chosen to file this Learning Object in 'My Learning Objects', this field will provide a list of Topics that you have previously created. Choose from an existing Topic or alternatively, create a new Topic using the 'Enter a New Topic' field. Your school may not allow new Topics to be created in the Central Repository using this screen. If this is the case, and you require a new Topic, please see your Administrator. There is an option to ‘Allow Central Repository Topic creation in Learning Objects’ in Staff Kiosk Assessment > Parameters (Setup). |
OR Enter a New Topic | Use this field to create a new Topic; the text that you enter here will create a new folder in the Learning Object Repository under the Subject Area and Year Group you have selected above. The system will not duplicate a Topic if it already exists in the repository. |
Resource Details
Source | |
Resource Name | Enter the name of your Resource, e.g. 'Book Review Rubric'. The 'Resource Name' will appear in the Learning Objects Repository under the 'Subject Area', 'Year Group' and 'Topic' you have selected above. |
Description | Enter a description for your Resource. For example, 'Rubric that outlines to the students what they need to do to achieve a certain mark'. Although the description is optional, we recommend that it be populated. The text that you enter here can be used as search criteria when looking for Resources in Staff Kiosk Assessment > Learning Objects (Maintain & Assign). |
Resource Type | Select the type of Resource you are creating. For example, a PDF, a Powerpoint®, a Word® document would be a 'Document'. Document, Image, Flash, Audio and Video Click on the 'Choose' button in the 'Attachment' field and navigate to select the file you wish to upload. Important! On certain devices such as iPads, Flash files may not be supported. Therefore, if students are likely to access this Resource using one of these devices, then it is recommended to use an alternative file type.
Enter a Website address into the 'URL' field. Websites must be prefixed with one of the following:
The program will automatically prefix your URL with |
What do you want to do next?
Create another Resource for the same Subject Area, Year and Topic | Once your Resource has been saved, the 'Create a Resource' screen will refresh. The information you entered into the 'Subject Area', 'Year Group' and 'Topic' field for this Resource will be displayed in the new screen. |
Assign this Resource to a class now | Once your Resource has been saved, you will be redirected to the 'Class Assign Resource' screen. Click here for further information on Class Assigning Resources. |
Assign this Resource to a custom group now | Once your Resource has been saved, you will be redirected to the 'Custom Assign Resource' screen. Click here for further information on Custom Assigning Resources. |
Create a Question using this Resource for the same Subject Area, Year and Topic | Once your Resource has been saved, you will be redirected to Step 1 of the 'Question Builder'. Your Resource will be automatically attached to the Question in the 'Selected Resources' column, in Step 3 of the 'Question Builder'. |
Create an Activity using this Resource for the same Subject Area, Year and Topic | Once your Resource has been saved, you will be redirected to Step 1 of the 'Activity Builder'. Your Resource will be automatically attached to the Activity in the 'Selected Resources' column, in Step 2 of the 'Activity Builder'. |
Save this Resource and return to the Learning Objects screen | Once your Resource has been saved, you will be redirected to the 'Learning Objects' screen. The Resource that you have just created will be selected in the Learning Object Repository. |
Click the 'Save' button to create your Resource and complete the action you selected in the 'What do you want to do next?' section of the screen.