
Maintaining Your Appointment Schedule
Overview
To maintain your appointment schedule in the Staff Kiosk Staff > Parent Teacher Interviews program, click the 'pencil' icon in the Action column of the ‘Parent Teacher Interviews List Screen’.
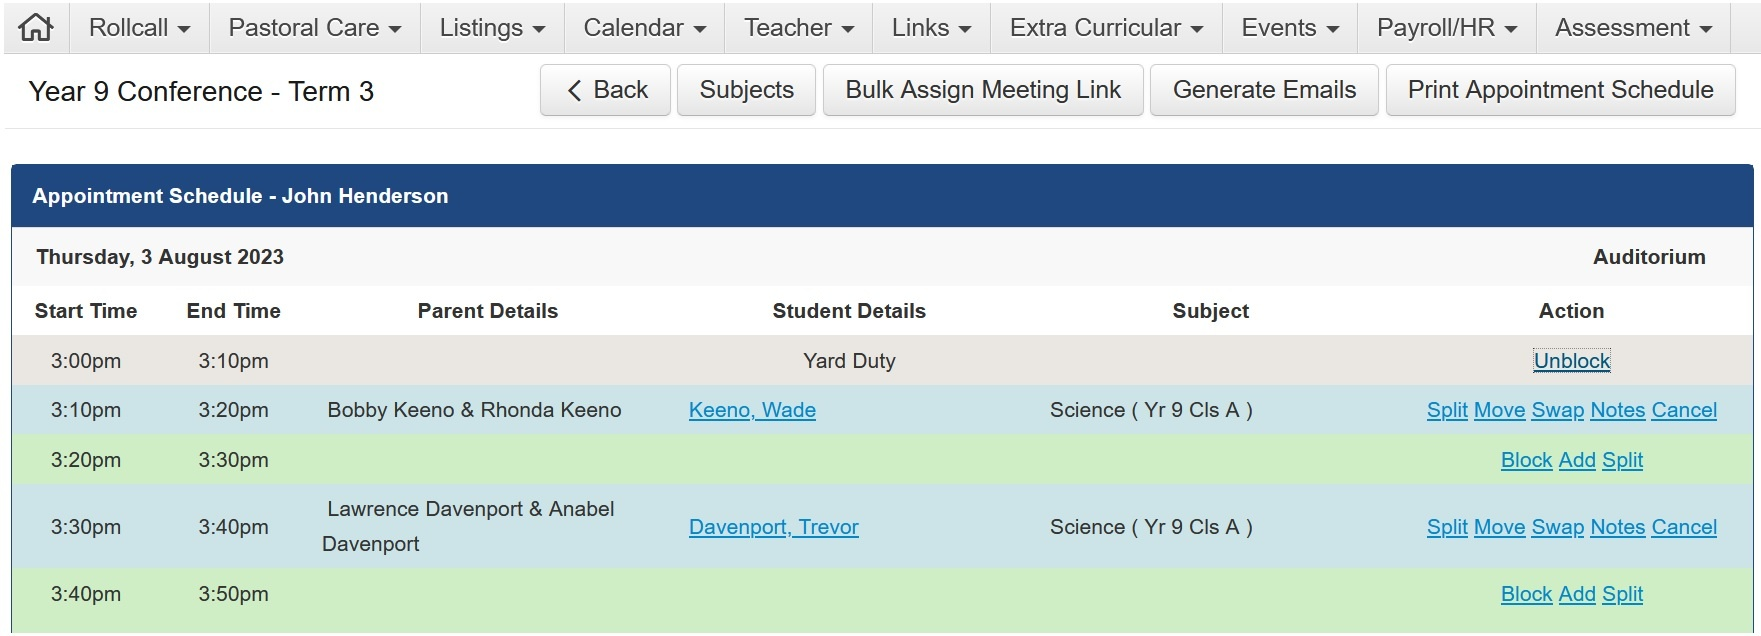
Example
Parent Names
The Parent Name displayed in the Staff Kiosk is derived from the Parent 1 and Parent 2 fields on the 'General' tab of the Parent Record. This is the default name prefilled into the appointment; however, staff and parents are able to adjust the name of the participating parents at booking time. The changes made to the parents' name/s in relation to the conference are only retained in this conference.
Conference Actions
Button | Details |
|---|---|
Subjects | Enter the Subject priority, request interviews with specific parents, or delete the Subject from the conference. For more information, refer to the TASS Knowledge Base article on ‘Maintaining Your Subject Preferences.' |
Bulk Assign Meeting Link | Set the meeting link for appointments. Like with any other grid program in TASS, you can fill down or drag from the lower right corner to speed up data entry. Teachers can edit or delete individual Online Meeting Links by clicking 'Notes' in the Action column of the Appointment Schedule screen. |
Generate Emails | The 'Generate Emails' button presents the standard email modal allowing you to email those parents and students that you have an appointment with. You have the option to use a predefined template or create your own email. Use the ‘Email Template’ dropdown to select predefined templates created by your school using TASS.web System Admin > Utilities > Email Settings on the ‘Email Templates’ tab. Templates must be assigned to the ‘Parent Teacher Interview’ category to appear in the dropdown list. The parent email addresses used for this correspondence are the ‘Email 1’ and ‘Email 2’ from the parent record in TASS.web Student Admin > Parent Records > Parent Information > Parents on the ‘Address’ tab. For more information, refer to the TASS Knowledge Base article on ‘How do I send email communications for Parent Teacher Interviews?’ |
Print Appointment Schedule | Print your appointment schedule. |
Appointment Actions
Action | Details | ||||||
|---|---|---|---|---|---|---|---|
Block | Select ‘Block’ to make yourself unavailable for an appointment slot. You can nominate how many appointments to block by using the 'Block Appointments To' field and entering the reason for blocking them. You can also reverse this process for this appointment by clicking the 'Unblock' link from the 'Appointment Schedule' screen. | ||||||
Unblock | Select ‘Unblock’ to become available for an appointment slot after blocking it. | ||||||
Add | Select ‘Add’ to manually enter an appointment. If, for example, a parent has contacted you directly. Use the ‘Magnifying Glass’ icon to search for the student. Once selected, the student and parent details will be displayed. If the student is part of a split family arrangement, there may be more than one parent record linked to this student. A 'Split Family Access Number' field will appear where this happens. Select the parent record for the appointment from the drop-down list. The parent data will then be shown. You can change the 'Parent Attending / Name', 'Parent Email' and 'Parent Mobile Phone' fields if the parent has advised that they are different for this appointment. Select the ‘Subject Code’ for the appointment. Select ‘Save’ to save the appointment. When a new appointment is added, parents are not automatically notified. Use the ‘Generate Emails’ feature to inform parents about the appointment. | ||||||
Split | Select ‘Split’ to split this appointment into two. For example, you may be oversubscribed and decide to split an appointment slot into two to see more parents. If the appointments were 10 minutes long, you could split them into two 5-minute appointments. Appointments shorter than the specified 'Minimum Appointment Length' for this conference cannot be split. Additionally, you cannot split an appointment with an odd duration, as it cannot be evenly divided. You can also reverse this process for this appointment by clicking the 'Join' link from the 'Appointment Schedule' screen. | ||||||
Join | Select ‘Join’ to rejoin a previously split appointment. Two standard (non-split) appointments cannot be joined. | ||||||
Move | Select ‘Move’ to move an appointment to another available time slot. First, select a new appointment time from the 'Move Appointment To' field. Only available appointment times will be displayed. Next, choose how you would like to notify the parent of the appointment change:
When ‘Email Parent’ is selected, an email is sent to ‘Email 1’ and ‘Email 2’ from the parent record in TASS.web Student Admin > Parent Records > Parent Information > Parents on the ‘Address’ tab. When ‘SMS Parent’ is selected, an SMS message is sent to ‘Mobile Phone 1' and ‘Mobile Phone 2’ from the parent record in TASS.web Student Admin > Parent Records > Parent Information > Parents on the ‘Address’ tab when the ‘SMS’ checkbox is selected for each mobile phone number and the SMS Gateway API is enabled in TASS.web System Admin > Utilities > API Gateway Maintenance on the ‘External APIs’ tab. Important! SMS messages are not free. Your school will be charged a fee by your SMS provider for each message that is sent. Your school must have an SMS Gateway configured to use this feature. Refer to the SMS Notification Setup Checklist for details.
| ||||||
Swap | Select ‘Swap’ to swap appointments with another parent. First, use the 'Swap Appointment With' field to select the parent booking with which you would like to swap this appointment. Next, choose how you would like to notify the parent of the appointment change:
When ‘Email Parent’ is selected, an email is sent to ‘Email 1’ and ‘Email 2’ from the parent record in TASS.web Student Admin > Parent Records > Parent Information > Parents on the ‘Address’ tab. When ‘SMS Parent’ is selected, an SMS message is sent to ‘Mobile Phone 1' and ‘Mobile Phone 2’ from the parent record in TASS.web Student Admin > Parent Records > Parent Information > Parents on the ‘Address’ tab when the ‘SMS’ checkbox is selected for each mobile phone number and the SMS Gateway API is enabled in TASS.web System Admin > Utilities > API Gateway Maintenance on the ‘External APIs’ tab. Important! SMS messages are not free. Your school will be charged a fee by your SMS provider for each message that is sent. Your school must have an SMS Gateway configured to use this feature. Refer to the SMS Notification Setup Checklist for details.
| ||||||
Cancel | Cancel an appointment. Choose how you would like to notify the parent of the appointment change:
When ‘Email Parent’ is selected, an email is sent to ‘Email 1’ and ‘Email 2’ from the parent record in TASS.web Student Admin > Parent Records > Parent Information > Parents on the ‘Address’ tab. When ‘SMS Parent’ is selected, an SMS message is sent to ‘Mobile Phone 1' and ‘Mobile Phone 2’ from the parent record in TASS.web Student Admin > Parent Records > Parent Information > Parents on the ‘Address’ tab when the ‘SMS’ checkbox is selected for each mobile phone number and the SMS Gateway API is enabled in TASS.web System Admin > Utilities > API Gateway Maintenance on the ‘External APIs’ tab. Important! SMS messages are not free. Your school will be charged a fee by your SMS provider for each message that is sent. Your school must have an SMS Gateway configured to use this feature. Refer to the SMS Notification Setup Checklist for details.
| ||||||
Notes | Select ‘Notes’ to enter notes against appointments prior to, during and after an interview. Parent Comment: This section displays any notes that a parent may have entered when requesting or booking an appointment through Parent Lounge. Teacher Note: Internal notes that are not visible to parents. Teacher Note Attachment: Click ‘Choose File’ to add an attachment. Appointment Note: Notes that can be shared with parents via email. Appointment Note Attachment: Click ‘Choose File’ to add an attachment. Meeting URL: If an Online Meeting URL has been defined, it displays here. Click the ‘Join Online Meeting’ button to access this URL and join the meeting. Examples of how notes could be used:
Notes can be viewed/printed from the following locations:
| ||||||
Join Online Meeting | If a URL for an online meeting is configured, a 'Join Online Meeting' link shows. Click this link to join the online meeting with the parent. There are two methods for bulk assigning the URL for the Online Meeting Link:
Schools need to use their own online meeting software to obtain the 'Online Meeting Link' as TASS.web does not provide this function. |