
GL - General Ledger Setup (SU)
Overview
The TASS.web General Ledger ‘General Ledger Setup’ program is used to set up:
GL Structure
GL Segments
Journal Types
Reporting Codes
Group Codes
Tax Codes
Bank Accounts
The GL module parameters
Bank Feed Mappings
The Initial Setup process needs to be completed before any financial transactions are entered into the system.
This program displays the following tabs in a multi-tab layout: 'GL Structure', 'Segments', 'Journal Types', 'Parameters', 'Reporting Codes', 'Group Codes', 'Tax Codes', and 'Bank Accounts'.
The program will operate in a viewing-only mode until you select the 'Edit' icon at the top of the screen.
Important!
Be aware that ALL records attached to these fields will be affected if changes are made to an existing setup. It is not a good idea to change these parameters unless you are 100% sure of the outcome.
Initial Setup
Important!
For the initial setup, you will automatically be placed in 'Add' mode. When initially setting up your General Ledger, it is suggested that the steps from the General Ledger Setup Checklist (Part 1 - Initial Setup) be completed in the order specified.
GL Structure Tab
The ‘GL Structure’ tab is used for the initial setup and subsequent review of your GL structure.
The structure defines the makeup of your GL Account codes and is user-definable and can contain up to 18 characters. A filler uses up a character.
Important!
Once this structure has been defined, alterations are not possible.
The recommended GL account structure is made up of four components :
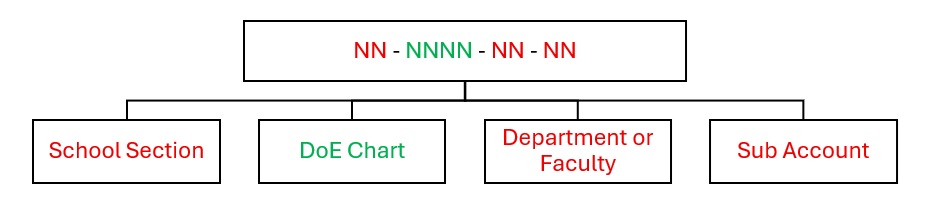
Using this structure as an example, the red components are called 'Segments', the green component is the 'Chart' and the black components are 'Fillers'.
When deciding on the structure for your GL accounts, it is important to consider scalability and future growth. The DoE chart of accounts prescribes 'Chart' numbering for ranges of Income, Expense, and Balance Sheet accounts.
Using the example above the GL Structure would be:
Start Position | Length | Description | Default text | Type | Department Consolidation |
|---|---|---|---|---|---|
1 | 2 | School Section | Segment | Yes | |
3 | 1 | - | Filler | ||
4 | 4 | DoE Chart | Chart | ||
8 | 1 | - | Filler | ||
9 | 2 | Department or Faculty | Segment | Yes | |
11 | 1 | - | Filler | ||
12 | 2 | Sub Account | Segment | No |
Fields that require detailed information | |
|---|---|
Start Position | The position within the 18-character GL code structure at which each 'Chart', 'Filler' or 'Segment' element begins. This will be automatically determined by the system. |
Length | The length (field-width) of each of the 'Chart', 'Filler' or 'Segment' elements within the 18-character limit, e.g. The 'Chart' component is usually 4 characters long. |
Description | This is the detailed description for each component of your GL structure. Refer to the table above for the descriptions that would be entered for the recommended chart structure. The descriptions that are entered here for 'Segments' will be displayed extensively throughout the module in filter screens. |
Default Text | You should only enter the default text for 'Fillers'. You must use a hyphen (-). These will become visible in all account code entry and display screens. |
Type | The type of element represented by this component of the GL code structure. There are three possible elements:
Important! Only on 'C' type may exist with the 18-character structure.
|
Department Consolidation | The setup here is used by Staff Kiosk Staff > Budgets. Segments of your chart that are to be used in departmental consolidation will be set to 'Yes'. |
Important!
If setting up your own GL structure it is desirable to allow for future scalability within this structure as once defined, alterations to this structure are not possible.
Segments Tab
The ‘Segments’ tab is used to add the dissections that will become available for each component within the GL structure that has been defined as a 'Segment' on the 'GL Structure' tab in this program
Using the example detailed on the 'GL Structure' tab, the sections would be:
School Section.
Department or Faculty.
Sub Account.
At least one dissection code must be set up for every segment component within the GL structure.
To 'Add' or 'Edit' a segment, click on the 'Arrow' icon displayed to the right of the relevant row.
The 'Segment Codes' screen that is now displayed defaults to 'Add' mode, with the cursor situated in the code field. If you wish to 'Edit' or 'Delete' a segment, select the appropriate link.
After making your required changes, click the 'Save' button to commit your changes to the TASS.web database. Alternatively, select the 'Cancel' button to return to the previous screen without saving any changes.
Important!
If a segment is in use (defined against an account code) it may not be deleted.
Fields that require detailed information | |||||||||||||||||||||||||||||||||||||||||||||||||
|---|---|---|---|---|---|---|---|---|---|---|---|---|---|---|---|---|---|---|---|---|---|---|---|---|---|---|---|---|---|---|---|---|---|---|---|---|---|---|---|---|---|---|---|---|---|---|---|---|---|
Code | Generally, this is a numeric code, however, alphabetic codes are acceptable. The length of the code must match the number of characters defined for the segment. Numeric codes will facilitate faster data entry. | ||||||||||||||||||||||||||||||||||||||||||||||||
Description | A detailed description for this segment dissection. Using the recommended GL structure example (refer to figure 1) 'Codes' and 'Descriptions' could be:
Segment dissections are used by many search filters on the various screens and reports within the TASS.web general ledger, and should consequently be carefully considered. | ||||||||||||||||||||||||||||||||||||||||||||||||
Group Code | The adding of a group code against a segment code is optional. Group codes are defined in this program (General Ledger Setup) on the 'Group Codes' tab. | ||||||||||||||||||||||||||||||||||||||||||||||||
Journal Types Tab
Journal types are used comprehensively across the TASS.web financial modules to facilitate the easy tracking of account ledgers. These journal types can represent the subsidiary ledger from which the journal originated, and are attached to each financial transaction generated from that subsidiary ledger.
There are also journal types for transactions that originate within the GL, such as General Journals, Recurring Journals, Cash Book Journals etc.
The system comes pre-loaded with the following journal types in your default company:
Code | Description | GL Flag |
|---|---|---|
ADJ | Adjustments Journal | N |
CB | Bank Transfers Journal | N |
CBJ | Cashbook Journal | Y |
COS | Cost of Sales Journal | N |
CP | Cash Payments Journal | N |
CR | Cash Receipts Journal | N |
CSJ | Commercial Sales Journal | N |
DEJ | Department Expense | N |
FA | Fixed Assets | N |
FJ | Fees Journal | N |
GJ | General Journal | Y |
PJ | Purchasing Journal | N |
REF | Deposit Refund Journal | N |
RJ | Recurring Journal | Y |
SJ | Shop Sales Journal | N |
PAY | Payroll Journal | N |
Important!
The only journal types that should be set as being editable in the GL are those above with a 'GL Flag = Y'. Do not change the flags for other journal types.
Adding Journal Types
To add a new journal type, click the 'New Journal Type' button to display the 'Journal Types' screen.
When satisfied with your entry, click on the 'Save' button to commit your changes to the TASS.web database.
Viewing and Editing Journal Types
To 'View', 'Edit' or 'Delete' a journal type, click on the associated link. The 'Journal Types' screen is then populated with detail of your chosen selection.
When satisfied with your entry, click on the 'Update' button to commit your changes to the TASS.web database.
Fields that require detailed information | |
|---|---|
Code | The journal code used by the system to maintain uniqueness. |
Description | Unique description for this journal code. |
GL Flag | Yes/No flag, which indicates whether 'manual' journals can be entered or edited using this journal type in TASS.web Finance > General Ledger > Account & Journal Information > Journals. Important! The only journal types that should be set as being editable in the GL are General, Recurring and Cash Book. Do not change the flags for other journal types. |
You may also choose to delete a journal type. Click the 'Delete' link, followed by the 'Delete' button to delete the chosen journal type from your TASS.web database. You will then be prompted with a message confirming your choice.
Parameters Tab
The 'Parameters' tab is where the parameters and system defaults for your school or company's general ledger module are defined.
Important!
After the initial set up of these parameters, care should be exercised if any of the settings are to be changed as this can affect the operation of the entire TASS.web financial module.
Fields that require detailed information | |
|---|---|
General Journal Code | Code for General Journal transactions previously defined in General Ledger Setup (this program) on the 'Journal Types' tab. |
Cash Book Installed | Yes/No flag indicating whether the cash book is installed and operational throughout TASS.web. If the cash book is installed all cash transactions must take place through the Cashbook. Important! This option should remain checked except in the initial GL setup when the GL opening balances are being loaded (see section 'Initial Setup' above). |
Recurring Journal Code | Code for Recurring Journal transactions previously defined in General Ledger Setup (this program) on the 'Journal Types' tab. |
Use Control Totals | Yes / No flag which when checked, indicates that control totals must be used when entering journal batches in TASS.web Finance > General Ledger > Account & Journal Information > Journals. Important! If set to 'Yes', the control totals must equal the debit and credit amounts within that batch before posting can occur. In most situations, this would be set to 'No'. |
Cashbook Journal Code | Code for Cashbook Journal transactions previously defined in General Ledger Setup (this program) on the 'Journal Types' tab. |
Inter-Company Journal Codes | This is a conditional field and will only be active where the current company is an ‘Included Company’. When active it will be a single select picklist populated with the journal codes set up for GL use. This tab will only be displayed where the current company is an ‘Included Company’. Use TASS.web Finance > General Ledger > GL – Setup Information > Company Information. Click ‘New Company’ and under the ‘Enterprise’ tab to create an ‘Included Company’. The ‘Enterprise’ tab is only available if TASS.web is ‘Enterprise’ enabled. |
Auto Post Sub-Ledger Journals | This will be unchecked by default. Tick this box if you want automatic posting of journals generated from sub-ledgers. |
Post to Suspense | Yes/No flag which when checked, indicates that the suspense account is to be used for any errors (such as undefined GL account codes) encountered during posting. |
Display Style | The selections available here allow account balances to be displayed in either of two formats: 'Show DR or CR' indicates that the letters 'DR' or 'CR' are to be displayed after the amount. 'Show credits with minus sign' indicates a minus (-) sign is to be displayed before the amount for any account holding a credit balance. |
Suspense Account | Suspense (temporary holding) Account Code previously defined in TASS.web Finance> General Ledger > Account & Journal Info > Accounts. A 'Lookup' (binoculars) icon is available at the right of this field. Select this icon to display the 'GL Account Lookup' screen, which will enable you to search for the suspense account using criteria such as 'Account Code', 'Description', 'Type' or 'Tax Code'. |
Last Journal Number | A system maintained number for the last journal batch created. |
Last Journal Posting | A system maintained date of the last journal batch posted. |
Budget Title | A budget may be defined for all or a subsection of your GL accounts, and a distinctive title for the budget set up here. |
Locked | Yes/No field which when checked will disable any alterations being made to a pre-defined budget. If you should wish to edit this budget through either TASS.web Finance > General Ledger > Account & Journal Information > Budgets or TASS.web Finance > General Ledger > Account & Journal Information > Budget Upload, this entry must be unchecked first. |
Reporting Codes Tab
This program is used to maintain reporting codes that are used for:
The consolidation and/or separation of General Ledger accounts on your 'Balance Sheet' and the 'Income Statement'.
Defining 'Groups' and 'Line Items' on the 'Cash Flow Statement'.
Defining 'Key Financial Data' groups for the 'GL Account Summary'.
There are nine reporting codes available. Codes 2 to 9 are reserved for specific purposes.
This table shows the use of reporting codes in General Ledger:
Rep Code | Reporting Code/Description | Income Statement | Balance Sheet | Cash Flow Statement | GL Account Summary |
|---|---|---|---|---|---|
1 | School definable | Could be used for alternative grouping and/or consolidation. Also could be used for the 2nd level of additional consolidation. | Could be used for alternative grouping and/or consolidation. Also could be used for the 2nd level of additional consolidation. | Not used. | Not used. |
2 | Financial Statements – Separation Codes | Separation (optional), e.g. Operating and Non-Operating Areas. | Separation, e.g. Current and Non-Current. | Not used. | Not used. |
3 | Financial Statements – Grouping/Consolidation Codes | Groupings and Consolidation. | Another level of separation /grouping, e.g. Cash and Prepayments. (Refer to online help for example.) | Not used. | Not used. |
4 | Key Financial Data | Not used. | Not used. | Not used. | Group Key Financial Data, e.g. Cash, Debtors, Creditors, Loans, CAP Ex. |
5 | Trading Entities | To group accounts for trading entities, e.g. Bookshop, Uniform Shop etc. | Not used. | Not used. | Not used. |
6 | Financial Statements - Additional Consolidation | Additional Consolidation. | Additional Consolidation. | Not used. | Not used. |
7 | Cash Flow Statement - Grouping Codes | Not used. | Not used. | Grouping. | Not used. |
8 | Cash Flow Statement - Cash Inflow Codes | Not used. | Not used. | Cash Inflows. | Not used. |
9 | Cash Flow Statement - Cash Outflow Codes | Not used. | Not used. | Cash Outflows. | Not used. |
The codes and descriptions that you enter against each reporting code will depend on your requirements within the various financial reports.
Reporting codes are sorted based on their code. Therefore, in an area where you may have a large number of headings, it is a good idea to increment the codes in 5's, e.g. E05, E10, E15, E20 etc.
However, here are some examples that may be useful:
Reporting Code 2 – Financial Statements – Separation Codes
Code | Description |
|---|---|
010 | Operating |
020 | Non-Operating |
030 | Current |
040 | Non-Current |
Reporting Code 3 – Financial Statements – Grouping/Consolidation Codes
Code | Description |
|---|---|
A10 | Cash |
A20 | Debtors and Prepayments |
A30 | Property Plant and Equipment etc |
E10 | Tuition Salaries |
E20 | Other Tuition Expenses |
E30 | Administration Salaries |
E40 | Other Administration Expenses (etc) |
I10 | Tuition Fees |
I20 | Boarding Fees |
I30 | Government Grants |
I40 | Sundry Income (etc) |
Reporting Code 4 – Key Financial Data
Code | Description |
|---|---|
010 | Cash |
020 | Debtors |
030 | Creditors |
040 | Loans |
050 | Capital Expenditure |
Reporting Code 5 – Trading Entities
Code | Description |
|---|---|
010 | Book Shop |
020 | Stationery Shop |
030 | Uniform Shop |
040 | Boarders Shop |
Reporting Code 6 – Financial Statements - Additional Consolidation
Code | Description |
|---|---|
A10 etc | Codes are totally school definable but could be used to group certain Asset accounts on the Balance Sheet |
E10 etc | Codes are totally school definable but could be used to group certain Expense accounts on the Income Statement |
I10 etc | Codes are totally school definable but could be used to group certain Income accounts on the Income Statement |
L10 etc | Codes are totally school definable but could be used to group certain Liability accounts on the Balance Sheet |
Reporting Code 7 – Cash Flow Statement - Grouping Codes
Code | Description |
|---|---|
010 | Cash Flows from Operating Activities |
020 | Cash Flows from Investing Activities |
030 | Cash Flows from Financing Activities |
Reporting Code 8 – Cash Flow Statement - Cash Inflow Codes
Code | Description |
|---|---|
010 | Receipts from Fees |
020 | Receipts from government grants |
030 | Receipts other |
040 | Proceeds from sale of property, plant and equipment |
050 | Proceeds from long term borrowings |
Reporting Code 9 – Cash Flow Statement - Cash Outflow Codes
Code | Description |
|---|---|
010 | Payments to employees |
020 | Payments to suppliers |
030 | Interest paid |
040 | Payments for land, buildings, improvements, plant & equip |
050 | Repayment of long term borrowings |
060 | Principal repayments under finance leases |
These reporting codes are then attached to the GL account using TASS.web Finance > General Ledger > Account & Journal Info > Accounts Grid Entry or TASS.web Finance > General Ledger > Account & Journal Info > Accounts.
To 'Add' or 'Edit' a reporting code heading you need to click the 'Edit' button at the top of the screen first then click on the next to the appropriate reporting code.
The 'Reporting Code' screen that is now displayed defaults to 'Add' mode, with the cursor situated in the code field.
If you wish to 'Edit' or 'Delete' a reporting code, select the appropriate link.
In 'Add' mode click on the 'Create' button to commit your changes to the TASS.web database.
If in 'Edit' mode, make your required changes and select the 'Save' button.
Fields that require detailed information | |
|---|---|
Description | This description will appear on the financial report as a heading. |
For detailed instructions on how to utilise these reporting codes on your financial statements, refer to 'Income Statement', 'Balance Sheet' and 'Cash Flow Statement'.
Group Codes Tab
This program is used to 'Add', 'View', 'Edit', or 'Delete' group codes.
Group Codes can be set up and attached to:
Individual GL account segments using General Ledger Setup (this program) on the 'Segments' tab.
Individual GL accounts using TASS.web Finance > General Ledger > Account & Journal Information > Accounts Grid Entry.
Example
One suggested use for the group code is to store the DoE Financial Questionnaire (FQ) item codes against individual General Ledger accounts. Once this has been done, you can run an account list grouped by the item codes, showing account balances and subtotals for each defined group code.
For more information on using group codes to assist with the DoE Questionnaire, refer to 'DoE Financial Questionnaire Preparation Checklist'.
Adding Group Codes
To add a new group code, click the 'New Group Code' button to display the 'Group Codes' screen.
When satisfied with your entry, click on the 'Save' button to commit your changes to the TASS.web database.
Viewing and Editing Group Codes
To 'View', 'Edit' or 'Delete' a group code, click on the associated link. The 'Group Codes' screen is then populated with detail of your chosen selection.
When satisfied with your entry, click on the 'Update' button to commit your changes to the TASS.web database.
Fields that require detailed information | |
|---|---|
Code | Group code used by the system to maintain uniqueness. |
Description | A detailed description of this group code. |
Tax Codes Tab
This is a critical GST configuration. Please read the following carefully.
It is important that you fully understand your school's BAS reporting requirements before Tax Codes are set up. The Alpha School System recommends that you seek independent GST advice to determine the BAS reporting requirements that are applicable to your school.
Periodic (monthly or quarterly) preparation and lodging of a BAS is a major feature of the Australian tax system. TASS contains reports, which provide the information necessary to complete your BAS. The level of detail provided by these reports is determined by the tax codes, which have been set up and used in TASS. Therefore, you need to start at the BAS level and look at each field in the G1 to G20 range then set up tax codes accordingly.
The following set of tax codes should be regarded as the most likely set that would typically be required. However, the final choice of Tax Codes will depend on factors at each school as well as the BAS completion method to be adopted:
Tax Code | Description | % | Where this code is used in TASS.web |
|---|---|---|---|
TS | Taxable Supply. | 10 | In Parent Accounts & School Shop |
ITS | Input Taxed Supply. | 0 | In Parent Accounts & School Shop |
EX | GST Free. | 0 | In Parent Accounts, School Shop & AP |
NOT | Not Reportable. | 0 | In Parent Accounts, School Shop & AP |
AC | Cred. Acquisitions – Capital. | 10 | In AP |
AO | Cred. Acquisitions – Other. | 10 | In AP |
ITA | Input Taxed Acquisition. | 0 | In AP |
WHT | 'No ABN' Withholding Tax. | 0 | In AP |
Linking Tax Codes to BAS Fields
For Supplies made:
TS | Taxable Supply | G1 |
ITS | Input Taxed Supply | G4 & G1 |
EX | GST Free | G3 & G1 |
NOT | No Tax | Not reported on BAS |
For Acquisitions made:
AC | Cred. Acquisitions – Capital | G10 |
AO | Cred. Acquisitions – Other | G11 |
ITA | Input Taxed Acquisition | G11 |
EX | GST Free | G11 |
WHT | 'No ABN' Withholding Tax | G11 |
NOT | No Tax | Not reported on BAS |
Adding Tax Codes
To add a new tax code, click the 'New Tax Code' button to display the 'Tax Codes' screen.
When satisfied with your entry, click on the 'Save' button to commit your changes to the TASS.web database.
Viewing and Editing Tax Codes
To 'View', 'Edit' or 'Delete' a tax code, click on the associated link. The 'Tax Codes' screen is then populated with detail of your chosen selection.
When satisfied with your entry, click on the 'Update' button to commit your changes to the TASS.web database.
Fields that require further explanation | |
|---|---|
Code | Refer to the table above for suggested tax codes. These are suggestions only and should be considered carefully before being adopted. |
Description | Refer to the table above for suggested tax codes descriptions. These are suggestions only and should be considered carefully before being adopted. |
Tax Percentage | Refer to the table above for suggested tax codes percentages. These are suggestions only and should be considered carefully before being adopted. |
Calculation Method | Two types of calculation methods are possible:
When you use 'Calculation Method - W' the program forces you to enter your General Ledger Withholding Tax (No ABN) account in the field directly below. |
Withholding Tax Account | The GL liability account to which you wish to distribute withholding tax. This tax code must have been previously defined in TASS.web Finance > General Ledger > Account & Journal Info > Accounts to be available for selection. Important! This should be a GL account that is used only for the purpose of withholding tax. |
For more information on Withholding tax, refer to Withholding Tax Process for Invoices.
Bank Accounts Tab
This program is used to define your school or company's bank accounts.
Bank accounts are also set up in TASS.web Finance > Accounts Payable > Setup Information > Accounts Payable Setup on the 'Bank Accounts' tab.
Important!
Note that a GL account must have first been defined for your bank account(s) in TASS.web Finance > General Ledger > Account & Journal Information > Accounts.
Adding Bank Accounts
To add a new bank account, click the 'New Bank Account' button to display the 'Bank Accounts' screen.
When satisfied with your entry, click on the 'Save' button to commit your changes to the TASS.web database.
Viewing and Editing Bank Accounts
To 'View', 'Edit' or 'Delete' a bank account click on the associated link. The 'Bank Accounts' screen is then populated with detail of your chosen selection.
When satisfied with your entry, click on the 'Update' button to commit your changes to the TASS.web database.
Fields that require detailed information | |
|---|---|
Code | Enter a 9 character maximum code to be assigned to a Bank Account that is set up in General Ledger. |
Description | A detailed description of the account (i.e. the account name). |
Account Code | Unique code for this bank account. |
GL Account Code | GL account code pre-defined for this account in TASS.web Finance > General Ledger > Account & Journal Information > Accounts. For convenience, you may select the 'Lookup' (Binoculars) icon and search for a valid account code in the database. Search criteria include account code, description, type and tax code. |
Description | A detailed description of the account (i.e. the account name). |
Financial Institution Code | Code for the financial institution at which this bank account is held. Examples may include CBA for the Commonwealth Bank of Australia or WBC for Westpac. |
B.S.B Code | The Bank/State/Branch (BSB) code for the branch at which this account is held. This must be in the format ###-###. |
Account Number | Bank assigned account number for this bank account. |
Next Cheque Number | System field for the next cheque number to be used. This field is maintained and automatically incremented by the system as cheques are issued from the Accounts Payable module. |
Bank Feed | This field determines the method to be used to complete the Bank Reconciliation process for this Bank. When 'Not Enabled', the Bank Reconciliation process is to manually tick off cash book transactions that match your bank statement using program 'General Ledger > Cash Book > Bank Reconciliation'. When 'Enabled', the Bank Reconciliation process is to upload statement transactions and use the 'Reconcile' option in program 'General Ledger > Cash Book > Bank Account Dashboard' to auto and manually "reconcile" (ie. match) these uploaded transactions with the cash book transactions already in TASS. When 'Not Enabled', you will not be able to change to 'Enabled' if there is a partially completed Bank Reconciliation. When 'Enabled', you will not be able to change to 'Not Enabled' once you have uploaded statement transactions and started reconciling. |
Dashboard Sort Number | Use this field to indicate the order in which you would like your Bank Accounts to display in program 'General Ledger > Cash Book > Bank Account Dashboard' |
Bank Logo | Upload a logo for the bank to display on the Bank Accounts Dashboard |
Last Statement Page No. | The number of the last statement received from the bank and subsequently reconciled and closed. This field is maintained and automatically incremented by the system as bank reconciliations are completed and saved. |
Statement Balance | Closing balance as indicated on the last balanced bank statement. This field is maintained and automatically updated by the system as bank reconciliations are completed and saved. |
Important!
The “Last Statement Page No.” and “Statement Balance” fields should be entered prior to doing your first bank reconciliation, they will subsequently be maintained by the system.
Bank Feed Upload File Mapping
Use the 'Mapping' link to define your file mapping.
The 'Mapping' link will only be available once the 'Bank Feed' option is set to 'Enabled'
Before you can complete this mapping, you must download your statement transactions data from your Bank. To do this, select a date range and the CSV file format. Once downloaded. open the file to see the data columns so that you can map them correctly.
On this screen, you must define the data columns in the downloaded CSV file that will be uploaded into TASS and the data in each of these columns.
Fields that require detailed information | |
|---|---|
Field Number | This is the column number from the downloaded CSV file |
Field Name | The following Field Names are mandatory and therefore must be included in your mapping:
The following Field Names are optional in your mapping:
Examples of valid mappings:
The following dates formats are acceptable:
|
Inter-Company Accounts Tab
This tab allows the user to maintain inter-company accounts.
This tab will only be displayed when multi-company Enterprise mode is enabled, and the current company is marked as a ‘company to be included’ in TASS.web Finance > General Ledger > Setup Information > Company Information on the Company Details ‘Enterprise’ tab.
To add an Inter-Company Account, click ‘New Account’.
This button will only be active when an Inter-Company Journal Code has been set up for the current company in TASS.web Finance > General Ledger > Accounts & Journal Info > Inter-Company Journals.
Field | Description |
|---|---|
Company | Choose the company name from the dropdown list. |
GL Account Code | Type in or search for a GL Account Code by clicking on the binoculars. |
Description | This field will automatically be populated when choosing a GL Account Code. |
Type | This field will automatically be populated when choosing an Account Code with either: A = Asset. L = Liability. |