
wB - Enter Results
From v01.060.01.200, webBook is no longer accessible. The features previously offered by webBook are now available in Staff Kiosk Assessment > Markbook and Enter Results and Comments.
This area is used to:
Enter individual student results.
Enter individual student comments.
Maintain student final results that have been derived from raw scores entered through Progressive Assessment.
The information entered here will appear on Student Academic Reports.
Click on the 'Enter Results' link for a subject class. This will open a screen with an assessment panel for each student within the class.
This is an example:
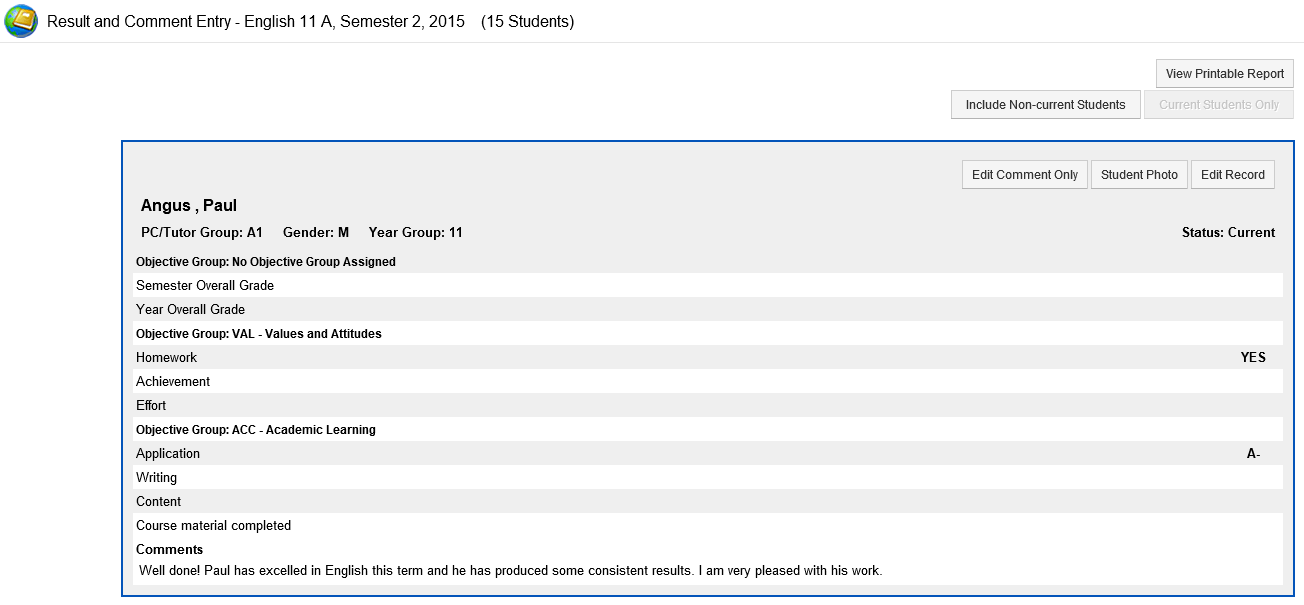
The Objectives/criteria/outcomes that have been set up for this subject in the TASS.web Academic Reporting module will be displayed under each student's name.
TIP: By default, only current students will be displayed. To display students who have left the school (non-current), click the 'Include Non-current Students' button.
Result and Comment Entry Buttons
Against each student, three buttons are available:
Edit Comment Only.
Student Photo.
Edit Record.
Edit Comment Only
This option would be used in an academic reporting period where no results are to be entered.
An example may be an interim report where comments only are required.
Student Photo
Click this button to view the student's photo.
Edit Record
This option will display the 'Student Result and Comment Entry' screen. This screen is split into two sections:
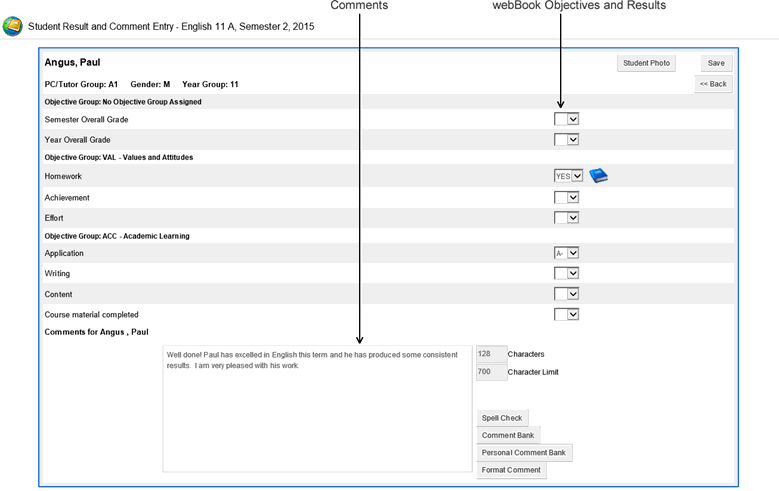
webBook Objectives and Results
This section of the screen will display the webBook Objectives and associated result formats that your school has set-up for this subject.
The Objectives displayed could also be grouped under school defined headings (Objective Groups).
As an example:
Objective Group > | ACC - Academic Learning |
Objective > | Writing |
Objective > | Content |
Objective > | Course Material Completed |
The types of result formats that you may see include | |||||||||||||
|---|---|---|---|---|---|---|---|---|---|---|---|---|---|
 | Free-form non validated text boxes to enter results. A suggested range of results for this Objective will be displayed to the right of the field. Example: (1 -4) No validation (checking) will be performed upon saving unless validations have been defined. | ||||||||||||
| Validated text boxes to enter results. The valid range will be displayed to the right of the field. Example: (1 -4). Values outside of this range will not be allowed on save. | ||||||||||||
| A drop-down list displaying valid values as set by the academic reporting administrator. Example: A, B, C, D, E Use the drop-down list to select a valid option. | ||||||||||||
| A drop-down list displaying valid values as set by the academic reporting administrator. A 'Blue Book' icon will be available next to the dropdown list. Clicking this icon will display result based comments that have been set by your school. An example of a result based comments could be:
In these types of fields you can:
Result related comments will print on student academic reports that are generated using the TASS.web Student Admin > Academic Reporting > Report Processing > Generate Student Reports. Your school may also have had a customised report developed, that supports result based comments. | ||||||||||||


Comments
Comments can be entered using either of the following methods:
Freeform comment entry.
Using the school's comment bank.
Using your own personal comment bank.
All of these methods may not necessarily be available. Your school determines the methods that are available, e.g. the school's comment bank may be inactive.
The 'Character Limit' for comment entry has been set by your school.
The comment sizes/character limits used in webBook, Staff Kiosk Assessment are set by your school.
There are multiple possibilities for how the program determines this:
Comment Size Hierarchy | |||
1 | Reporting Setup | TASS.web Student Admin > Academic Reporting > Setup Information > Reporting Setup on the ‘Reporting Parameters’ tab, in the 'Maximum Student Comment Size' field. |
|
2 | Assessment Setup | TASS.web Student Admin > Academic Reporting > Setup Information > Assessment Setup on the 'Result Periods’ tab, in the 'Max. Comment Size' field. |
If there is a 'Max Comment Size' number on this tab it will override size limits set in Reporting Setup. |
3 | Year Group specifications | Your web server tassportal\webBook > webBook.ini file. |

Comment sizes set up this way will override size limits setup using Assessment Setup and Reporting Setup.
|
Free Form Comments
To enter free form comments position the cursor within the comments entry portion of the screen and start typing.
This documentation will refer to this area of the program as the student comment work area.
Formatting options within the student comment work area include:
Inserting a line break in your text by using the 'Enter' key once.
Inserting a paragraph break in your text by using the 'Enter' key twice.
Using 'Keywords' to assist with inserting information such as student names, subjects, gender etc.
Using the School's Comment Bank
The 'Comment Bank' is a collection of comments that your school has set up for you to use.
To access a comment from the school's comment bank, click on the 'Comment Bank' button.
Select a 'Comment Category' from the dropdown list to display a list of comments that you can use.
The 'Comment Categories' displayed have been set up by your school, comments may have been allocated into subject-based or performance-based categories.
Use the 'Insert' hyperlink to take the comment back into the student comment work area.
Alternatively, you can choose the comments that you want to use by keying in a valid code surrounded with square brackets into the student comment work area. Example [1001].
Using the Personal Comment Bank
This is an area that allows you to create your own personal collection of comments which can then be reused.
To access a comment from your own personal comment bank, click on the 'Personal Comment Bank' button.
'Comment Categories' can be used to organise your comments into different sections. For example, subject-based or performance-based categories.
Use the 'New' button to create a new 'Comment Category', or the 'Remove' button to delete an existing category and the comments allocated to it.
Select a 'Comment Category' from the dropdown list to display a list of comments that you can use.
Use the 'Insert' hyperlink to take the comment back into the student comment work area.
Use the 'Edit' hyperlink to change an existing personal comment and save this back to your personal comment bank.
Use the 'Delete' hyperlink to remove an existing personal comment from your personal comment bank.
To add a new comment you must first select the category that it is to go into (from the 'Comment Category' dropdown list) and then click the 'New Comment' button.
Click on the 'Check Spelling' button before saving your new comment to the database.
Important!
The maximum number of characters for personal comments is 2000.
Keywords
webBook supports 'keyword' substitution.
The following 'keywords' may be used to substitute the student's first (or preferred) name:
[NAME]
[NAME'S]
Student names display as per the ‘NAME keyword substitution format' setting in TASS.web Student Admin > Academic Reporting > Setup Information > Reporting Setup on the 'Reporting Parameters’ tab.
Use [SUBJECT] to substitute the subject description.
The following keywords may be used for Gender Separation:
[He/She]
[he/she]
[His/Her]
[him/her]
[son/daughter]
[son's/daughter's]
[himself/herself]
The keyword substitution values above are defined in TASS.web Community > Setup Information using the 'Genders Setup' program.
Additional gender values (to those above) may exist and be available if your school has defined them.
Make sure that you use the keywords exactly as they are defined.
These words may already be available in the school's comment bank. You may also insert these keywords directly into free form text comments.
Once you have finished entering comments that contain 'Keywords', click the 'Format Comments' button to convert any keywords used.
Spell Check
Click on the 'Spell Check' button to check the spelling of text in the student comment work area.
If no mistakes are found a 'Spell Check Complete!' message will be displayed.
If a spelling mistake is found, the word that is not in the dictionary will be highlighted and you will be prompted to 'Ignore', 'Change', 'Ignore All' or 'Change All' to the suggested correction. Select your choice by clicking on one of these options.
Alternatively, enter your own correction in the 'Change To' field and click 'Change'.
Your system administrator will determine as to whether the ability to 'Add' words into the customisable dictionary is available. If the 'Add' button is available, care should be taken as words that you add will be available to other users. Therefore if you add an incorrect word into the dictionary the spell checker will not detect it as a mistake. This will then apply to all users.
View Printable Report
This button enables you to produce a hardcopy or document for the class that you are currently working on. This will include any results or comments that you have entered so far.
'Printing Options' allows you to choose the destination of the report. This can be to Adobe® PDF, Microsoft Excel® or Microsoft Word®.
You can also elect to have the report print the result based comments.