
Student Appointment Log
Overview
The Staff Kiosk Calendar > Student Appointment Log can be used to:
View a list of student appointments
Add an appointment for a student
Edit an existing student appointment
Cancel a student appointment
Print a report of student appointments

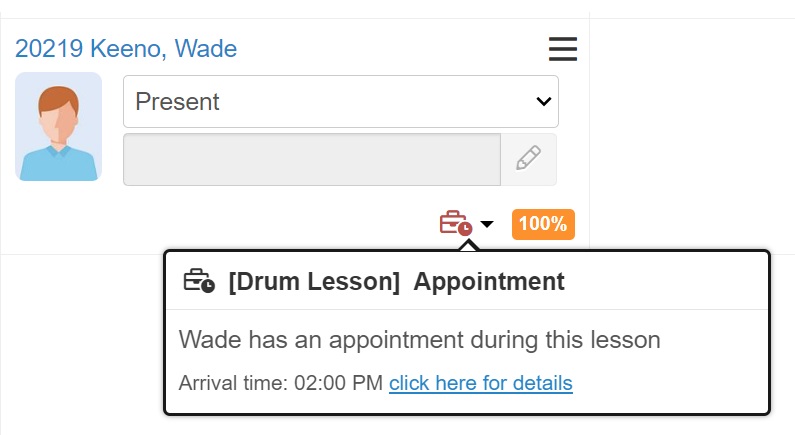
Appointments are displayed on Student Profiles and on Class Rollcall screens. This visibility communicates to staff where a student is expected to be if they are not in their timetabled class, and allows them to make an informed decision on how to mark a roll.
Student Appointments do not affect attendance records or roll calls in any way.
Check out the ▶️ Student Appointment Program and Self Registration Video for more information.
Appointment List Screen
When you access the program, the screen will display a list of the Appointment Log entries in the last week for students in your current subject classes. Alternatively, you can use the filters at the top of the school to return a different list of student appointments.
Fields that require further explanation | |
|---|---|
Student | Student Name |
Date / Time | The Date and Time of the scheduled appointment. |
Type | The appointment Type. This is dependent on which appointment types the user has been given permission to view. Each appointment type has it's own permission point in TASS.web System Admin > Users > Portal Security Permissions. Types are defined in the Staff Kiosk Calendar > Appointment Types (Setup) program. |
Comment | The comment icon displays if a comment has been recorded by the student for the appointment. Where the Type has a 'APP SR Comment Flag' marked as Yes in Staff Kiosk Calendar > Appointment Types (Setup), the Student has the ability to add a comment at the time they check-in to an appointment through the Self Registration portal. Hover over the icon to view the comment. |
Notes | The comment icon displays if a note has been recorded by the staff member for the appointment. Hover over the icon to view the note. This Note is also visible in Staff Kiosk Student Profile > Notes to users with the ‘View’ permission point enabled for the ‘Appointment Type’ in TASS.web System Admin > Users > Portal Security Permissions. |
Confidential Notes | The comment icon displays if a confidential note has been recorded by the staff member for the appointment. For example: counselling notes. Hover over the icon to view the confidential note. The user must have the 'View Confidential Notes' permission point in TASS.web System Admin > Users > Portal Security Permissions to add and view confidential notes |
Arrival Date / Time | The Date and Time that the Student arrived at the appointment. This may be different to the scheduled date / time. This field can be updated by the Student through the Appointment Self Registration portal. |
Check Out Date / Time | The Date and Time that the Student checked out of the appointment. This field can be updated by the Student through the Appointment Self Registration portal. |
Resp. Staff Member | The Staff member responsible for the appointment. |
Attachment | The attachment icon display if an attachment has been added to the appointment. For example: a careers plan. Click on the icon to open the attachment. |
Cancelled | This column will display when the 'Include Cancelled' filter has been selected. Cancelled appointments display the text 'Cancelled'. |
Action | View, Edit and Cancel the appointment. |
Filters
Include Cancelled | Tick this checkbox to display Cancelled student appointments. |
Date Range | Choose the desired Date Range. |
Responsible Staff Member | Enter a staff member's name to filter the results to the responsible staff member. Multiple staff members can be entered. |
Type | Filter to display Students who have an appointment for a specific Type. The available types is dependent on which appointment types the user has been given permission to view. Each appointment type has it's own permission point in TASS.web System Admin > Users > Portal Security Permissions. Types are defined in Staff Kiosk Calendar > Appointment Types (Setup). |
Campus | Only displayed where the school has Campuses setup. |
Student Selection | Use this to select from students in these groups:
|
Add a Student Appointment
Click the 'New' button to display the 'Student Appointment Details' screen.
Fields that require further explanation | |
*Student | Search for the required student.  Type three or more characters of the student's code, surname, preferred surname or given name into the 'Student Search' Box: 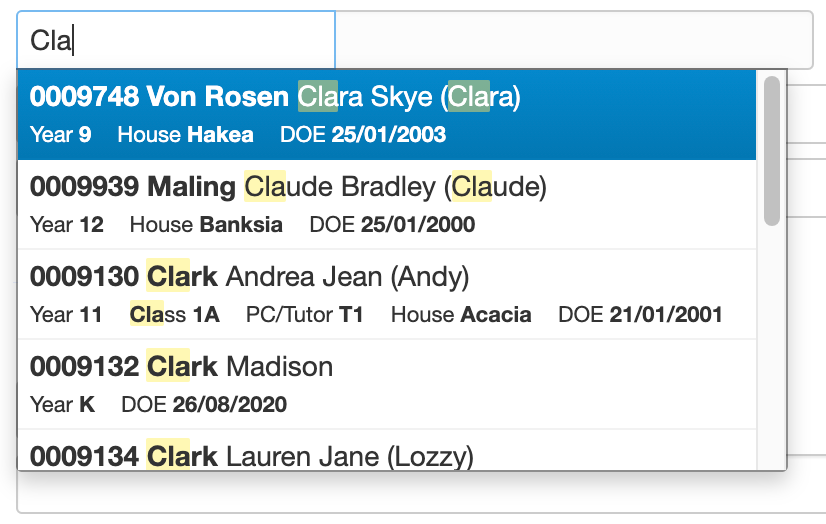 As soon as the third character is entered, matching students are displayed. You can keep typing to further refine your search or click on the blue section to select the student. Only current students will be displayed. If the field name is plural (Student(s)) you can add multiple. |
*Date & Time | Enter the date and time for this Appointment. This field will automatically default to the current date and time |
*Type | Use the drop-down list to select the appointment type for this entry. Each appointment type has its own permission point in TASS.web System Admin > Users > Portal Security Permissions. Types are defined in Staff Kiosk Calendar > Appointment Types (Setup). |
Responsible Staff Member | Use the drop-down list to select a staff member who is responsible for the appointment. |
Student Comment | This field can be used to record the Student's comments during the Appointment. Where the Type has a 'APP SR Comment Flag' marked as Yes in Staff Kiosk Calendar >Appointment Types (Setup), the Student will have the ability to add a comment at the time they check-in to an Appointment through the Self Registration portal. |
Notes | Record a note about the appointment. This Note is also visible in Staff Kiosk Student Profile > Notes to users with the ‘View’ permission point enabled for the ‘Appointment Type’ in TASS.web System Admin > Users > Portal Security Permissions. This Note is also visible to students in Student Cafe eDiary > Calendar. |
Confidential Notes | Record a confidential note about the appointment. The user must have the 'View Confidential Notes' permission point in TASS.web System Admin > Users > Portal Security Permissions to add and view confidential notes. |
Attachments | Multiple attachments can be added to the Appointment. |
*End Time | Use the drop-down list to select the time the appointment will conclude. |
*Display in Parent Lounge | Set to 'Yes' to enable the Appointment to be available in the Parent Lounge. The permission point titled ‘Student Appointments' must be ticked to display the Appointment Feed in eDiaries in both Parent Lounge and Student Cafe. |
Arrival Date & Time | The arrival time can be entered at the same time that the appointment is created. Alternatively, the appointment can be later edited once the student arrives at the appointment. This field can also be updated by the Student through the Appointment Self Registration portal. |
Checkout Date & Time | Only available to edit when an Arrival Date and time has been entered. This field can also be updated by the Student through the Appointment Self Registration portal. |
View / Edit a Student Appointment
Click the 'View' or 'Edit' icon to display the 'Student Appointment Details' screen.
In addition to the fields explained above in 'Adding a Student Appointment', there are other fields that display when viewing or editing a 'Student Appointment.
Fields that require further explanation | |
Show / Hide Change History | This link displays the 'Change History' showing the details of any changes made to the appointment. |
Submit Change | Submit any changes you have made to the Student Appointment. |
Cancel a Student Appointment
Click the 'Cancel' icon to open the Student Appointment Details screen.
Select 'Submit Cancel' to cancel the appointment.
Appointments cannot be deleted.
Appointments can be cancelled only where there is no 'Arrival Date / Time' entry recorded.
Appointment Self Registration Portal
The Student Appointment Log can be used in conjunction with the Appointment Self Registration Portal (APPSR), which allows students to check-in for a scheduled or non-scheduled appointment.
The portal is designed to work with a touch screen and a magnetic swipe card reader. A docket printer can also be used to generate:
An Appointment Arrival Slip
An Appointment Check-out Slip, with the details of the next Timetabled class that the Student should proceed to.
To check-in or check out of an Appointment, the student will swipe their card or sign in using their network credentials. After signing in, they'll be presented with a screen:
Scenario | Screen Displayed |
|---|---|
If the student has appointments to check out of. Only records for the last 7 days will be available. | Check Out screen |
If the student does not have appointments to check out of and has booked appointments for today's date (where no Arrival Date is recorded). | Booked Appointments screen |
If the student does not have appointments to check out of or booked appointments. | Appointment Self Registration Entry screen |