
Adding a New Requisition
Overview
There are 2 methods available to enter a new Requisition in the Staff Kiosk Staff > Requisitions program:
Enter all the details for your requisition using the '+ Add New Requisition' button.
Clone the details of your requisition from an existing requisition.
This method requires you to search for the requisition that is to be cloned first. Once located, Click the 'Clone' link in the 'Action' column on the 'My Requisitions' screen. The 'Requisition' screen will populate the following fields from the cloned requisition:Supplier Code.
Supplier ABN.
Supplier Address
Delivery details
Requisition Line details.
These details can be edited prior to saving the new requisition.
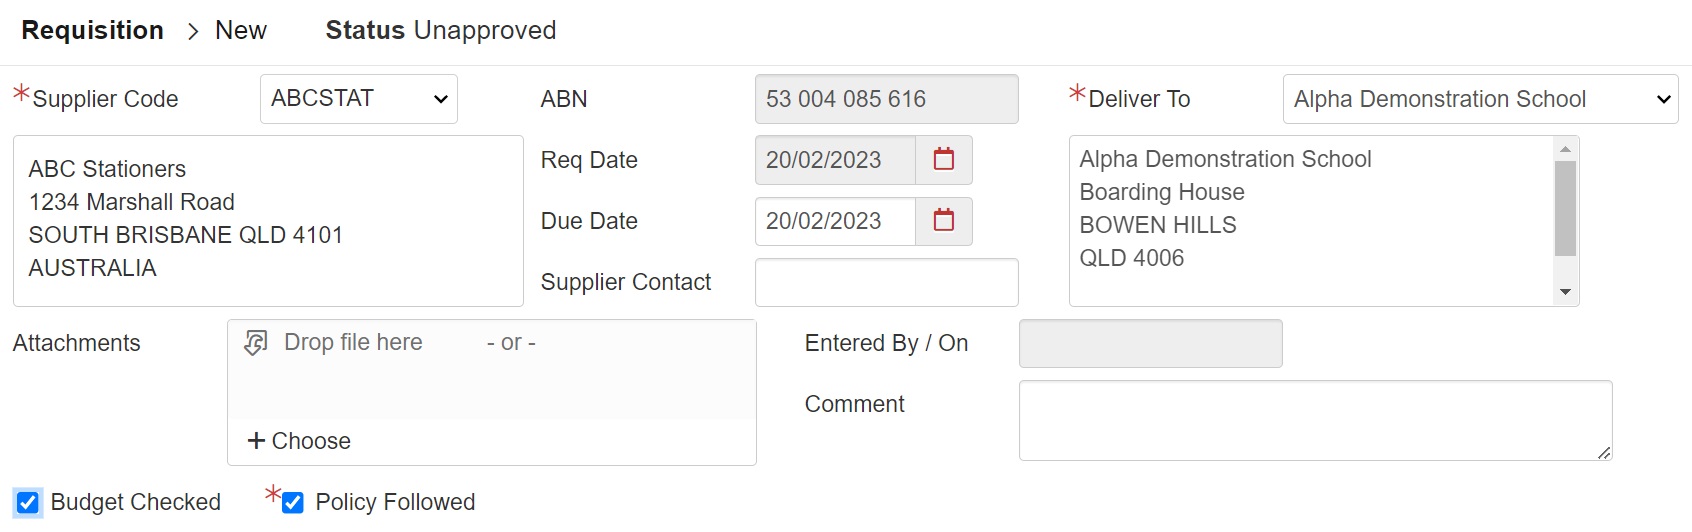
New Requisition - General Details
Example
Fields that require further explanation | |
* Supplier Code | Type three or more characters of the Supplier's code, Supplier Name, ABN or Contact Name into the 'Supplier Code Search' box. As soon as the third character is entered, matching Suppliers are displayed. You can keep typing to further refine your search or select the required Supplier from the picklist displayed. |
Due Date | Enter the date that you would like the goods or services to be supplied to the school. |
* Deliver To | This field is automatically populated with the school's default delivery address. Use the drop-down list to select an alternative address or, manually amend the address for this purchase order only. |
Supplier Contact | Enter the name of a contact person for the supplier. |
Attachments | You would use this to attach a scanned copy of the supplier quote or other supporting information for this requisition. |
Entered By/On | Populated once the entry is saved. |
Comment | Enter up to 250 characters to describe the requisition. This will be visible to approvers when reviewing the requisition. |
Additional Fields | Your school may have created additional fields that may require you to enter additional information. These 'User Defined Fields' are displayed beneath the 'Comments' field and can consist of 3 Y/N flag fields and 3 free form text fields. These fields are for informational purposes only. Additional fields marked with (*) are mandatory and must be completed. |
Requisition Lines Grid
Use the 'Requisition Line' grid to enter the items that will be purchased in this requisition.
To maintain existing line items, click 'Edit' or 'Delete' in the 'Action' column.
Fields that require further explanation | |||||||||||||||||||||
Cost Inc. GST | If this box is ticked the program will calculate the tax as being included based on 'Order Quantity' by 'Unit Cost'.
| ||||||||||||||||||||
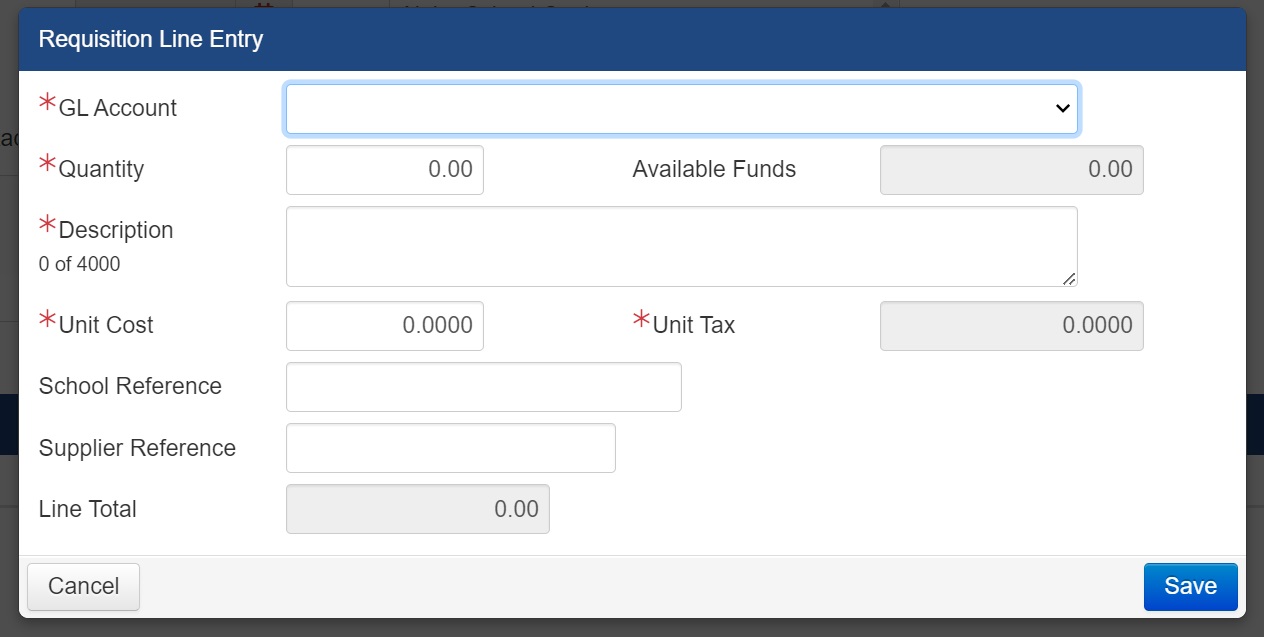
Requisition Line Entry
Click the '+Add Req Line' button to display the 'Requisition Line Entry' screen.
Example
Fields that require further explanation | |
* GL Account | Select a 'General Ledger Account' code for this line item from the dropdown list. The accounts that are available have been predefined by your school. |
* Quantity | Enter the quantity. The maximum value is 99,999.99. |
Available Funds | A display-only field that will show how much money is left in the GL Account budget. This is calculated using:
|
* Description | Up to 4000 characters. |
* Unit Cost | Enter the price per unit for this item. Maximum value is 9,999,999.9999 |
* Unit Tax | This will be automatically calculated based on the 'Cost Incl Tax' tick box in the 'Requisition Line Grid'. |
School Reference | An optional field used to identify the school's identification number for the product or service. |
Supplier Reference | An optional field used to identify the supplier's identification number for the product or service. |
Line Total | An automatically generated field that is calculated based on the amounts entered into the 'Quantity' and 'Unit Cost' fields, and includes the Unit Tax total. |
Click the 'Save' button to add this line to the requisition.
Repeat to add further line items to this acquisition.
Your acquisition entry can contain items from several different General Ledger Accounts, so long as the approval hierarchy is the same across all of the GL accounts that will be used (including delegation limits).
The first GL Account selected will determine which other GL accounts display in subsequent requisition lines, based on the Approval hierarchy.
For example, if the requisition will include items from two GL accounts that the English HOD is the approver for, at the same approval level, the requisition may include both items.
If the requisition will include an item from the English GL account, and an item from the PE GL account, who is a different approver to that of the English GL account, then a separate requisition will need to be added.
Budget Checking
Budget checking will occur each time you add a new line to the requisition.
The system will check the 'Line Total', less the tax component, against the Available Funds for the 'GL Account' selected.
If the new line causes the budget to be exceeded, two possible messages will appear:
'Error: Account is over budget'. If this message appears you will need to follow your school's policy in relation to budget authorisation. Your line item cannot be added to this requisition.
'Warning: Account is over budget. Would you like to continue? If this message appears you will need to follow your school's policy in relation to budget authorisation. Your line item can still be added to this requisition.
If the new line causes the 'Early Warning' value to be exceeded (e.g. 70% of budget) then the following message will appear: 'Warning: NN% budget expended'.
Submit New Requisiton
Once the requisition is completed following the steps above, click the 'Submit New' button to submit your requisition for approval. A confirmation message will appear notifying you of the requisition number.
Users who are set up as an approver will also receive a notification that there is a requisition awaiting approval.
This notification will be:
Sent as an email (where enabled). The email will contain a link that when clicked will automatically redirect the user to the requisition in Staff Kiosk.
This requires the user to already be logged into Staff Kiosk. If not, the user will be redirected to the Staff Kiosk login screen.
Displayed in 2 places in Staff Kiosk and include a count of the requisitions waiting to be approved:
Staff Kiosk Homepage > Requisitions to Action.
Staff Kiosk Staff > Requisitions on the 'Requisitions' screen.
Refer to the ‘Approving and Rejecting Requisitions’ article for more information about this process.
Invoice Approvals in Staff Kiosk
If your school uses the Staff Kiosk Invoice Approvals Workflow, when an invoice related to a Requisition is received and entered into TASS.web, the Requisition requester is automatically assigned as the Invoice Approver when the appropriate security permissions are enabled. The Invoice can then be approved or rejected in the Staff Kiosk Staff > Invoice Approvals program.
See ‘Running Hold Payments Processing in Staff Kiosk Invoice Approvals’ for more information on setting up and using this feature.
User Security Permissions
For the Requisition requester to also be the Invoice Approver, they must have one or both of the following permissions applied in TASS.web System Admin > Users > Portal Security Permissions for ‘Staff Kiosk’.
The 'Invoice Approvals' permission allows users to approve only invoices assigned to them.
The '--Advance Approver' permission allows users to access and approve all invoices.