
Marking a Custom Roll
The Custom Rollcall marking screen can be access by navigating to Staff Kiosk Rollcall > Custom Rolls, then selecting the ‘Rollcall’ icon from the Action column.
This screen displays a list of students allocated to the roll selected and their student photo.
Did you know that Custom Rolls can be downloaded to the Staff Orbit app, marked offline, and synced to Staff Kiosk when back in range? For more information, refer to ‘What is Staff Orbit Offline Mode?’.
This screen has three components:
Top Header
On the left side of the header the following fields are visible:
Source | This field defaults to the last search criteria used to obtain the list of students allocated to this roll. This text can be edited to further identify the group of students in this custom roll. If the Custom Roll was created in the Extra Curricular module, the Extra Curricular Group informaiton will appear here. |
Roll Description | Enter a unique description for this custom roll. If the Custom Roll was created in the Extra Curricular module, the Session type will appear here. |
Date | Indicates the date that this roll will be marked. |
Time | Indicates the time that this roll will be marked. |
Marked By | When the roll has not been marked, this field displays the status ‘Not Marked’. After the roll has been marked, the name of the user who submitted the attendance will be recorded here. |
Marked On | After the roll has been marked, this field indicates the date and time this was completed. |
On the right side of the header, the following buttons are visible:
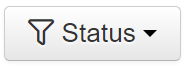 | Use the 'Status' option to filter the students displayed by their attendance status. For example, to only display students that have been marked as absent. |
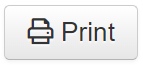 | Use the ‘Print' icon to produce a listing of the students in this custom roll with their attendance status and any alerts, based on the 'Status' filter applied. |
Custom Roll Hamburger Menu  | The options in the ‘hamburger menu’ can be used to:
Use the Custom Rolls 'hamburger menu' to send communication this student and/or parents, based on the 'Status' filter applied. For example, an OSHC staff member can send an SMS to parents of students who have been marked absent from the 'After School Hours Care' custom roll. |
2. Student List
Code | The ‘Code’ column displays the Student Code of thte Student | ||||||||||||||||||||||||||||||||||
Photo | The photo from the Student Record is displayed here. | ||||||||||||||||||||||||||||||||||
Student Name | This is the Name of the Student. | ||||||||||||||||||||||||||||||||||
Extra Curricular Attendance Overview | This section only appears when set up in a certain way from the Extra Curricular module. It provides an overview of attendance for the whole term, semester or other specified period of time. As each session's attendance is submitted, ticks and crosses will appear in the overview section to represent each student's attendance patterns. See ‘Can I create an extra curricular custom roll with an attendance overview for the entire term?’ for more information. | ||||||||||||||||||||||||||||||||||
Present | Use the 'Present' checkbox to indicate the attendance of each student. Tick the checkbox to mark the student ‘Present’. Leave the checkbox unticked to mark the student ‘Absent’. The ‘Mark All’ button at the top of the Present column allows you to toggle all students to either all ‘Present’ or all 'Absent’ with just one click. The 'Mark All' button will not affect Extra Curricular Student Absence Notifications submitted by parents in Parent Lounge. Use the ‘Explained’ checkbox to indicate if you have received an explanation for the student's absence. If parents submit a Student Absence Notification for Extra Curricular Activities in Parent Lounge, the ‘Explained’ checkbox will be automatically ticked, and a comment from the parent will be accessible by clicking on the ‘Comments’ icon. If a student is marked Absent, and the ‘Explained’ checkbox is not ticked, the absence will be flagged as ‘unexplained’ and allow for an automated SMS to be sent to Parents and Caregivers when the ‘Send SMS on Save’ feature is enabled. | ||||||||||||||||||||||||||||||||||
Explained | Use the ‘Explained’ checkbox to confirm that you have received an explanation for the student's absence. Tick the checkbox if you have received an explanation. Leave the checkbox unticked for the absence to be considered 'unexplained'. When the ‘Send SMS on Save’ feature is enabled, Parents and Caregivers of students with ‘unexplained’ absences will receive an SMS. | ||||||||||||||||||||||||||||||||||
'Comment' icon  | Use the ‘comment’ icon to enter additional information about a student for this custom roll. | ||||||||||||||||||||||||||||||||||
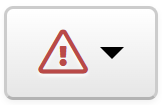
Alert | Various notification icons may be displayed against each student, providing additional information about the student you are marking in this custom roll. Various icons are displayed throughout Staff Kiosk, providing notifications, alerts and additional information about specific students.
| ||||||||||||||||||||||||||||||||||
Student Hamburger Menu | The options in the ‘hamburger menu’ can be used to:
The eDiary will show you if there is any other event occurring for this student, such as a music lesson.
| ||||||||||||||||||||||||||||||||||
Comment | Use this field to record a comment about this custom roll. For example, Rollcall for students that will be participating in… This field will be mandatory when cancelling a custom roll. |


Bottom Banner
Save Attendance | Click the ‘Save Attendance’ button to save and submit the roll. Send SMS on Save Schools can send SMS Notifications to Parents and Caregivers each time their student has an ‘Unexplained Absence’ recorded on a Custom Roll. This feature can be enabled, and custom SMS message text can be defined in Staff Kiosk Rollcall > Custom Rolls Parameters. There are two ways that this feature can be implemented:
The Parent/Caregiver who receives the SMS is determined by the ‘Communication Rules Type’ defined in the TASS.web Student Admin > Teacher Records > Setup Information > Staff Kiosk Setup in the ‘Comm Type for Custom Roll Save & Send SMS’ field. |
Cancel | Click the 'Cancel' button to return to the 'Custom Roll' list screen. |