
How to Upload Timetable and Subject Data from Timechart
Important!
It is important to be aware that when you use the TASS.web Timetable in conjunction with Timechart, there needs to be elements of consistency between this external package and TASS.web.
Users should be aware of how TASS.web is set up and operates in the following areas:
Scope of Subjects Defined.
Year Groups.
Subject Codes and Class Codes.
Teacher Codes.
Room Codes.
Defined Days.
Periods Defined for each day.
Student Codes.
Scope of Subjects Defined
Subjects are defined in TASS.web Student Admin > Students Records > Setup Information > Student Records Setup in the 'Subjects' tab. If a Subject is referenced in Timechart, then it must be defined in TASS.web.
Year Groups
Year Groups used in TASS.web must also be referenced with the same year group numbers in Timechart. The field 'Year' in Timechart must be set up with the same year groups as in TASS.web.
Important!
Do NOT use this field in Timechart to also identify the class group, e.g. 8A or 8.1.
Do not leave this field blank in Timechart.
Subject Codes and Class Codes
The subject code in Timechart must identify both the subject and the class group, e.g. the code 'ENGA' May be used for English class group A. However, in TASS.web these are stored in different fields, e.g. The Subject Code '0001' may be used to identify English with the code 'A' to identify the Class Group within this subject.
TASS.web requires you to define a translation table (TASS.web Student Admin > Timetable > External Data Interface > Define Subject/Class Translations) which defines the TASS.web Subject Code and Class Code for each of the Subject Codes used in Timechart.
Important!
Subject Codes used within Timechart must be strict alphanumeric codes. Do not have spaces or any special characters in these code fields even if it is allowed in Timechart.
Subject Codes used within Timechart must be no more than ten characters in length.
Do not leave the 'Subject' and 'Class' code fields blank in Timechart.
Teacher Code
The same Teacher Codes must be used in TASS.web and Timechart. Teacher Codes in TASS.web may be up to 3 alphanumeric characters in length and must be unique (TASS.web Student Admin > Teacher Records > Teacher Information > Teachers).
Teacher Codes within Timechart must be strict alphanumeric codes. Do not have spaces or special characters in these code fields even if they are allowed in Timechart.
Do not leave the 'Teacher Code' field blank in Timechart.
Teacher Codes used within Timechart must be no longer than 3 characters in length, even though Timechart may allow more characters to be used.
Room Code
The same Room Codes must be used in TASS.web and Timechart. Room Codes in TASS.web may be up to 4 alphanumeric characters in length and must be unique (TASS.web Student Admin > Timetable >Setup Information > Timetable Setup in the 'Rooms' tab).
Important!
Room Codes within Timechart must be strict alphanumeric codes. Do not have spaces or any special characters in these code fields even if they are allowed in Timechart.
Do not leave the 'Room Code' field blank in Timechart.
Days
The days defined and referenced in Timechart must be defined within TASS.web (Student Admin > Timetable > Setup Information > Timetable Setup in the 'Days' tab).
Periods
The Periods defined and referenced in Timechart must be defined within TASS.web (Student Admin > Timetable > Setup Information > Timetable Setup in the 'Periods' tab).
Student Code
Where you wish to import student subject selections and subject class allocations into TASS.web from Timechart, then the TASS.web Student Codes must also be used in Timechart to identify each student.
In essence, there must be a high degree of consistency between TASS.web and Timechart before the timetable data can be imported into TASS.web. The import process uses the externally generated timetable data to formulate the 'Master Timetable' within TASS.web. Each row or record in the TASS.web Master Timetable comprises:
Day Code.
Period Code.
Subject Code.
Year Group*.
Subject 'Class' Group.
Teacher Code.
Room Code.
These seven fields make up what we term a 'cell' within the TASS.web Master Timetable. Each cell within the Master Timetable must conform to this framework and MUST have a valid entry for each field. If for example, you wish to timetable 'Form Class' as a lesson, the 'Form Class' must be first set up as a subject then linked to each student it is to effect. Additionally, teachers must be defined who take each Form Class.
There are a number of complex issues in linking externally generated timetable data into TASS.web. These areas should be fully explored with your TASS Support Staff Member if you are unsure of their ramifications.
* Year group is not required where the timetable in TASS.web is set to unitised.
Creating Export Files From Timechart
Background Information
Timechart allows for the export of both (or either) the master timetable and student subject data to text files, which can be uploaded into TASS.web. If you are using the 2000 Version of Timechart (also known as Version 5), simply follow the steps below to set the preferences, which will result in the appropriate fields being sent to the export file/s.
If only the master timetable is to be imported into TASS.web, only complete 'To Export the Master Timetable Using Timechart 2000' below. However, if you also wish to import student subjects into TASS.web, complete 'To Export the Students' Subjects from Timechart 2000' below as well.
Disclaimer
The Alpha School System does not provide support or training on the Timechart product. These instructions and screen pictures relating to the Timechart product are a guide only, and no warranty is given as to their accuracy. All support requests in relation to Timechart should be directed to your Timechart support agent.
Open Timechart 2000, select the Display drop-down menu, choose the 'Preferences' option, then move to each of the tabs and check the appropriate options as listed below.
Important!
Before changing settings, we strongly recommend that you take screen dumps or note the settings so they can be reset as required.
After selecting the appropriate settings, use the 'File' drop-down menu to send the data to file, once for the master file, then optionally a second time if you are exporting/importing students' subjects.
To Export the Master Timetable Using Timechart 2000
To open the Timetable window, from the window drop-down menu, choose 'Timetable'.
Update the preference parameters on the four tabs as follows:
From the 'Display' drop-down menu, choose 'Preferences'.
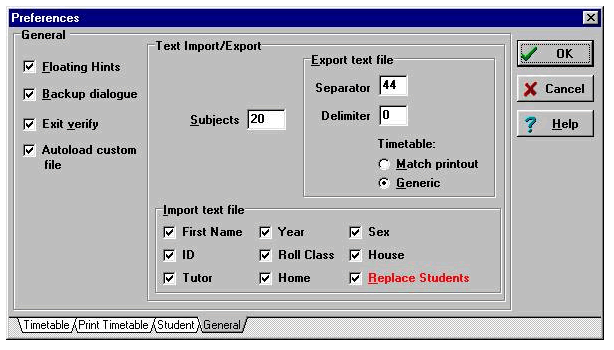
Click on the 'General' tab at the bottom of this window (see below), then:
Click the radio button for 'Generic', rather than 'Match printout'.
Ensure the separator is '44' (comma separated).
For the number of students' subjects to be downloaded, set this to 16 in the 'Subjects' field (this is not required if the students' subjects are not to be exported/imported).
Important!
Some settings may be different for your school, depending on your school's requirements. Note that import text file options are only valid if you plan on importing data back into Timechart, which is beyond the scope of this document. Check with Timechart if unsure.
Now click on the 'Timetable' tab at the bottom of the window, then:
Tick all the time slots you wish to import into TASS.
'Show Year/Class' is usually set to 'Either'.
'Show 'Year' as' is usually set to 'Year'.
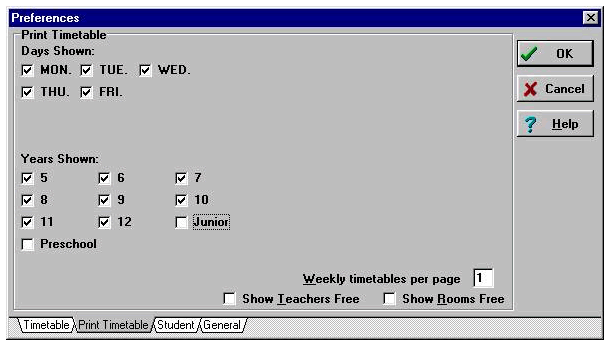
Now click on the 'Print Timetable' tab at the bottom of the window, then:
Click all the days you wish to export from Timechart for import into TASS.web.
In the 'Years Shown' section, click all the years you wish to export/import.
The other fields are irrelevant to export/import.
Now click on the 'Student' tab at the bottom of the window, then:
In the 'Fields Shown' area, ensure that Year, Class (rollclass), ID, Tutor and Home Room are all ticked.
For List Style, tick 'Other Subjects' radio button.
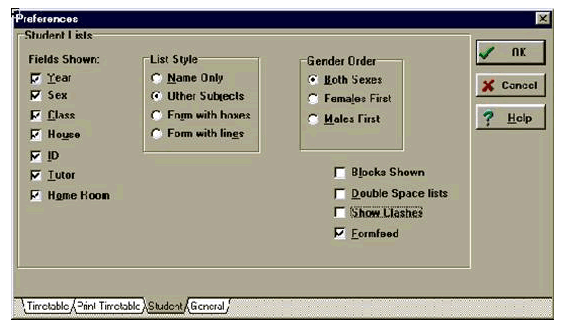
When satisfied with all settings, click 'OK' to save.
From the window drop-down menu, choose 'Timetable', which should show the main timetable window.
Then, from the 'File' drop-down menu, choose 'Export as Text File'. Save the file, making a note of its location.
To Export the Students' Subjects from Timechart 2000
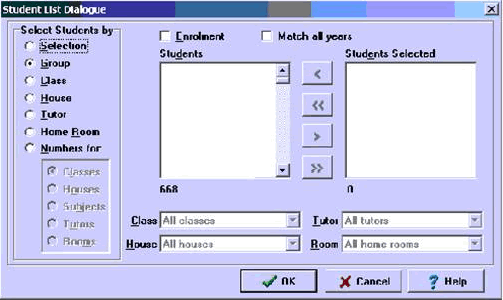
From the window drop-down menu, choose 'Student List'. Then in the Student List Dialogue window:
In the 'Select Students by' area, tick 'Group'.
In the 'Match all years' window:
If you have a horizontal (most usual) timetable, leave this checkbox blank (i.e. don't tick it).
If you have a vertical timetable, tick this checkbox.
From the File drop-down menu, choose 'Export as Text File'.
Save the file, making a note of its location.
If the export is unsuccessful, it may also be necessary to check that the tabs are correct on the Display > Preferences window.
Importing the Master Timetable into TASS.web
Follow the steps in this section to import the master timetable file into TASS.web.
This step-by-step guide describes the correct completion of steps within TASS.web.
Refer to the 'Exporting the Master Timetable' section of this document (above) for a brief guide to creating the master timetable export file from Timechart.
Important!
The steps must be completed in this order. Do not proceed to the next step until you have completely finished each step.
Define Import Format
TASS.web Student Admin > Timetable > External Data Interface > Define Import Format.
The master timetable file generated by Timechart usually contains seven fields of data for each row in the file.
An example of a valid row within this file is 1,3,ENGA,12,12A,AJ,P42
General Tab
The following fields will need to contain the following data in the 'General' tab:
Field | Details |
|---|---|
Total Number of Fields in Import Record | 7 — This will vary according to your Timechart settings. If unsure, count the number of fields in the file created by Timechart and type that number in this field. To check, you may need to look at the file with Notepad or Wordpad. |
Imported data fields are delimited with | , |
Imported data strings are quoted | N. To check, you may need to look at the file with Notepad or WordPad. Example: Quoted — Not Quoted — |
Imported data records are delimited with | 1 |
Use subject/class translations | Y |
Fields Tab
The following fields will need to contain the following data in the 'Fields' tab:
Import from Field Number | Into Column |
|---|---|
1 | Day_code |
2 | Prd_code |
3 | Sub_code |
4 | Year_grp |
6 | Tch_code |
7 | Room_code |
Field number 5 is not uploaded and so is not defined in TASS.web Student Admin > Timetable > External Data Interface > Define Import Format.
Select 'Save' to commit your entry and/or changes to the TASS.web database.
Define Subject / Class Translations
TASS.web Student Admin > Timetable > External Data Interface > Define Subject/Class Translations.
This program provides for the setup of a table of translations for each subject code used in Timechart into the TASS.web Subject Code and the Class Group identifier.
Important!
It is important that you define the translation within TASS.web for every code used in Timechart before proceeding with any upload of data.
For example, Code 'ENGA' used in Timechart might translate in TASS.web to subject code '0001' class group 'A'.
Import Data
TASS.web Student Admin > Timetable > External Data Interface > Import Data.
This program allows you to upload the file that you exported from Timechart.
General Tab
The following fields will need to contain the following data in the 'General' tab:
Import from Field Number | Into Column |
|---|---|
Timetable | The timetable defined in TASS.web Student Admin > Timetable > Setup Information > Timetable Setup on the 'Timetable Definitions' tab to which you wish to import this data. Important! Only applicable in Multi-Timetable mode. |
Year | The year defined against the timetable selected in the previous step. |
Semester / Term | The term/semester defined against the aforementioned year as defined in TASS.web Student Admin > Timetable > Setup Information > Timetable Setup. |
Year Group | The nominated year group for which to filter the records being uploaded. If used, then only the records in the file that contain the year group will be loaded into the system. |
File Name | Select the 'Browse' button and navigate to locate the correct file. Select the file and click 'Open' to select the file. |
Select the 'GO' button to proceed with uploading the file.
This program will check that there is data in all six fields in every row of this file — this includes the teacher and room codes. It also checks that all Timechart subject codes are defined in the 'Define subject/class translations' screen. Any rows that fail this initial validation will NOT be imported. The system will provide a report that lists the exceptions.
You can either fix the data back in the external timetable package and start the whole upload process again, or you can proceed with the upload 'as is'.
Validate Imported Data
This program goes through the imported data and checks each row and field to ensure that data is valid.
If validation errors are found, these rows will be displayed on the screen highlighted in yellow. You are able to fix these validation issues on the screen by using the 'Edit' or 'Delete' Action links. Alternatively, you can correct the data back in Timechart and re-import the file again.
The 'Print' tab enables the user to print an 'Exception Report' containing the records that are not valid.
If the validation is successful, a message will be displayed and you will be taken automatically to the 'Generate Master Timetable' program.
Generate Master Timetable
Run this program to take the validated data and generate the actual timetable cells in the TASS.web Master Timetable Table (ttmast).
General Tab
The following fields will need to contain the following data in the 'General' tab:
Import from Field Number | Into Column |
|---|---|
Timetable | The timetable definition previously defined in TASS.web Student Admin > Timetable > Setup Information > Timetable Setup on the 'Timetable Definitions' tab. This field is not available (nor required) in single timetable mode. Important! Only applicable in Multi-Timetable mode. |
Year | The year previously defined and relevant to your selected timetable mode. |
Semester / Term | The term/semester previously defined and relevant to your selected timetable mode. |
Year Group | Year group against which to generate the master timetable. If a 'Year Group' is not provided then the Timetable uploaded will replace the Timetable data currently in TASS for the nominated Timetable. |
Select the 'GO' button to proceed with generating the Master Timetable.
If there is existing data in the selected Year/Semester, a warning will be displayed.
Press 'OK' to proceed with the import which will replace the existing timetable data for the Year/Semester OR click 'Cancel' to abort the import.
Important!
The timetable being uploaded will replace any timetable data that currently exists for that timetable being uploaded, i.e. The timetable being replaced will be deleted.
The master timetable has now been imported into TASS.web.
Importing Student Subjects
Follow the steps in this section to import the student subjects' file into TASS.web.
This step-by-step guide describes the correct completion of steps within TASS. Refer to the 'Exporting Student Subjects' section of this document (above) for a brief guide to creating the student subjects export file from Timechart.
Important!
The steps must be completed in this order. Do not proceed to the next step until you have completely finished each step.
Import Student Subject Data
The student subjects file generated by 'Timechart' contains five fields not required for the import.
The file will have one row per student with Field #4 being the student code and Fields #7 and above being the subject and class code (e.g. 'ENGA').
Example: BELL,DAVID,M,31245,,BANKSIA,ENGA,SCIA,MTHA,JAP5,HIS3,ART2,GERD,GEO
Field numbers 1, 2, 3, 5 and 6 must be in this file but are ignored in the upload and therefore can either be empty or can have any data.
This program takes the file that you exported from Timechart and loads it into the TASS.web student subject table. The file can reside anywhere on your network provided you can navigate to it.
General Tab
The following fields will need to contain the following data in the 'General' tab:
Field | Details |
|---|---|
Year of Study | The required timetable year into which to import the student subject data. |
Current Semester | The required term/semester within the timetabled year into which to import the student subject data. |
Total Number of Fields in Import Record | 16. This should be the same as specified in Timechart's Display => Preferences 'Subjects' field. If set to the default of 20, type 20 here instead. If unsure, count the number of fields in the file created by Timechart. The number of fields in the file can be counted by opening the file in Notepad or WordPad. |
Import File | Select the 'Browse' button and navigate to the correct file to be uploaded. |
File Format | Select the 'The Timechart Format' option |
Import Options | Select from the following options:
Important! Take great care when using this option. It should NOT be used for a year and semester where student results and comments have already been entered.
|
Note that the difference between Option 2 and 3 is that with Option 2 existing subject records in TASS that are not referenced in the upload file will be left unchanged in TASS.
Important!
Each row in the import file will be cross-referenced against the TASS.web student codes and valid subject/class translations before being uploaded. Invalid rows will NOT be imported, and an exception report will be generated with detail of the records failing the validation process.
Select the 'GO' button to proceed with importing student subject data.