
PAC - Receipts
Overview
The TASS.web Parent Accounts ‘Receipts’ program can be used to:
Add a new receipt.
View and maintain existing receipts.
Apply receipts against parent accounts (fee receipts only).
Print individual receipt batches.
Generate a receipts listing.
Drill down on Parent Account detail from the 'Receipt Details' screen.
You can access this program by navigating to the TASS.web Finance > Parent Accounts > Receipting menu.
Adding a New Receipt
Select the 'New' icon at the top of the screen to enter a new receipt or receipt batch and display a blank 'Receipt Details' screen.
Focus is on the 'New' icon when the screen first loads. Press 'Enter' to open the 'Receipt Details' screen ready for input.
General Tab
When the 'Receipt Details' screen is first displayed in add mode, the focus will be in the batch number field.
TASS.web allows you to progressively work on a receipt batch. That means you can enter a number of receipts in a batch, end out of the program and then come back later to continue with more receipt entry.
If you have un-banked receipts in the system, the program will display the first of these pre-existing batches in the drop-down list. If the receipt you are about to enter is a continuation of an existing batch select the appropriate batch number.
If there are no un-banked receipts in the system, the program will default to 'New Batch'.
Fields that require further explanation | |
Batch Number | The receipt batch number. This will be automatically populated in view, edit and apply mode, and allocated by the system in add mode. Refer above. |
Receipt Type | This can be a Fee Receipt, Sundry Receipt or Enrolment Receipt. The subsequent selection of a parent code or enrolment code, or the ability to enter sundry receipt detail will be determined in correspondence to your selection in this field. Check out ▶️ Sundry Receipt Video for more information. |
Receipt No. | The receipt number, automatically populated in view, edit and apply mode, and allocated by the system in add mode. |
Parent Code / Enrolment Code | Depending on whether you are entering a current parent or enrolled parent receipt, this field will display the appropriate lookup window. The personal, address, current balance and building fund paid detail will be automatically populated from the relevant parent account upon your selection of a valid account. For convenience, you may select the 'Lookup' (Binoculars) icon and search for a valid account code in the database. To find a Parent, enter 3 or more characters of their Code or a Parent's name and you will see a picklist of matching Parents. Alternatively, key in the parent name or partial name (no wildcards are required) and press 'Tab'. The 'Alternative Parent Search' window will be displayed and you can scroll through the program's matches by clicking on 'Next' and then the 'Select' button for the correct parent. The final alternative is to key in the correct parent code. Once you have selected the parent code and the parent details have been displayed to the screen, the 'Drilldown' button at the top of the screen becomes active. This enables you to directly access the 'Parent Account Inquiry' program to lookup information. Once you have finished with the inquiry screen click on 'Cancel' to be returned to the receipting screen. |
* Received From | For Enrolment and Sundry Receipt Types only. Enter the person's name or the company that made the payment, up to 61 characters. This field is automatically populated for enrolment-related sundry receipts by combining ‘Parent 1 Name’ and ‘Parent 2 Name’ with a space in between and truncating if necessary. |
Address | Non-editable fields that display the parent's default 'Billing / Account Address' block details. The default address block is defined by TASS.web Finance > Parent Accounts > Setup Information > Parent Account Setup on the 'Parameters' tab. |
Account Balance | The current outstanding account balance of the selected parent. |
Building Fund Paid | The current amount that has been paid towards the Building Fund. |
On Stmt /Printed/Jnl | The first two fields are Yes/No flags and indicate whether this receipt has appeared on a previous statement and whether the receipt has been previously printed. |
* Applied Amount | The amount that has already been applied to this receipt. (This will only display in edit or view mode.) |
* Bank | The school's bank account into which this receipt is to be banked. You may overwrite this if this receipt is to be banked into a different account. |
* Bank GL Account | The GL account code is derived from the 'Bank' used for this receipt. |
* Payment Type | Cash, Cheque, Plastic, EFTPOS, Direct Deposit, Web, BPay or Direct Debit. CASH (Type C): This receipt type will be included in the Bank Deposit Report Total. They will be combined with Cheque and Plastic receipt types and posted to the Cashbook as one amount. Important! The date that gets posted to the cashbook is the date from the 'Bank Deposit Report' when it is run in 'Final Report' mode. Therefore if cash receipts have been entered over a few days and then banked, it is the date from the banking (Bank Deposit Report) that goes through to the Cashbook. CHEQUE (Type Q): This receipt type will be listed separately on the Bank Deposit Report. It will be included in the Bank Deposit Report Total. They will be combined with Cash and Plastic receipt types and posted to the Cashbook as one amount. Important! The date that gets posted to the cashbook is the date from the 'Bank Deposit Report' when it is run in 'Final Report' mode. Therefore if cheque receipts have been entered over a few days and then banked, it is the date from the banking (Bank Deposit Report) that goes through to the Cashbook. PLASTIC (Type P): This receipt type will be used where you have the old-style manual 'swipe' machine for credit card processing . This receipt type will be listed separately on the Bank Deposit Report. It will be included in the Bank Deposit Report. They will be combined with Cash and Cheque receipt types and posted to the Cashbook as one amount. Important! The date that gets posted to the cashbook is the date from the 'Bank Deposit Report' when it is run in 'Final Report' mode. Therefore if plastic receipts have been entered over a few days and then banked, it is the date from the banking (Bank Deposit Report) that goes through to the Cashbook. EFTPOS (Type E): This receipt type would be used where the payment is processed through an online EFTPOS machine. This receipt type will be listed separately on the Bank Deposit Report – but on a separate page. They will not be included in the Bank Deposit Report total. All EFTPOS receipts are totaled for each date and posted to the Cashbook. Important! The date on the 'Bank Deposit Report', when run in final mode, is not the determining factor for the Cashbook posting date for EFTPOS type receipts. The 'Bank Deposit Report' is still required to make these receipts post to the cashbook however if you had EFTPOS receipts spanning say 3 days there will be 3 lines posted to the cashbook. DIRECT DEPOSIT (Type D): This receipt type would be used where the payment has already been separately deposited into the school's bank account. Important! The date on the 'Bank Deposit Report', when run in final mode, is not the determining factor for the Cashbook posting date for Direct Deposit type receipts. The 'Bank Deposit Report' is still required to make these receipts post to the cashbook however each direct deposit will create a separate line in the cashbook. WEB (Type W): This receipt type is used only where the payment is made electronically from within Parent Lounge or from a third party payment gateway provider. They will not be listed on the Bank Deposit Report and not included in the Bank Deposit Report total. They are totalled and posted to the Cashbook based on the external providers batch number which is recorded in Comment Line 2 field on each receipt. Important! The date on the 'Bank Deposit Report', when run in final mode, is not the determining factor for the Cashbook posting date for WEB type receipts. The 'Bank Deposit Report' is still required to make these receipts post to the cashbook however each change in the payment clearing house's batch number is stored in Comment Line 2 for these types of receipts. These are then totaled this way and create a line in the cashbook for each batch number. BPAY (Type B): This receipt type is used only where the payment is made by BPay and the school's bank has provided a correctly formatted BPay load file to automatic receipt creation. They will not be listed on the Bank Deposit Report and not included in the Bank Deposit Report total. All BPay receipts are totaled for each date and posted to the Cashbook. Important! The date on the 'Bank Deposit Report', when run in final mode, is not the determining factor for the Cashbook posting date for BPAY type receipts. The 'Bank Deposit Report' is still required to make these receipts post to the cashbook however if you had BPAY receipts spanning say 3 days there will be 3 lines posted to the cashbook. DIRECT DEBIT (Type X): This receipt type is used only where the payment is made electronically using a file generated from the TASS Direct Banking sub-system in Parent Accounts. They will not be listed on the Bank Deposit Report and not included in the Bank Deposit Report total. All Direct Deposit receipts are totaled for each date and posted to the Cashbook. Important! The date on the 'Bank Deposit Report', when run in final mode, is not the determining factor for the Cashbook posting date for DIRECT DEBIT type receipts. The 'Bank Deposit Report' is still required to make these receipts post to the cashbook however if you had DIRECT DEBIT receipts spanning say 3 days there will be 3 lines posted to the cashbook. |
* Date Received | This will default to today's date or the date of the previous receipt transaction. A message will be displayed if you are attempting to add a receipt into an accounting period that is closed. |
* Total Received | You should enter the total amount of money being paid. |
* Discount Amt. | Applied to 'Fee Receipts' only. If you want to include a discount with the payment, then you should enter the amount of discount here – but the amount can not exceed the balance that is owing on the account. |
* Non-Fee A/c Amt | Applies to 'Fee Receipts' only. This is the amount of the total that is not to be applied to the parent's account. (It must be distributed to one or more General Ledger accounts, e.g. Building fund.) For Fee receipts, this field can be negative. This could be used where payment is made but the payment has had an amount deducted from it. For Sundry and Enrolment receipts, this field will default to the same figure as entered in 'Total Received' because the full amount of the receipt has to be disbursed to General Ledger. |
Cheque No./Date | This field only becomes active if 'Cheque' has been selected in the 'Payment Type' field – it is a mandatory field when active. The date is set to the same date as the 'Date Received'. |
Bank/Branch Name | An entry is only necessary if you are entering a cheque. The bank and branch name from the previous receipt from this parent will be inserted automatically as defaults |
Account/Card No. | This field is only relevant for 'Plastic' type receipts. Important! You should NEVER enter a complete credit card number in this field as whatever is entered here is stored in the database. If you do need to enter something here for a 'Plastic' transaction, check with your financial institution for what is a safe option, e.g. The number of digits to enter. |
Drawer | This field is relevant for 'Cheque, 'EFTPOS' and 'Plastic' receipts only and it is a mandatory field for these types. The Drawer name from the previous receipt from this parent will be inserted automatically as a default. |
Comments |
Important! The Comment Line 1 field is mandatory where the 'Non-Fee A/c Amount' is greater than zero. The description entered here is included as the General Ledger transaction description for each GL distribution entered on the 'GL Distribution' tab. When a payment is received and processed through a payment gateway, the Comment Line 2 automatically populates with the ‘Web/Electronic Receipt Batch #’. The ‘Web/Electronic Receipt Batch #’ uses this format:
|
This is a Yes/No field indicating whether this receipt is to be printed immediately upon saving. Tick this checkbox to print the receipt. Important! This field will only be available for selection when the 'Print Immediately' flag in TASS.web Finance > Parent Accounts > Setup Information > Parent Accounts Setup on the 'Receipting' tab is set to 'Prompt'. | |
Auto Apply | This checkbox indicates whether to automatically apply this receipt to the relevant parent account. This program will apply this receipt from the oldest transactions forward. Where it finds several transactions on the one day it will apply in accordance with the field 'Order to sort transactions when using auto apply' in TASS.web Finance > Parent Accounts > Setup Information > Parent Accounts Setup on the 'Receipting' tab. Uncheck this box to manually apply the receipt. In this mode, the 'Receipt Apply' screen will appear. Either enter the amount to apply in the 'Applied Amount' column next to the transactions that you wish to apply the receipt against or 'Enter' on the column to take the full amount of the transaction. Important! This field is only relevant for Fee Receipts. |
Address Tab
The 'Address' tab is for entry of an alternate receipt address (different than the address appearing on the 'General' tab > Address field) for fee receipts only.
A typical scenario for the use of this tab is when the fee receipt has is to be recorded against the nominated parent's account balance but has been paid by a third party. This third party is to receive the actual printed receipt, but the receipt transaction will still appear on the parent statement.
Important!
This tab will not be available for selection if entering or editing a sundry receipt.
GL Distribution Tab
This tab is used for one of the following scenarios:
A parent is paying an account payment plus 'something else' like a special levee or building fund. It is the 'something else' distribution that occurs on this screen.
The receipt is of a sundry nature where there is no parent account payment portion and the distribution has to be to one or more income areas.
This tab will display a 'General Ledger Grid' with the default distribution areas as set in TASS.web Finance > Parent Accounts > Setup Information > Parent Accounts Setup.
Fields that require further explanation | |
GL Account | The GL account(s) to be included in the distribution of this receipt. The default accounts for GL distribution (called 'Usual Receipt Distribution Areas') are set up in TASS.web Finance > Parent Accounts > Setup Information > Parent Accounts Setup on the 'Receipting' tab. Up to five accounts may be set up here. Additionally, you have one 'Miscellaneous' GL line for entry and; if your 'Building Fund Method' in TASS.web Finance > Parent Accounts > Setup Information > Parent Accounts Setup on the 'Parameters' tab is set to 'Donation'; you will have another GL distribution line set to your default building fund GL account. |
Gross Amount | The amount to be applied to this distribution line including tax if applicable. This field can be negative. This could be used where payment is made but the payment has had an amount deducted from it. |
Tax Code | The default tax code is determined by the GL Account. This can be overwritten. |
Tax Amount | The amount of tax is calculated automatically based on the Tax Code. |
Donor Number/Pledge Number and Appeal Code | There is an option to create a donation record across in the Fundraising module for the value of this GL Distribution Line. For example, you are processing Fundraising receipts as Sundry Receipts or where the amount of the parent's building fund or other donation is to create a Fundraising module donation. Once you have identified the appropriate donor record you can then enter a pledge number (which will automatically populate the Appeal Code) or an appeal code. Where the parent is linked to donor record in the Fundraising database then the donor number' will appear automatically. Completing this is mandatory where the distribution line is to the nominated 'Building Fund Account' (as set up in TASS.web Finance > Parent Accounts > Setup Information > Parent Accounts Setup) and the 'Enable Donations from Receipting' is set to 'Automatic (as setup in TASS.web Finance > Fundraising > Setup Information > Fundraising Setup). |
Enrolment Type | If this is an enrolment receipt it is mandatory to enter the receipt type. For more information on 'Enrolment Receipt Types', refer to 'Receipt Details' on 'Enrolment Detailed Entry'. |
Enrolment Student | Nominate the student in the family that this receipt is to apply to. The dropdown list will include the future enrolled students for the family. |
Select the 'Save' button to commit your entry to the TASS.web database.
Viewing or Editing Receipts
To 'View' or 'Edit' a receipt, use the search screen to search for records in the database.
You may also choose to 'Apply' an unapplied or partially applied receipt from this screen. This process is explained below.
This search screen provides the facility to search for existing receipts in the database using various search fields.
Searchable areas include Receipt Selections, Search Criteria, Fee Receipt Searching, Sundry Receipt Searching, and Filtering (individual or range searching by receipt amount, date, number or batch number).
Click the 'Go' button to execute the search and display the 'Receipts' screen with the matching records.
'View', 'Edit' and 'Apply' functions are available to alter previously made entries.
To delete a receipt, click ‘Edit’, then click the ‘Delete’ icon at the top of the Receipt Details screen.
Important!
Receipts that have been posted to General Ledger will be unavailable for editing. This also applies to receipts which have been banked and printed on a Bank Deposit Report.
Additionally, only fee receipts which have not been applied, or have been partially applied against parent accounts will be available for application.
In both cases, the relevant link will be unavailable for selection.
For more information, see How to Reverse Fee Receipts or How to Reverse Sundry Receipts.
You can search for all receipts that make up a bank deposit. The bank deposit number is a new field that was introduced with TASS.web. Each time a bank deposit report is run in 'Final Report' mode a new bank deposit number is assigned.
Applying Receipts
To 'Apply' an unapplied or partially applied fee receipt to a parent account, select the 'Apply' link next to the relevant receipt.
The 'Receipt Apply' screen will be displayed.
Use the 'Applications Grid' to nominate the amount to be applied against each charge.
There are several ways that you can do this:
Manually enter the amount in the 'Applied Amount' column for each relevant charge.
Use the 'Apply' link in the 'Action' column. This will make the 'Applied Amount' equal the 'Charge Amount' (If there is a sufficient 'Unapplied Amount' available. If there is not, it will insert the remainder of the 'Unapplied Amount').
Use the 'Auto Apply' button to make the 'Applied Amount' equal the 'Charge Amount' until the 'Unapplied Amount' is used up. This will commence from the 'Applied Amount' cell that you are currently clicked into.
Click on the bottom right-hand corner of a cell and drag downwards. This will make the 'Applied Amount' equal the 'Charge Amount' for the range of cells that you choose.
Example
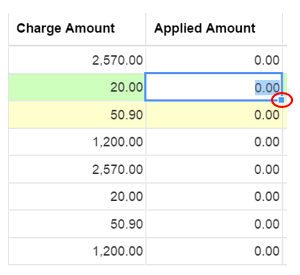
Note the 'Paid Amount' field is automatically updated with the application amount plus any amount already paid upon navigation to the next row. Additionally, the 'Unapplied Amount' section at the bottom of the screen is also updated automatically.
Select the 'Save' button to apply the total amount entered against the relevant parent account.
Alternatively, select the 'Cancel' button to return to the previous screen without committing any changes to the TASS.web database.
Printing a list of Receipts
Use the 'Receipts Search' screen to select the receipts to include in your list.
From the generated 'Receipts List' screen, select the 'Print' button.
Various sorting and formatting options are displayed, and you can select the type of file and layout you wish to use.
Click on 'Run' to create the file.
Include additional fields on your receipt listing by selecting options from the column on the right-hand side of the screen. Hold down the ' Ctrl ' key while clicking the mouse to select multiple 'Additional Fields'.