
Assigning Activities
Overview
The details that follow describe the process of assigning Activities to a class or a group of students.
After the nominated 'Start Date and Time', assigned Activities will be displayed in Student Café in My Activities > Curricular.
They will also be available to students in Student Café through:
The 'Activities to Complete' gadget.
eDiary > Calendar (using the 'LMS / Assessment Activities' feed).
You can also allow students to view basic details for an Activity using the 'Preview Date'. This allows students to see that an Activity is coming; however, they are not able to access any details or attachments until the 'Start Date and Time'.
Check out the ▶️ Create and Assign Assessment Activities in Staff Kiosk video for more information on creating and assigning assessable activities that will appear in Markbook.
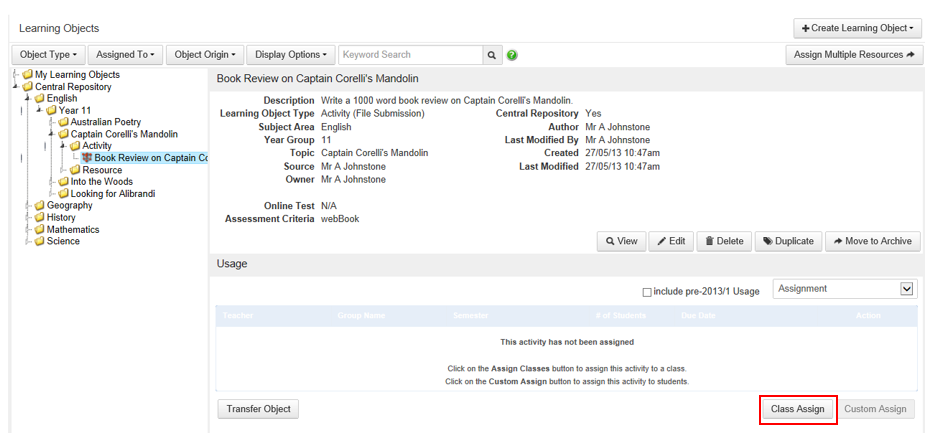
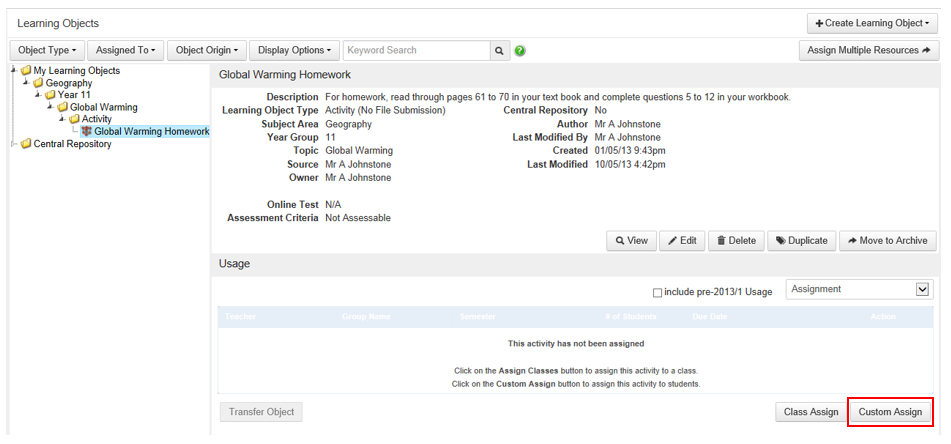
Class Assign
Click this button on the 'Learning Objects' screen to assign this Activity to one or more subject classes.
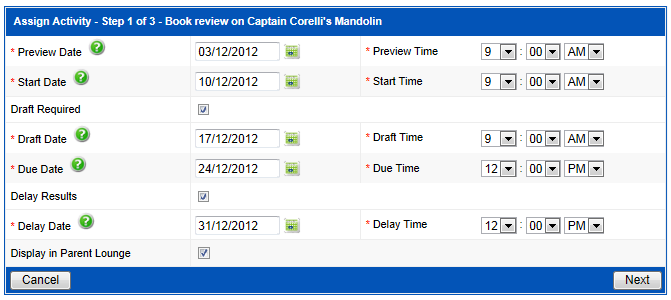
Assigning an Activity (Class) — Step 1 of 3
This step allows you to:
Nominate milestone dates and times for this Activity. These dates and times are important as they determine access to the Activity for students in Student Café and (optionally) parents in Parent Lounge.
Nominate if students are to submit a draft for this Activity.
Determine if parents can access this Activity in Parent Lounge.
This is an example of Step 1:
Fields that require further explanation | |
Preview Date and Time | This is the date and time that basic details relating to this Activity will be displayed to students in Student Café and (optionally) parents in Parent Lounge. From this date and time until the 'Start Date' and 'Start Time' (that you enter directly below), the following Activity details will be available to students and (optionally) parents:
Basic details for this Activity will also be visible to students in their eDiary (Student Café) on the date and time you enter here. |
Start Date and Time | This is the date and time that the full Activity details will be displayed to students in Student Café and (optionally) parents in Parent Lounge. If this is a 'File Submission' Activity, students can use Student Café to submit a file after this date and time. A full record for this Activity will also be visible to students in their eDiary (Student Café) on the date and time you enter here. |
Draft Required | Tick this checkbox if you require students to submit a draft for this Activity. |
Draft Date and Time | If you ticked the 'Draft Required' checkbox directly above, you must enter the date and time that students must submit a draft copy for this Activity. |
Due Date and Time | This is the date and time that students must submit a final copy of this Activity. If this is a 'File Submission' Activity, students will not be able to use Student Café to submit a file after this date and time (unless late submissions have been allowed). An 'Activity Due' reminder will also be visible to students in their eDiary (Student Café) on the date and time you enter here. |
Delay Results | By default, at the time that you enter results and comments against each student's completed work, they will be visible to students in Student Café and (optionally) parents in Parent Lounge. Use this field to nominate the same delayed date and time that all students in the class will be able to see their results and comments for this Activity. For example, the Activity is due on Tuesday, and the results will be available on Friday, giving you a few days to complete marking for the entire class. |
Delay Date and Time | This is the date and time that results and comments for this Activity will be visible to students in Student Café and (optionally) parents in Parent Lounge. |
Display in Parent Lounge | Use this field to indicate if parents will be able to see this Activity in Parent Lounge program Student Details > Curricular Activities. The ‘Display in Parent Lounge’ checkbox only controls the visibility of the Activity in Parent Lounge Student Details > Curricular Activities program. When the ‘Display in Parent Lounge’ checkbox is unticked, the Activity information will still be available in the 'My Assessments' Calendar Feed within the Parent Lounge Calendar > eDiary program. |
Click the 'Next' button to move to Step 2 of the Assign Activity process.
Assigning an Activity (Class) — Step 2 of 3
This step allows you to nominate the class(es) to which this Activity will be assigned.
Where the Activity Contains Objectives
This is an example of Step 2, where the Activity contains Objectives:
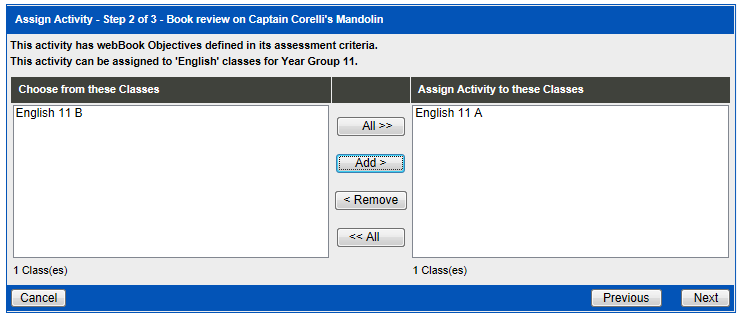
There are two possible scenarios that you may encounter when assigning an Activity that contains Objectives:
The Activity contains Objectives for the current reporting period.
In this case, you will only be able to assign this Activity to the subject class(es) displayed.
The Activity contains Objectives from a previous reporting period.
In this case, you will be directed to Step 2A to nominate the Objectives from the current reporting period that you will use to assess this Activity.
Click here for details on Objectives and Weighting.
Where the Activity Does NOT Contain Objectives
This is an example of Step 2, where the Activity does not contain Objectives (uses a standalone assessment or is not assessable):
Use the drop-down list to select your own classes (My Classes) or chose all subject classes (All Classes):
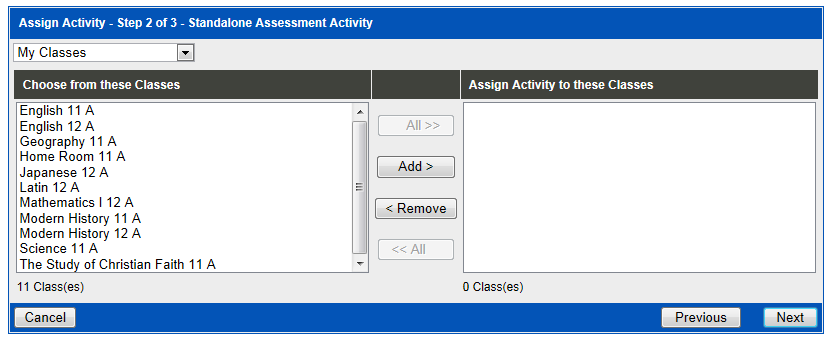
Highlight the class(es) that you want to assign this Activity to, in the 'Choose from these Classes' column and move them to the 'Assign Activity to these Classes' column.
Hold down the 'Ctrl' key whilst making selections to select more than one class.
Important!
When an Activity is assigned to a class, it is assigned to students who are in that class at that time. If a new student joins the class after the Activity has been assigned, then he/she will not automatically get that Activity.
To add a student to an Activity, you will need to use the 'Add Extra Students' button in program Staff Kiosk program Assessment.
Click the 'Next' button to move to Step 3 of the Assign Activity process.
Assigning an Activity (Class) — Step 3 of 3
This step allows you to nominate who will be responsible for assessing this Activity.
Where the Activity Contains Objectives
This is an example of Step 3, where the Activity contains Objectives:
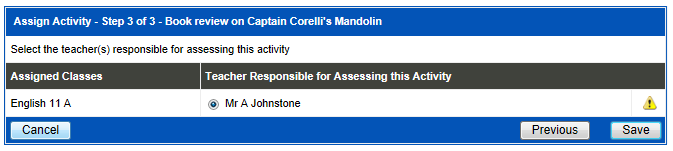
Click the 'Save' button to complete the Assign Activity process.
This is an example of Step 3, where the Activity contains Objectives, and you share the teaching of the class with another teacher:
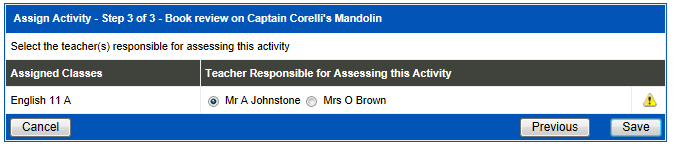
Nominate who will be responsible for assessing this Activity. The teacher selected here will be able to assess this activity using Staff Kiosk Assessment > Activity Planner and Staff Kiosk Assessment > Markbook.
The ‘yellow alert’ icon will be displayed on this screen if any students in your class do not have access to Student Café. Use the 'Class List' button in Staff Kiosk Assessment > My Classes to identify these students.
This is an example of Step 3, where the Activity contains Objectives and has been assigned to two classes (HOD or Department Administrator):
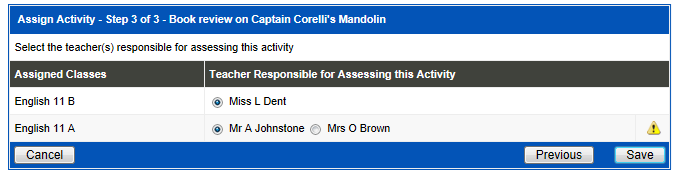
Nominate who will be responsible for assessing this Activity for each subject class. The teacher selected here will be able to assess this activity using Staff Kiosk Assessment > Activity Planner and Staff Kiosk Assessment > Markbook.
The ‘yellow alert’ icon will be displayed on this screen if there are any students in the class who do not has access to Student Café. Use the 'Class List' button in Staff Kiosk Assessment > My Classes to identify these students.
Where the Activity Contains Standalone Objectives or Is Not Assessable
This is an example of Step 3, where the Activity is a standalone assessment type:
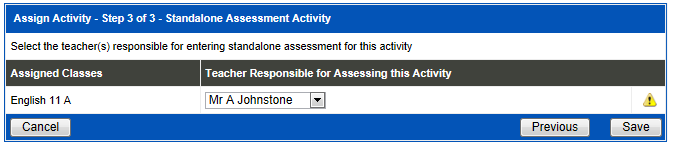
Use the drop-down list to select who will be responsible for assessing this Activity for each subject class.
The teacher selected here will be able to assess this Activity using the standalone method using Staff Kiosk Assessment.
The same step applies if the Activity is non-assessable. The teacher who is selected in this screen would be the teacher who will supervise the completion of the Activity.
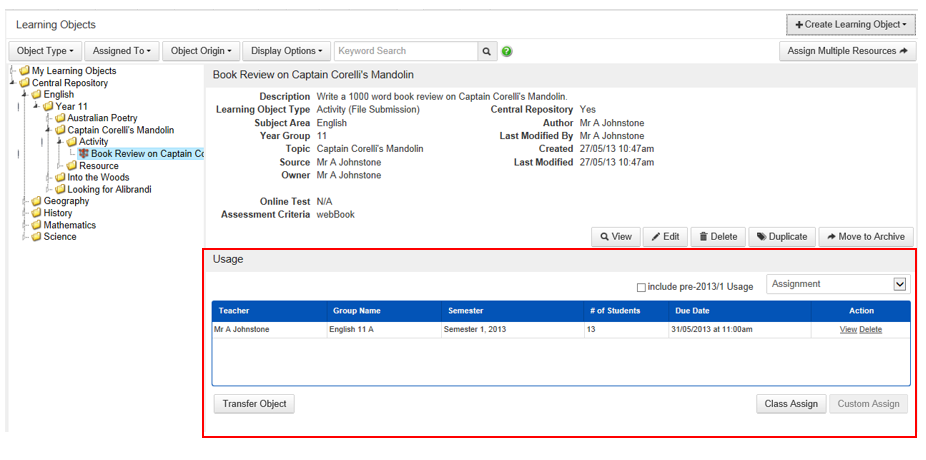
Once an assignment has been completed, details will be displayed in the 'Usage' panel.
Custom Assign
Click this button on the 'Learning Objects' screen to assign this Activity to a custom group of students.
A custom group can be:
Any student(s) who you select for this purpose only.
Any students who belong to a group (of your own) that you have already created using Staff Kiosk Staff > Groups.
Any students who belong to a public group that was created using Staff Kiosk Staff > Groups.
Important!
You cannot 'Custom Assign' an Activity that contains Objectives as they rely on subject class setups.
Assigning an Activity (Custom) — Step 1 of 3
The process in this step is the same as for 'Assigning an Activity (Class)'.
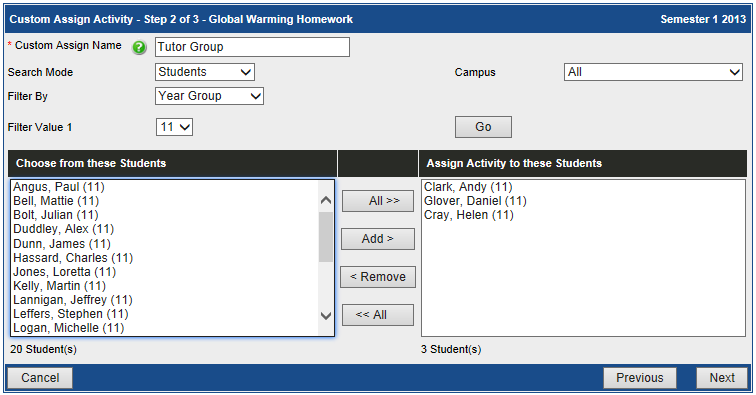
Assigning an Activity (Custom) — Step 2 of 3
This is an example of Step 2:
Fields that require further explanation | |
|---|---|
Custom Assign Name | This is a description for this custom group, e.g. Tutor Group. |
Search Mode | Use this field to select the students to include in this custom assignment. Options area:
|
Campus | The default is to include students from all campuses. Select a single campus if required. |
Filter By | This field will change based on the selection that you made in the 'Search Mode' field. |
Filter Value 1 | The filter available in this field is determined by the options you have selected above. |
Click the 'GO' button to load the selected students into the 'Choose from these Students' column.
Highlight the students who you want to assign this Activity to and move them to the 'Assign Activity to these Students' column.
Click the 'Next' button to move to Step 3 of the Assign Activity process.
Assigning an Activity (Custom) — Step 3 of 3
This is an example of step 3 if the Activity is a standalone assessment type:

Use the drop-down list to select who will be responsible for assessing this Activity. The teacher selected here will be able to assess this Activity using the 'Standalone' method using Staff Kiosk Assessment.
The same step applies if the Activity is non-assessable. The teacher who is selected in this screen would be the teacher who will supervise the completion of the Activity.
Once an assignment has been completed, details will be displayed in the 'Usage' panel.
