
PR - Position Roles
Overview
The ‘Position Roles’ program is used to define and map the different types of employee roles to positions at a school, e.g. Supply teachers, coaches and tutors and Office Administration staff that work at the school on a casual basis.
Once created, each role can then be mapped to one or more payroll positions.
Each role can also have multiple approvers, with an option to create a second layer of approval for submitted timesheets if required (i.e. First and Second Approvers).
For more information on setting up 'Online Timesheets', refer to How to Setup Staff Kiosk Online Timesheets.
Position Roles Tab
This tab is used to view, add, edit or delete Position Roles, as well as assign Positions and Approvers.
Important!
Every Position Role must have at least one First Approver. See section 'Assign Approvers' below.
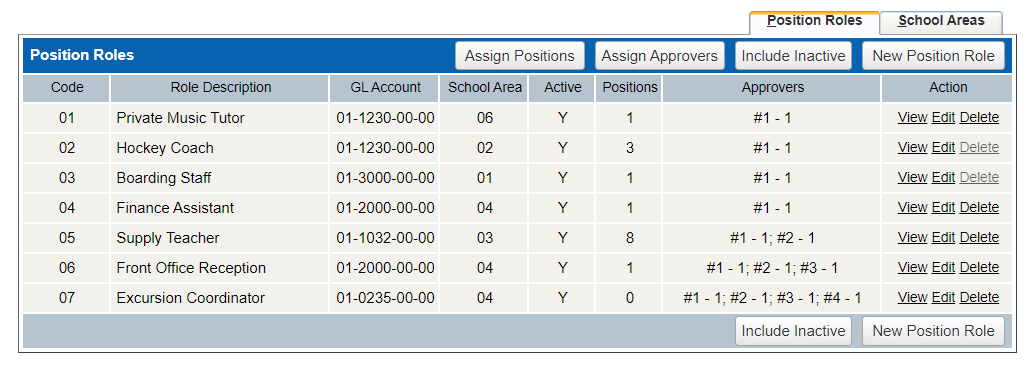
Buttons on the Position Roles Tab
Assign Positions: Click the 'Assign Positions' button to open the 'Assign Positions' screen.
Assign Approvers: Click the 'Assign Approvers' button to open the 'Assign Approvers' screen.
Include Inactive/Active Only: Click the 'Include Inactive' toggle button to see all records. When 'Active Only' is clicked, only active records are displayed.
New Position Role: Click the 'New Position Role' button to create a new Position Role using the 'Position Role Details' modal.
The Position Roles List
Fields that require further explanation | |
|---|---|
Code | This is the Role Code. |
Role Description | This is a detailed description of the Role. |
GL Account | This is the General Ledger Account Code. |
School Area | This is the School Area Code. |
Active | The status of the Role. |
Positions | This displays a count of the Positions mapped to this Role. See section 'Assign Positions'. |
Approvers | This displays two counters to show how many Approvers are mapped to the Role, one for 'First Approvers' and one for 'Second Approvers', e.g. #1 - 1; #2 - 0 (where a First Approver has been assigned but not a Second Approver). See section 'Assign Approvers'. |
Action | When clicked, the 'View' and 'Edit' action links open the Position Role Details modal. Click 'Delete' to delete the selected record. If the Role Code is in use you cannot delete it—this option will be greyed out (uneditable). |
Assign Positions
Step 1 - Select a Position or Position Role
On the 'Assign Positions' screen, there are two picklists available to map Positions to Position Roles.
Select an option from one of the picklists.
Options that require further explanation | |
|---|---|
Select a Position | When a Position is selected from this picklist, it will display the Position Description with the code appended within brackets. The heading at the top of the screen (in green font) will also display the Position Description with the text 'Position' appended within brackets. |
Select a Position Role | When a Position Role is selected from this picklist, it will display the Position Role Description with the code appended within brackets The heading at the top (in green font) will also display the Position Role Description with the text 'Position Role' appended within brackets. |
For more information on defining 'Positions', refer to TASS.web Payroll/HRM > Payroll > Setup Information > Payroll Setup on the 'Positions' tab.
Step 2 - Assign Selection to Position or Position Role
Use the buttons in the centre (i.e. 'Selected' and 'All') to move items in the 'Unassigned' left-column to 'Assigned' right-column, or vice-versa.
In this example, 'Financial Controller' was selected using the 'Select a Position Role' picklist. There are no current Positions assigned to this Position Role (the right-hand column 'Assigned Positions' is blank). To assign one or more Positions to this Position Role, select one or more 'Unassigned Positions' in the left-hand column and click the 'Selected (right arrow)' button. This will move them over to the 'Assigned Positions' column.
Remember to click the 'Save' button to retain any changes.
Holding down the 'Shift' key while clicking on your options permits a range selection, holding down the 'Ctrl' key enables selection of discrete (individual) criterion.
Assign Approvers
Step 1 - Select an Approver Level and an Approver or Position Role
On the 'Assign Approvers' screen, select an 'Approver Level' (e.g. #1) and use one of the two picklists available to map Approvers to Position Roles.
Options that require further explanation | |
|---|---|
Select Approver Level | Choose either First or Second Approver from the picklist options. |
Select an Approver | When an Approver is selected from this picklist, it will display the Approver’s Name (preferred name and surname) with the code appended within brackets. The heading at the top (in green font) will also display the Approver’s Name with the text 'Approver' appended within brackets. |
Select a Position Role | When a Position Role is selected from this picklist, it will display the Position Role Description with the code appended within brackets The heading at the top (in green font) will also display the Position Role Description with the text 'Position Role' appended within brackets. |
Step 2 - Assign Selection to Approver or a Position Role
When both an Approver Level and one of Approver or Position Role is selected, the screen will display the matching selections. From these, use the buttons in the centre (i.e. 'Selected' and 'All') to move items in the 'Unassigned' left-column to 'Assigned' right-column, or vice-versa (similar to 'Step 2 - Assign Selection to Position or Position Role' above).
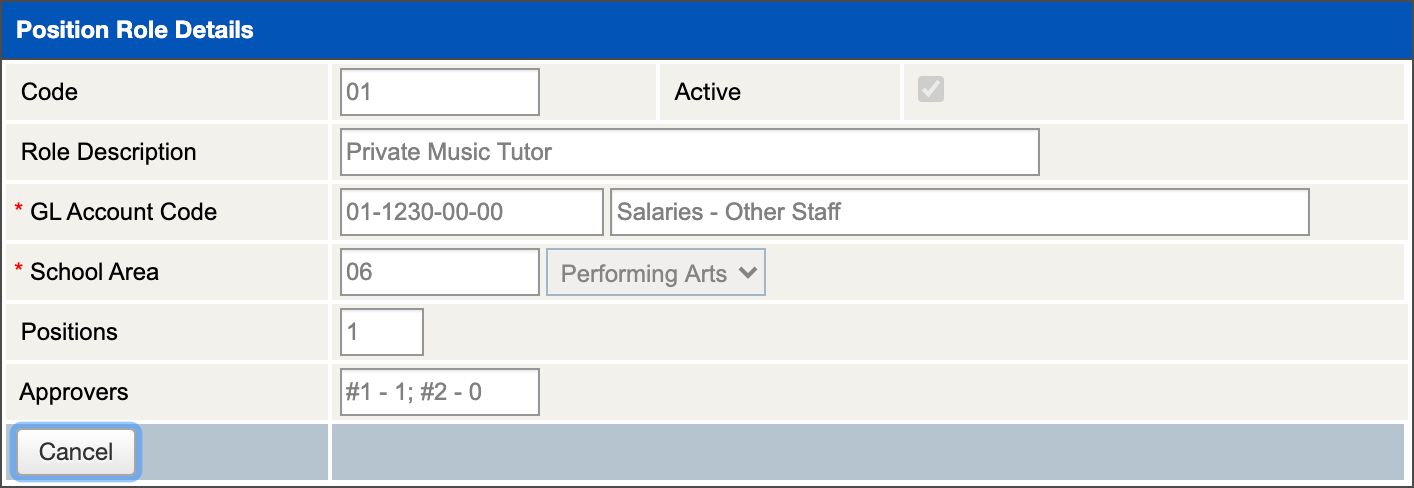
Position Role Details
The 'Position Role Details' modal will open when either the 'View', 'Edit' or 'Add' action links, on the 'Position Roles' tab, are clicked.
Fields that require further explanation | |
|---|---|
*Code | This is a mandatory field which can only be filled in 'Add' mode. This field accepts up to 10 alphanumeric characters only (A-Z, 0-9). Spaces and special characters are invalid. In 'Edit' mode this is greyed out and cannot be changed. |
Active | Ticked/unticked (Yes/No).
|
*Role Description | This is a mandatory field. This is a detailed description of the Role. This field accepts up to 100 characters of plain text. |
*GL Account | This is a mandatory field. Enter the General Ledger account code here as: Use the 'Lookup' (Binoculars) icon and search for a valid GL account code in the database. For more information on GL Account Masks, refer to Accrual Code Details. |
*School Area | This is a mandatory field. Use the picklist to select an active School Area. |
Positions | This field displays a count of Positions mapped to this Role. |
Approvers | This field displays two counters to show how many Approvers are mapped to this Role, one for 'First Approvers' and one for 'Second Approvers', e.g. #1 - 1; #2 - 0. |
When satisfied with your entry, click the 'Save' or 'Update' button to commit your changes to the database or 'Cancel' to return to the previous screen.
School Areas Tab
This tab enables the user to view, edit and delete School Areas.
Buttons on the School Areas Tab
Include Inactive/Active Only: Click the 'Include Inactive' button to see all records. When 'Active Only' is clicked, only 'Active' records are displayed.
New School Area: Click the 'New School Area' button to create a new School Area using the 'School Area Details' modal.
The School Areas List
Fields that require further explanation | |
|---|---|
Code | This is the School Area Code. |
Area Description | This is a detailed description of the School Area. |
Active | The status of the School Area record. |
Action | When clicked, the 'View' and 'Edit' action links open the School Area Details modal. Click 'Delete' to delete the selected record. If the School Area is in use you cannot delete it. For 'Edit' mode, if there are Position Roles that reference the School Area Code this option will be greyed out (uneditable). The roll-over info icon provides the following details 'Unable to edit. There are Position Roles linked to this School Area'. |
When satisfied with your entry, click the 'Save' or 'Update' button to commit your changes to the database or 'Cancel' to return to the previous screen.
School Area Details
The 'School Area Details' modal will open when either the 'View' or 'Edit' action links, on the 'School Areas' tab, are clicked.
Fields that require further explanation | |
|---|---|
*Code | This is the School Area Code, a mandatory field which can only be filled when creating a New School Area, i.e. 'Add' mode. This field accepts up to 10 alphanumeric characters only (A-Z, 0-9). Spaces and special characters are invalid. In 'Edit' mode this is greyed out and cannot be changed. |
Active | Ticked/unticked (Yes/No).
|
*School Area Description | This is a mandatory field. This is a detailed description of the School Area. This field accepts up to 100 characters of plain text. |
When satisfied with your entry, click the 'Save' or 'Update' button to commit your changes to the database or 'Cancel' to return to the previous screen.
Print Options
When the 'Print' icon is clicked, the 'Print Roles Print Options' modal will open.
Fields that require further explanation | ||
|---|---|---|
Report Options | Position Roles Listing (the default selection) | This report includes the following:
|
Assigned Approvers Listing | This report includes the following:
| |
Assigned Positions Listing | This report includes the following:
| |
Sort By | The default is for the report to sort by 'Role Description'. Alternatively, you can elect to sort by 'Role Code'. | |
Formatting Options | Choose to print the report as a PDF or export to Microsoft Excel® or Microsoft Word®. Export to PDF is the default setting. | |
Click 'GO' to generate the report or 'Cancel' to abort the process.